By: Team T09-1 Since: Feb 2019 Licence: MIT
- 1. Setting up
- 2. Design
- 3. Implementation
- 3.1. Undo/Redo Feature
- 3.2. Edit Module Feature
- 3.3. Module co-requisites
- 3.4. Find Feature
- 3.5. Requirement Add Feature
- 3.6. Requirement Move Feature
- 3.7. Requirement List Feature
- 3.8. Planner Add Feature
- 3.9. Planner Remove Feature
- 3.10. Planner Move Feature
- 3.11. Planner Show Feature
- 3.12. Planner Suggest Feature
- 3.13. Logging
- 3.14. Configuration
- 4. Documentation
- 5. Testing
- 6. Dev Ops
- Appendix A: Product Scope
- Appendix B: User Stories
- Appendix C: Use Cases
- Appendix D: Non Functional Requirements
- Appendix E: Glossary
- Appendix F: Instructions for Manual Testing
- F.1. Launch and Shutdown
- F.2. Adding a module
- F.3. Editing a module
- F.4. Deleting a module
- F.5. Adding module(s) to the degree plan
- F.6. Removing module(s) from the degree plan
- F.7. Using the degree plan to suggest module(s) to take
- F.8. Find modules
- F.9. Moving a module in the degree plan
- F.10. Showing the academic semesters in the degree plan
- F.11. Listing all the academic semesters in the degree plan
- F.12. Degree Requirement Category
1. Setting up
1.1. Prerequisites
-
JDK
9Only JDK 9 is officially supported -
IntelliJ IDE
IntelliJ by default has Gradle and JavaFx plugins installed.
Do not disable them. If you have disabled them, go toFile>Settings>Pluginsto re-enable them.
1.2. Setting up the project in your computer
-
Fork this repo, and clone the fork to your computer
-
Open IntelliJ (if you are not in the welcome screen, click
File>Close Projectto close the existing project dialog first) -
Set up the correct JDK version for Gradle
-
Click
Configure>Project Defaults>Project Structure -
Click
New…and find the directory of the JDK
-
-
Click
Import Project -
Locate the
build.gradlefile and select it. ClickOK -
Click
Open as Project -
Click
OKto accept the default settings -
Open a console and run the command
gradlew processResources(Mac/Linux:./gradlew processResources). It should finish with theBUILD SUCCESSFULmessage.
This will generate all resources required by the application and tests. -
Open
MainWindow.javaand check for any code errors-
Due to an ongoing issue with some of the newer versions of IntelliJ, code errors may be detected even if the project can be built and run successfully
-
To resolve this, place your cursor over any of the code section highlighted in red. Press ALT+ENTER, and select
Add '--add-modules=…' to module compiler optionsfor each error
-
-
Repeat this for the test folder as well (e.g. check
HelpWindowTest.javafor code errors, and if so, resolve it the same way)
1.3. Verifying the setup
-
Run the
pwe.planner.MainAppand try a few commands -
Run the tests to ensure they all pass.
1.4. Configurations to do before writing code
1.4.1. Configuring the coding style
This project follows oss-generic coding standards. IntelliJ’s default style is mostly compliant with ours but it uses a different import order from ours. To rectify,
-
Go to
File>Settings…(Windows/Linux), orIntelliJ IDEA>Preferences…(macOS) -
Select
Editor>Code Style>Java -
Click on the
Importstab to set the order-
For
Class count to use import with '*'andNames count to use static import with '*': Set to999to prevent IntelliJ from contracting the import statements -
For
Import Layout: The order isimport static all other imports,import java.*,import javax.*,import org.*,import com.*,import all other imports. Add a<blank line>between eachimport
-
Optionally, you can follow the UsingCheckstyle.adoc document to configure Intellij to check style-compliance as you write code.
1.4.2. Updating documentation to match your fork
After forking the repo, the documentation will still have the SE-EDU branding and refer to the se-edu/addressbook-level4 repo.
If you plan to develop this fork as a separate product (i.e. instead of contributing to se-edu/addressbook-level4), you should do the following:
-
Configure the site-wide documentation settings in
build.gradle, such as thesite-name, to suit your own project. -
Replace the URL in the attribute
repoURLinDeveloperGuide.adocandUserGuide.adocwith the URL of your fork.
1.4.3. Setting up CI
Set up Travis to perform Continuous Integration (CI) for your fork. See UsingTravis.adoc to learn how to set it up.
After setting up Travis, you can optionally set up coverage reporting for your team fork (see UsingCoveralls.adoc).
| Coverage reporting could be useful for a team repository that hosts the final version but it is not that useful for your personal fork. |
Optionally, you can set up AppVeyor as a second CI (see UsingAppVeyor.adoc).
| Having both Travis and AppVeyor ensures your App works on both Unix-based platforms and Windows-based platforms (Travis is Unix-based and AppVeyor is Windows-based) |
1.4.4. Getting started with coding
When you are ready to start coding,
-
Get some sense of the overall design by reading Section 2.1, “Architecture”.
2. Design
2.1. Architecture
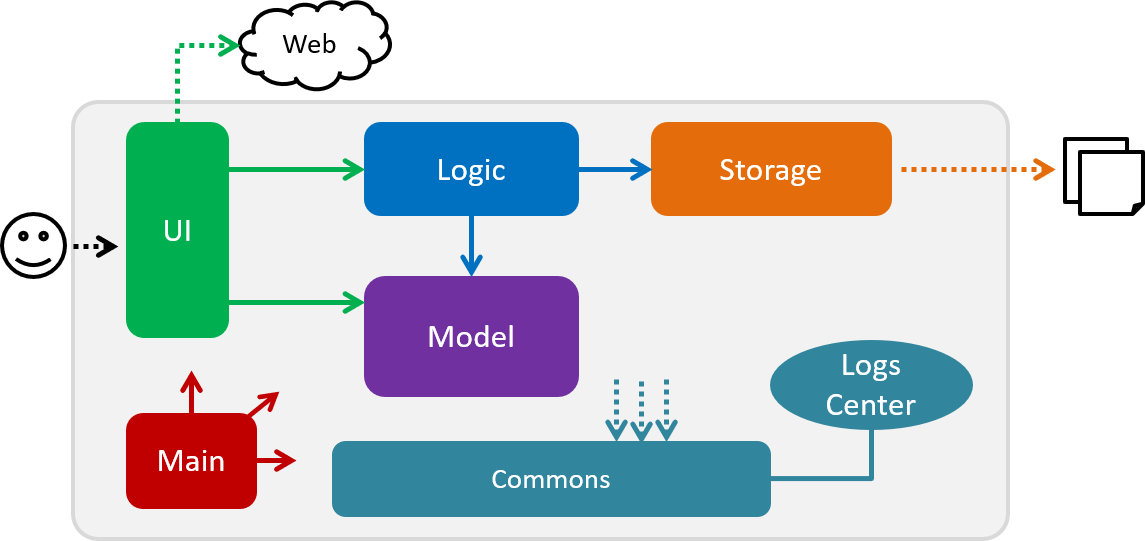
The Architecture Diagram given above explains the high-level design of the App. Given below is a quick overview of each component.
The .pptx files used to create diagrams in this document can be found in the diagrams folder. To update a diagram, modify the diagram in the pptx file, select the objects of the diagram, and choose Save as picture.
|
Main has only one class called MainApp. It is responsible
for,
-
At app launch: Initializes the components in the correct sequence, and connects them up with each other.
-
At shut down: Shuts down the components and invokes cleanup method where necessary.
Commons represents a collection of classes used by multiple other components.
The following class plays an important role at the architecture level:
-
LogsCenter: Used by many classes to write log messages to the App’s log file.
The rest of the App consists of four components.
Each of the four components
-
Defines its API in an
interfacewith the same name as the Component. -
Exposes its functionality using a
{Component Name}Managerclass.
For example, the Logic component (see the class diagram given below) defines it’s API in the Logic.java interface and exposes its functionality using the LogicManager.java class.
How the architecture components interact with each other
The Sequence Diagram below shows how the components interact with each other for the scenario where the user issues the command delete 1.
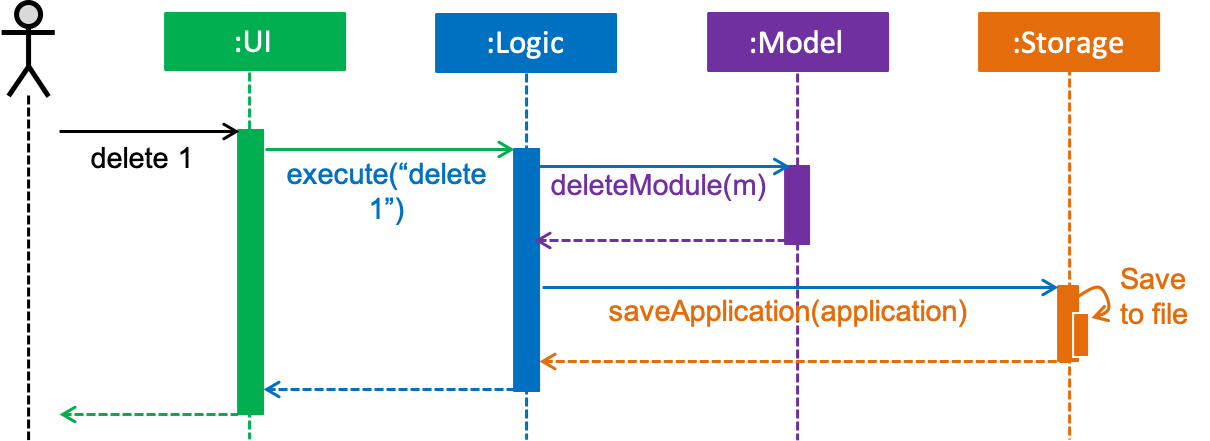
delete 1 commandThe sections below give more details of each component.
2.2. UI component
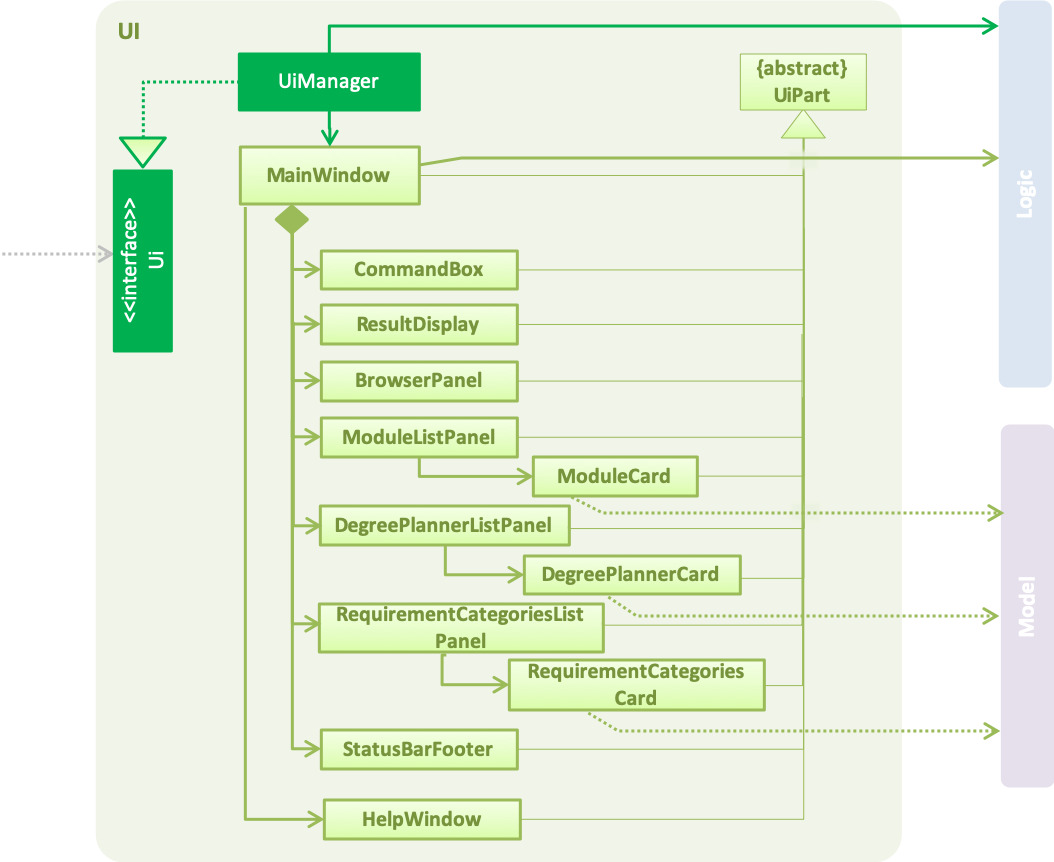
API : Ui.java
The UI consists of a MainWindow that is made up of parts e.g.CommandBox, ResultDisplay, ModuleListPanel, StatusBarFooter, BrowserPanel etc. All these, including the MainWindow, inherit from the abstract UiPart class.
The UI component uses JavaFx UI framework. The layout of these UI parts are defined in matching .fxml files that
are in the src/main/resources/view folder. For example, the layout of the
MainWindow is specified in
MainWindow.fxml
The UI component,
-
Executes user commands using the
Logiccomponent. -
Listens for changes to
Modeldata so that the UI can be updated with the modified data.
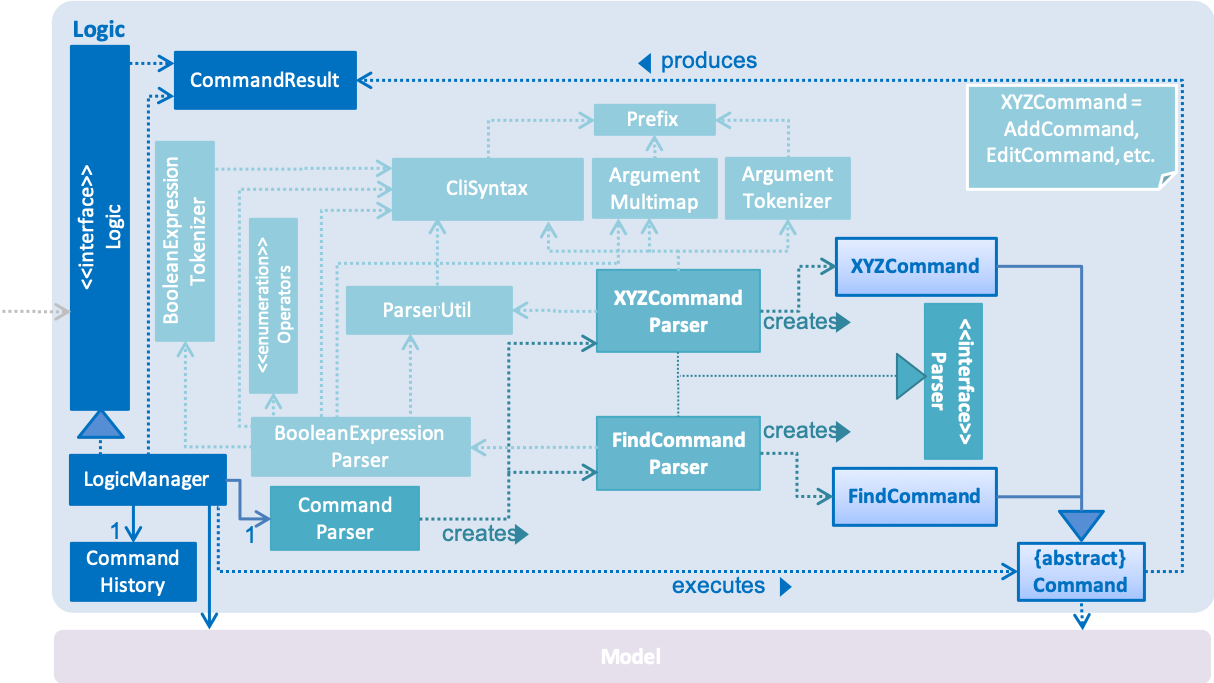
2.3. Logic component
API :
Logic.java
-
Logicuses theApplicationParserclass to parse the user command. -
This results in a
Commandobject which is executed by theLogicManager. -
The command execution can affect the
Model(e.g. adding a module). -
The result of the command execution is encapsulated as a
CommandResultobject which is passed back to theUi. -
In addition, the
CommandResultobject can also instruct theUito perform certain actions, such as displaying help to the user.
Given below is the Sequence Diagram for interactions within the Logic component for the execute("delete 1") API call.
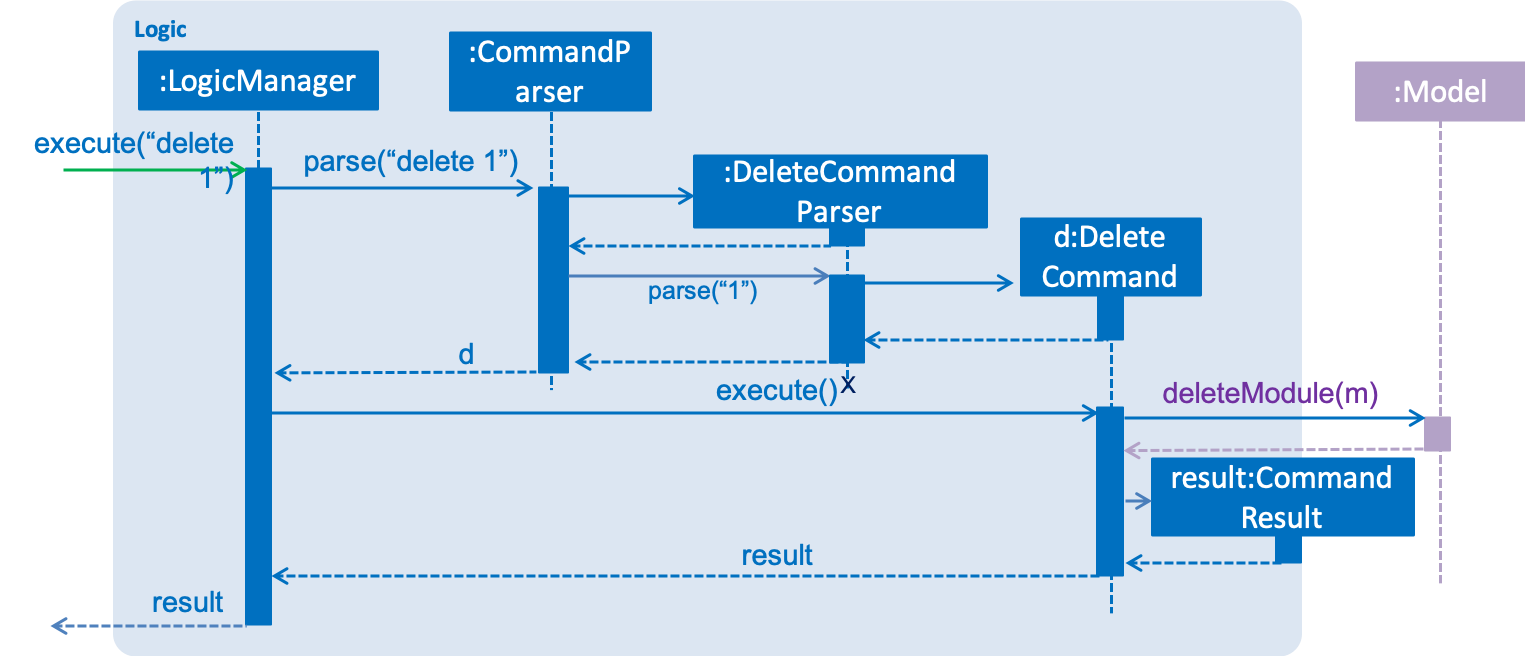
delete 1 Command2.4. Model component
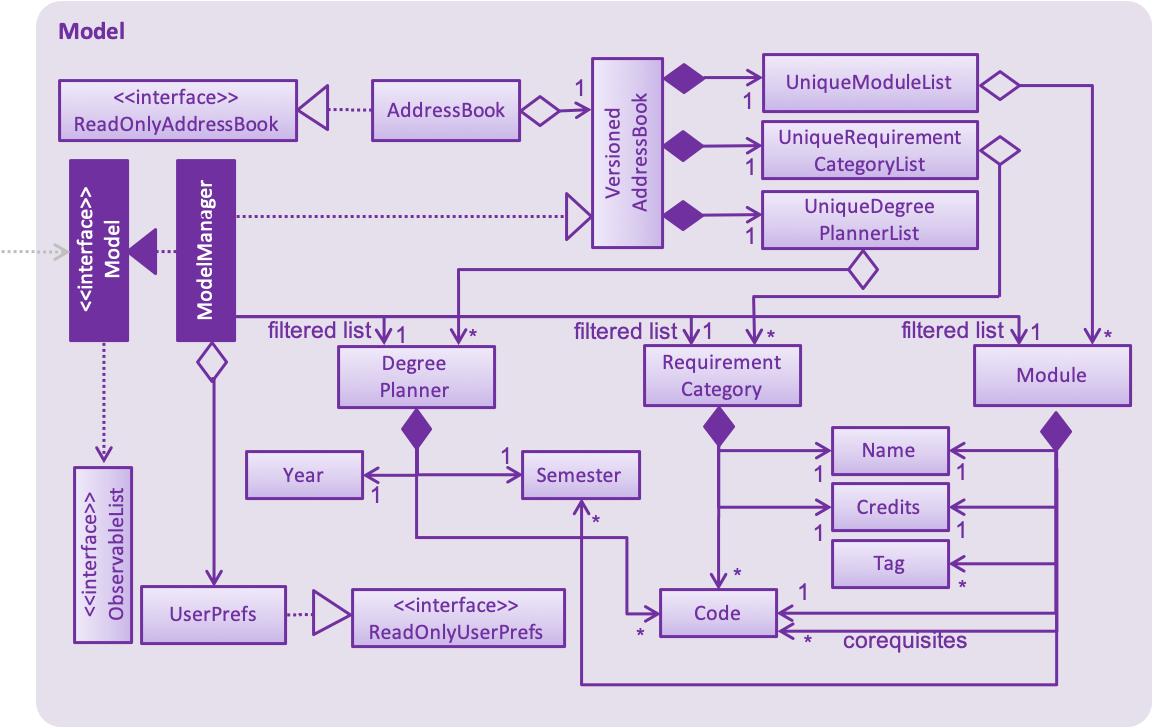
API : Model.java
The Model,
-
stores a
UserPrefobject that represents the user’s preferences. -
stores the Application data.
-
exposes an unmodifiable
ObservableList<Module>that can be 'observed' e.g. the UI can be bound to this list so that the UI automatically updates when the data in the list change. -
does not depend on any of the other three components.
2.5. Storage component
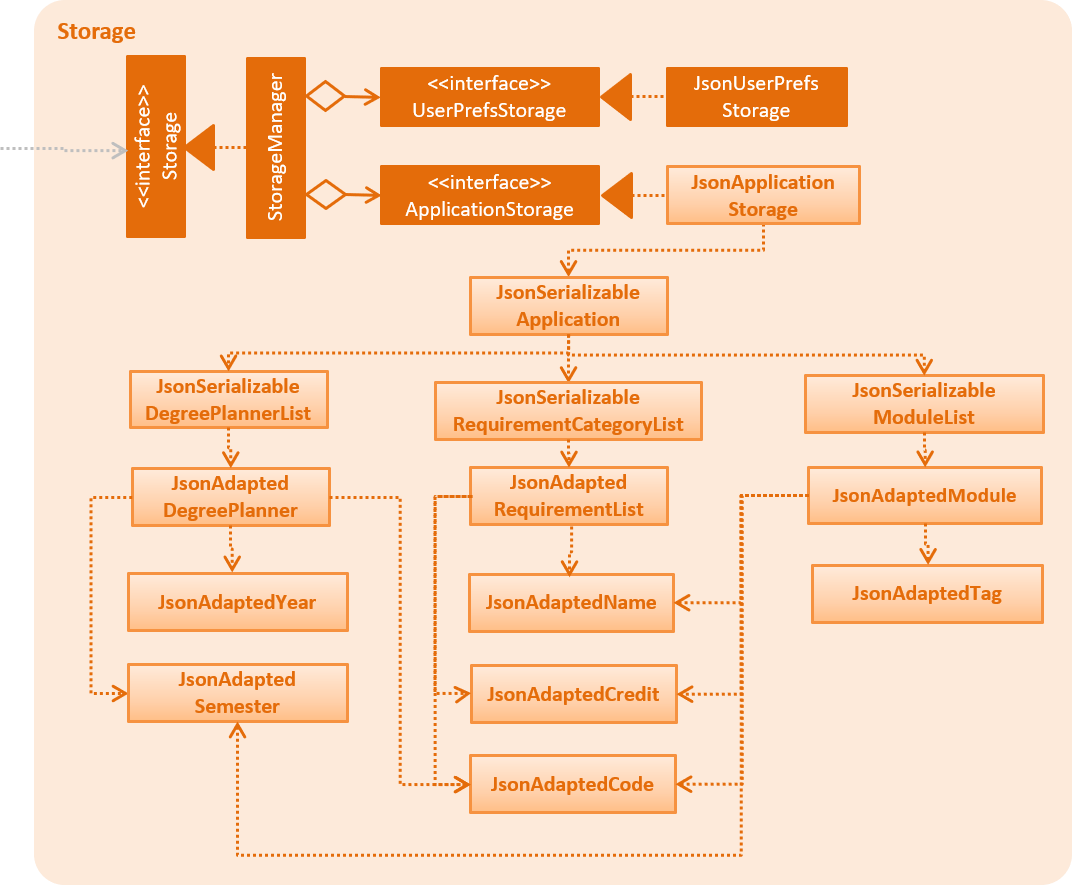
API : Storage.java
The Storage component,
-
can save
UserPrefobjects in json format and read it back. -
can save the Application data in json format and read it back.
2.6. Common classes
Classes used by multiple components are in the pwe.planner.commons package.
3. Implementation
This section describes some noteworthy details on how certain features are implemented.
3.1. Undo/Redo Feature
3.1.1. Current Implementation
The undo/redo mechanism is facilitated by VersionedApplication.
It extends application with an undo/redo history, stored internally as an applicationStateList and currentStatePointer.
Additionally, it implements the following operations:
-
VersionedApplication#commit()— Saves the current application state in its history. -
VersionedApplication#undo()— Restores the previous application state from its history. -
VersionedApplication#redo()— Restores a previously undone application state from its history.
These operations are exposed in the Model interface as Model#commitApplication(), Model#undoApplication() and
Model#redoApplication() respectively.
Given below is an example usage scenario and how the undo/redo mechanism behaves at each step.
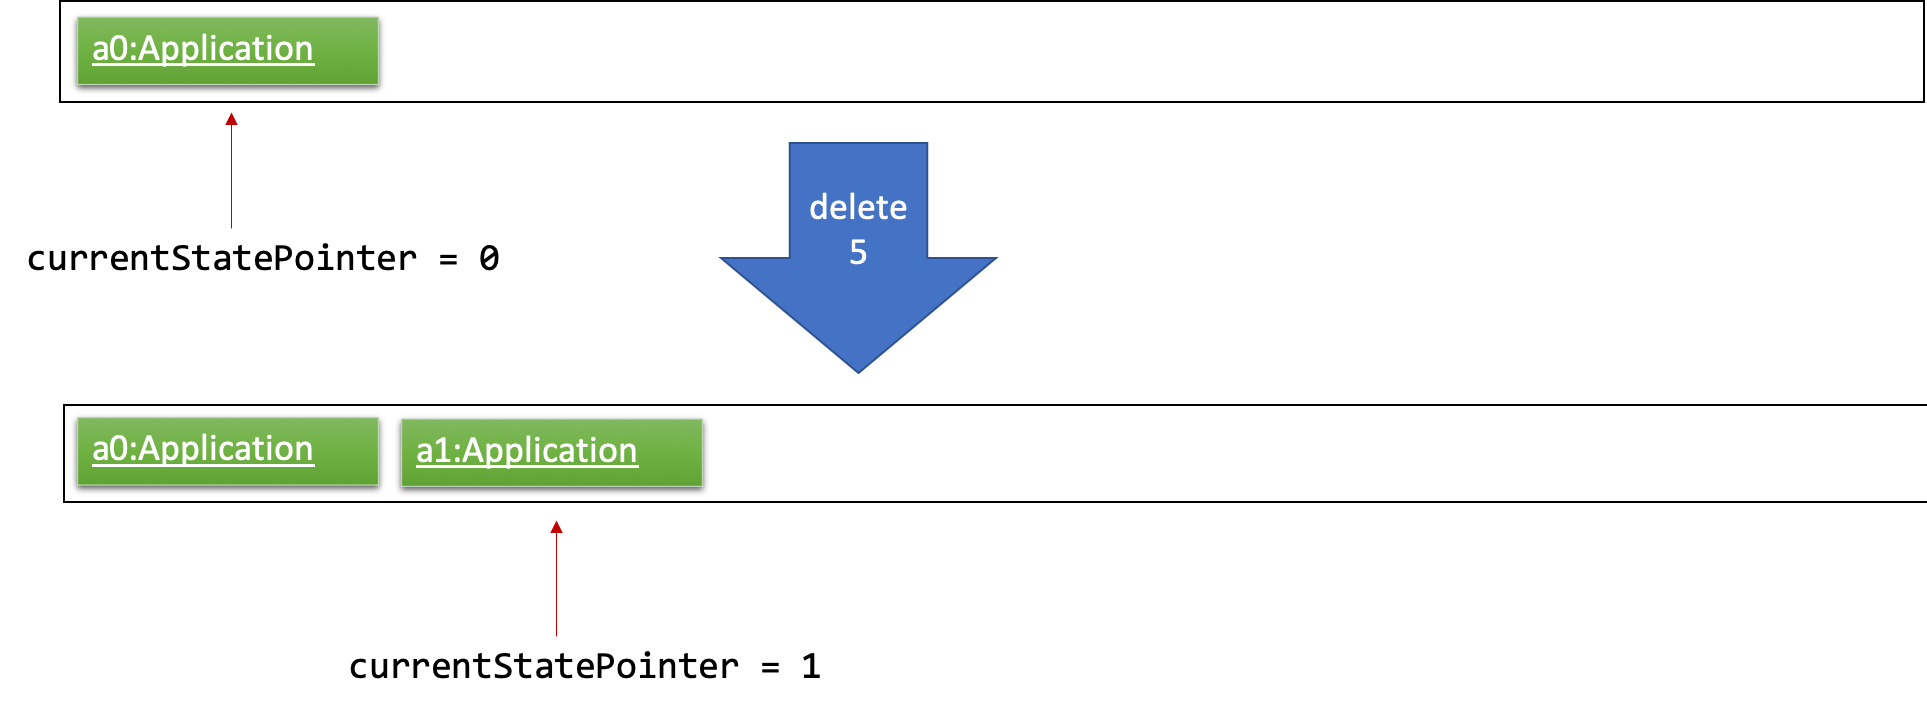
Step 1. The user launches the application for the first time. The VersionedApplication will be initialized with the
initial application state, and the currentStatePointer pointing to that single application state.

Step 2. The user executes delete 5 command to delete the 5th module in the application. The delete command calls
Model#commitApplication(), causing the modified state of the application after the delete 5 command executes to be saved in the applicationStateList, and the currentStatePointer is shifted to the newly inserted application state.
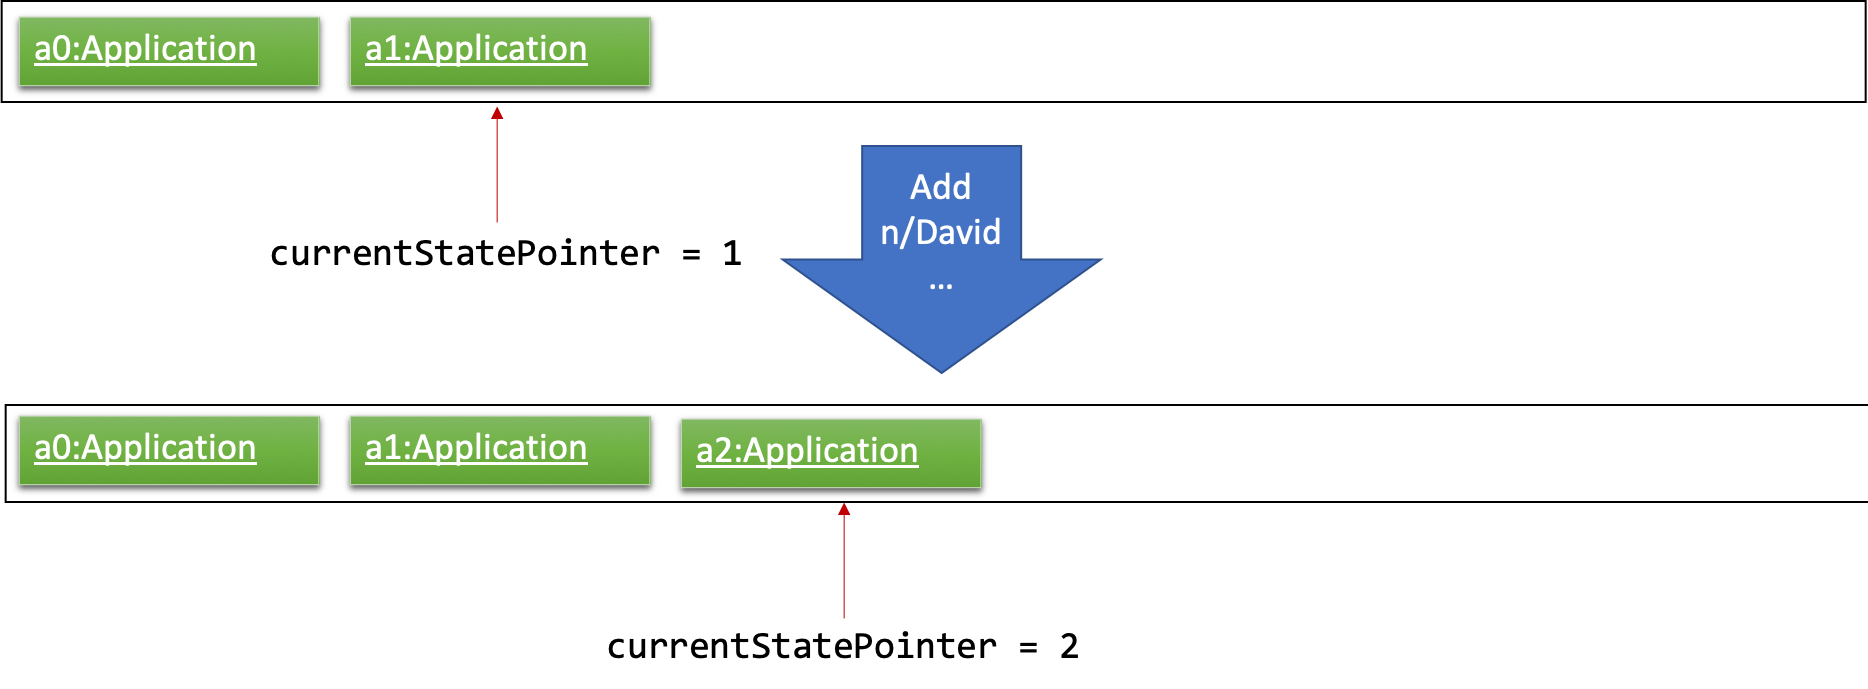
Step 3. The user executes add n/David … to add a new module. The add command also calls
Model#commitApplication(), causing another modified application state to be saved into the applicationStateList.
If a command fails its execution, it will not call Model#commitApplication(), so the application state will not be
saved into the applicationStateList.
|
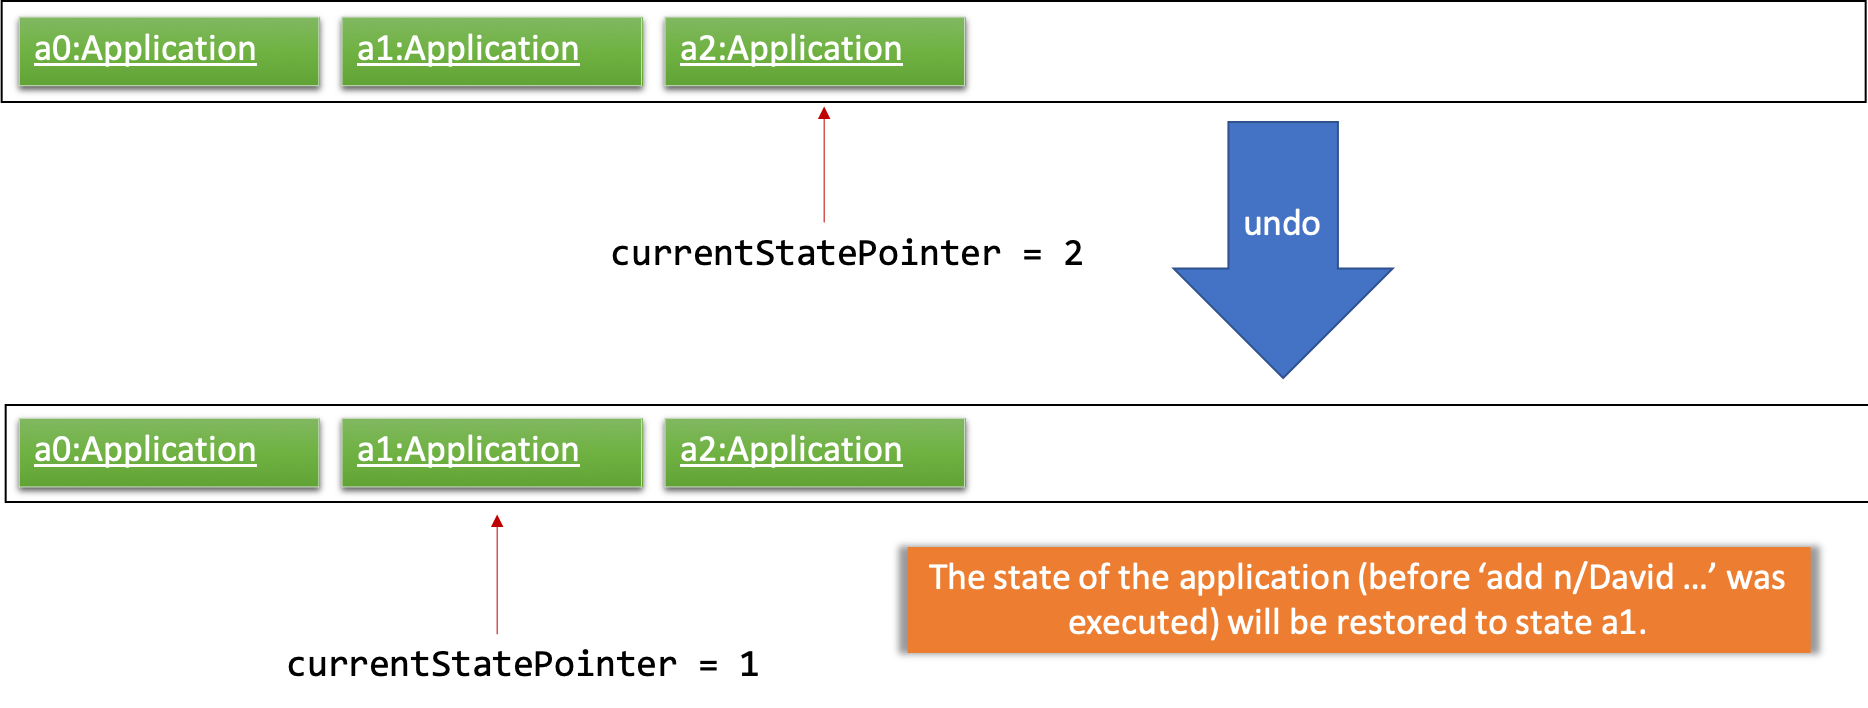
Step 4. The user now decides that adding the module was a mistake, and decides to undo that action by executing the
undo command. The undo command will call Model#undoApplication(), which will shift the currentStatePointer once to the left, pointing it to the previous application state, and restores the application to that state.
If the currentStatePointer is at index 0, pointing to the initial application state, then there are no previous
application states to restore. The undo command uses Model#canUndoApplication() to check if this is the case. If so, it will return an error to the user rather than attempting to perform the undo.
|
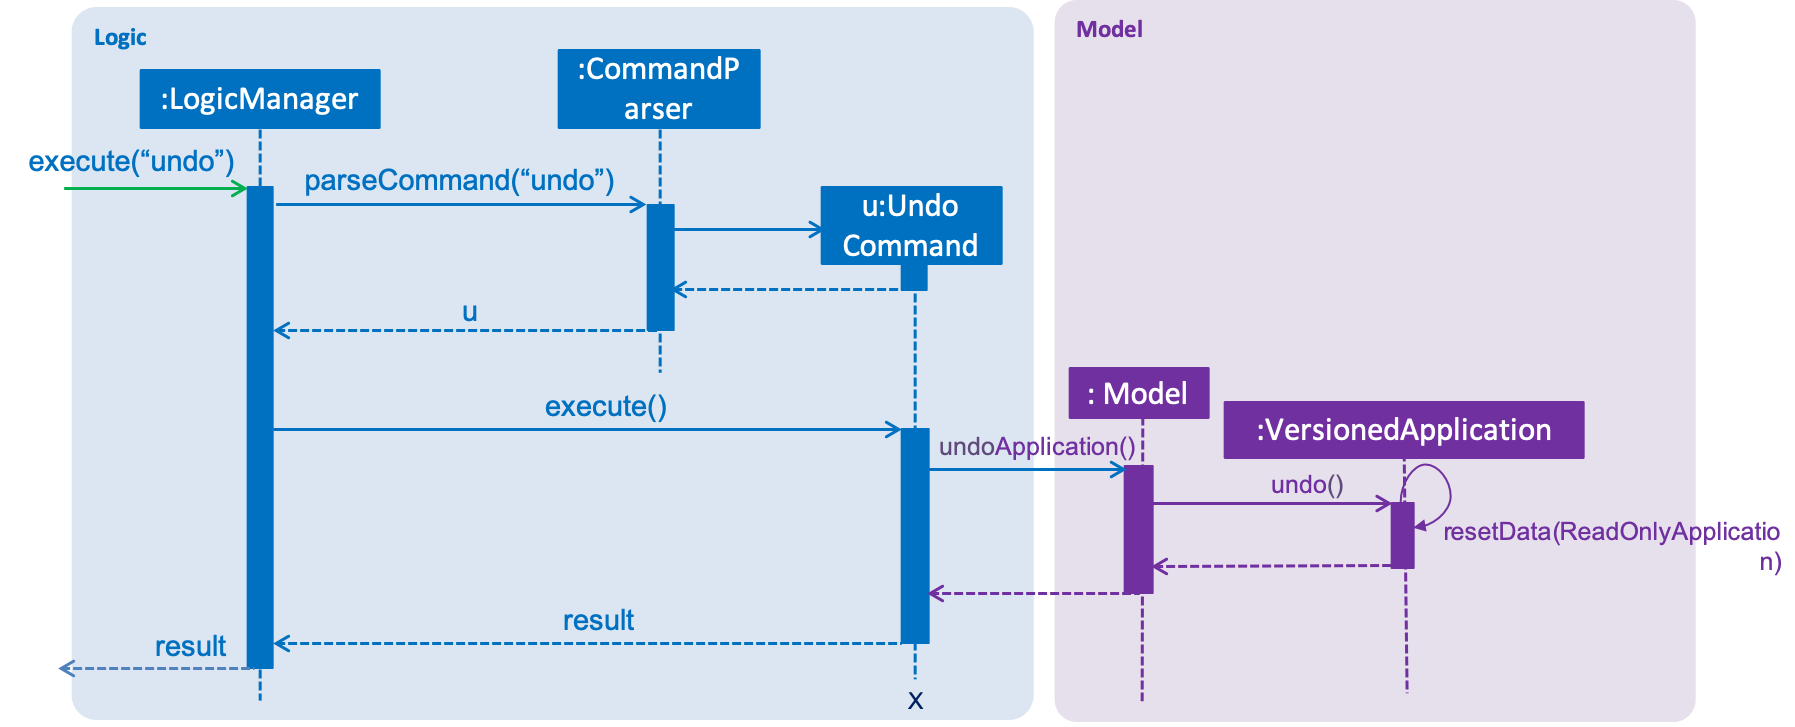
The following sequence diagram shows how the undo operation works:
The redo command does the opposite — it calls Model#redoApplication(), which shifts the currentStatePointer
once to the right, pointing to the previously undone state, and restores the application to that state.
If the currentStatePointer is at index applicationStateList.size() - 1, pointing to the latest application
state, then there are no undone application states to restore. The redo command uses Model#canRedoapplication() to check if this is the case. If so, it will return an error to the user rather than attempting to perform the redo.
|
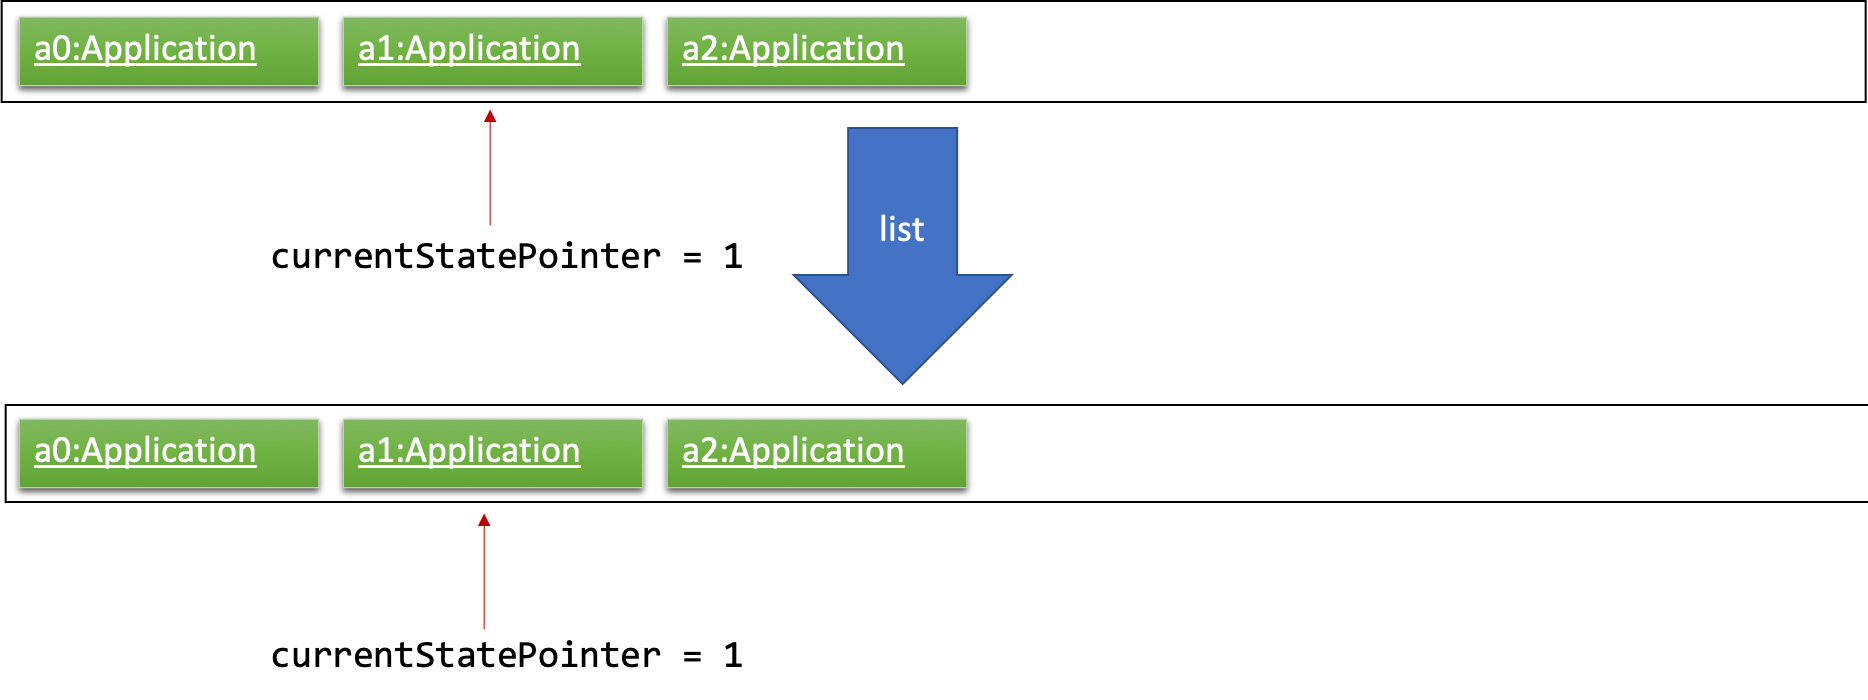
Step 5. The user then decides to execute the command list. Commands that do not modify the application, such as list, will usually not call Model#commitapplication(), Model#undoapplication() or Model#redoapplication(). Thus, the applicationStateList remains unchanged.
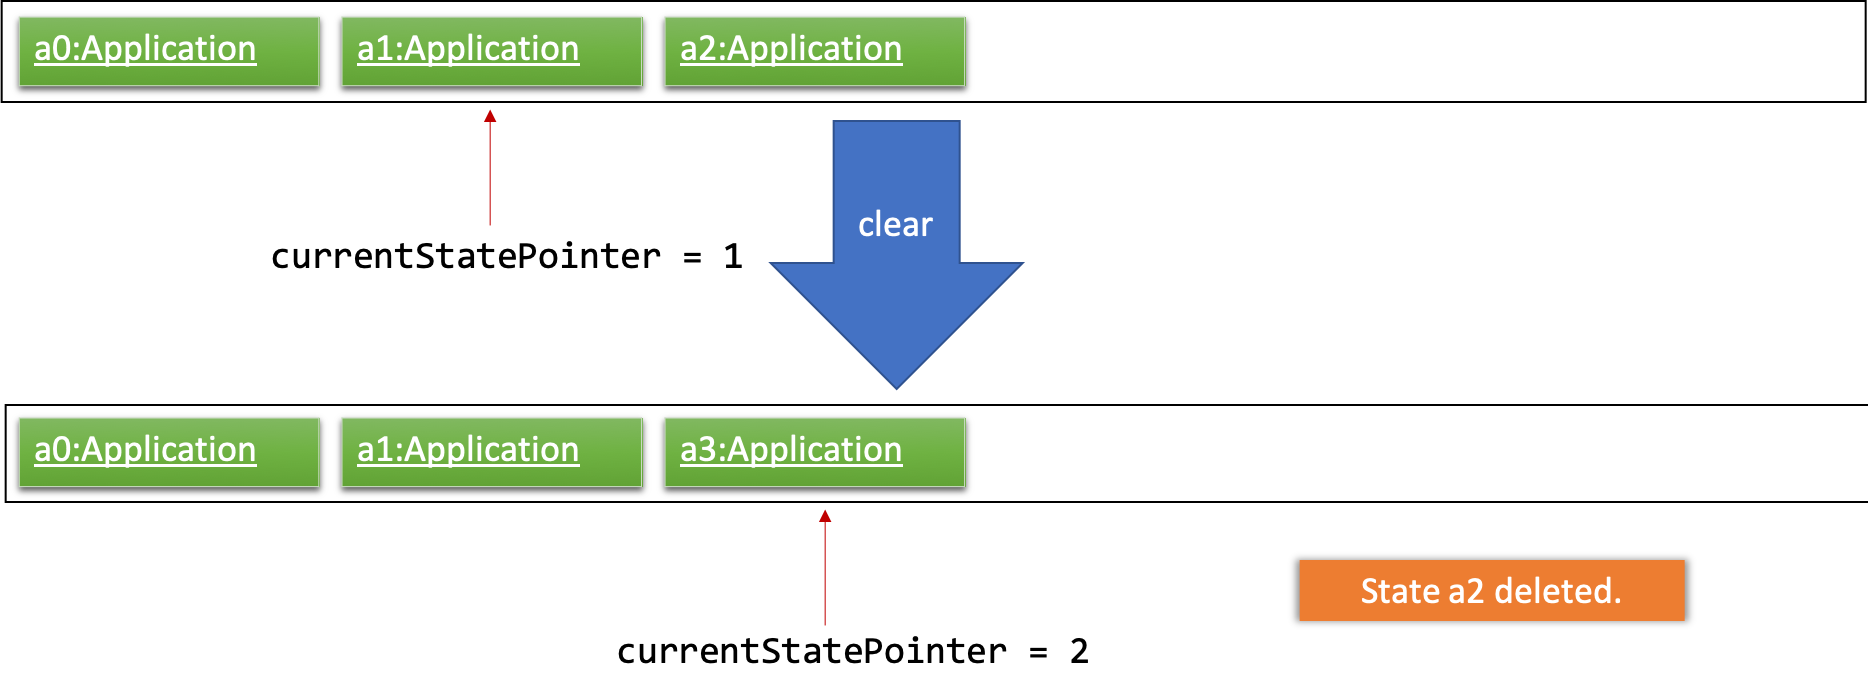
Step 6. The user executes clear, which calls Model#commitApplication(). Since the currentStatePointer is not
pointing at the end of the applicationStateList, all application states after the currentStatePointer will be purged. We designed it this way because it no longer makes sense to redo the add n/David … command. This is the behavior that most modern desktop applications follow.
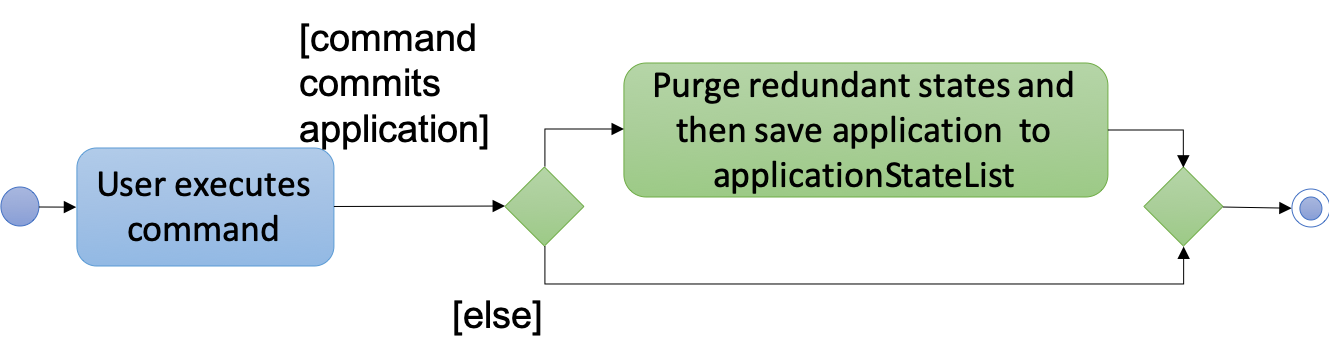
The following activity diagram summarizes what happens when a user executes a new command:
3.1.2. Design Considerations
Aspect: How undo & redo executes
-
Alternative 1 (current choice): Saves the entire application.
-
Pros: Easy to implement.
-
Cons: May have performance issues in terms of memory usage.
-
-
Alternative 2: Individual command knows how to undo/redo by itself.
-
Pros: Will use less memory (e.g. for
delete, just save the module being deleted). -
Cons: We must ensure that the implementation of each individual command are correct.
-
Aspect: Data structure to support the undo/redo commands
-
Alternative 1 (current choice): Use a list to store the history of application states.
-
Pros: Easy for new Computer Science student undergraduates to understand, who are likely to be the new incoming developers of our project.
-
Cons: Logic is duplicated twice. For example, when a new command is executed, we must remember to update both
HistoryManagerandVersionedApplication.
-
-
Alternative 2: Use
HistoryManagerfor undo/redo-
Pros: We do not need to maintain a separate list, and just reuse what is already in the codebase.
-
Cons: Requires dealing with commands that have already been undone: We must remember to skip these commands. Violates Single Responsibility Principle and Separation of Concerns as
HistoryManagernow needs to do two different things.
-
3.2. Edit Module Feature
The edit feature aims to help users update module details in our application. When there are changes to be made to
the module (e.g. semesters which modules are offered in have changed), users will want to be able to update the
module details easily without going through the hassle of deleting and adding the new module.
This section describes the implementation and the design considerations of the edit feature, and how the edit
feature is capable of cascading the updated module code from the module list to the requirement categories and degree
plan.
3.2.1. Current Implementation
When the user invokes the edit command, e.g. (edit 1 code/CS1231), the following steps are taken by the
application.
-
The
CommandParserinvokes theEditCommandParserclass to parse the user input provided. The parsed data will then be used to create aEditCommandobject and will be returned toCommandParserand subsequentlyLogicManager. -
LogicManagerwould then invoke theEditCommand#execute(…), which performs the following validation checks to ensure that the edited module details are valid.-
Ensures that the edited module does not exists in module list (non-duplicate module)
-
Ensures that the edited module is not updated to be a co-requisite of itself (no self-referencing)
-
Ensures that the edited module’s co-requisite exists in the module list
-
Ensures that the edited module’s co-requisites can be taken in the same semester
-
Ensures that the edited module can be taken in the same semester as the edited module’s co-requisites
-
Ensures that the updated semesters which the edited module is offered in allows the module to remain in the current semester of the degree plan.
-
-
Once the validation checks are complete,
EditCommandwill invokeModel#editModule(…), which will be discussed later. -
EditCommandwill then invokeModel#updateFilteredModuleList(…)to display all modules in the filtered module list. -
Finally, a success message will be displayed to the user.
The high-level overview sequence diagram for the edit feature is shown below.
|
|
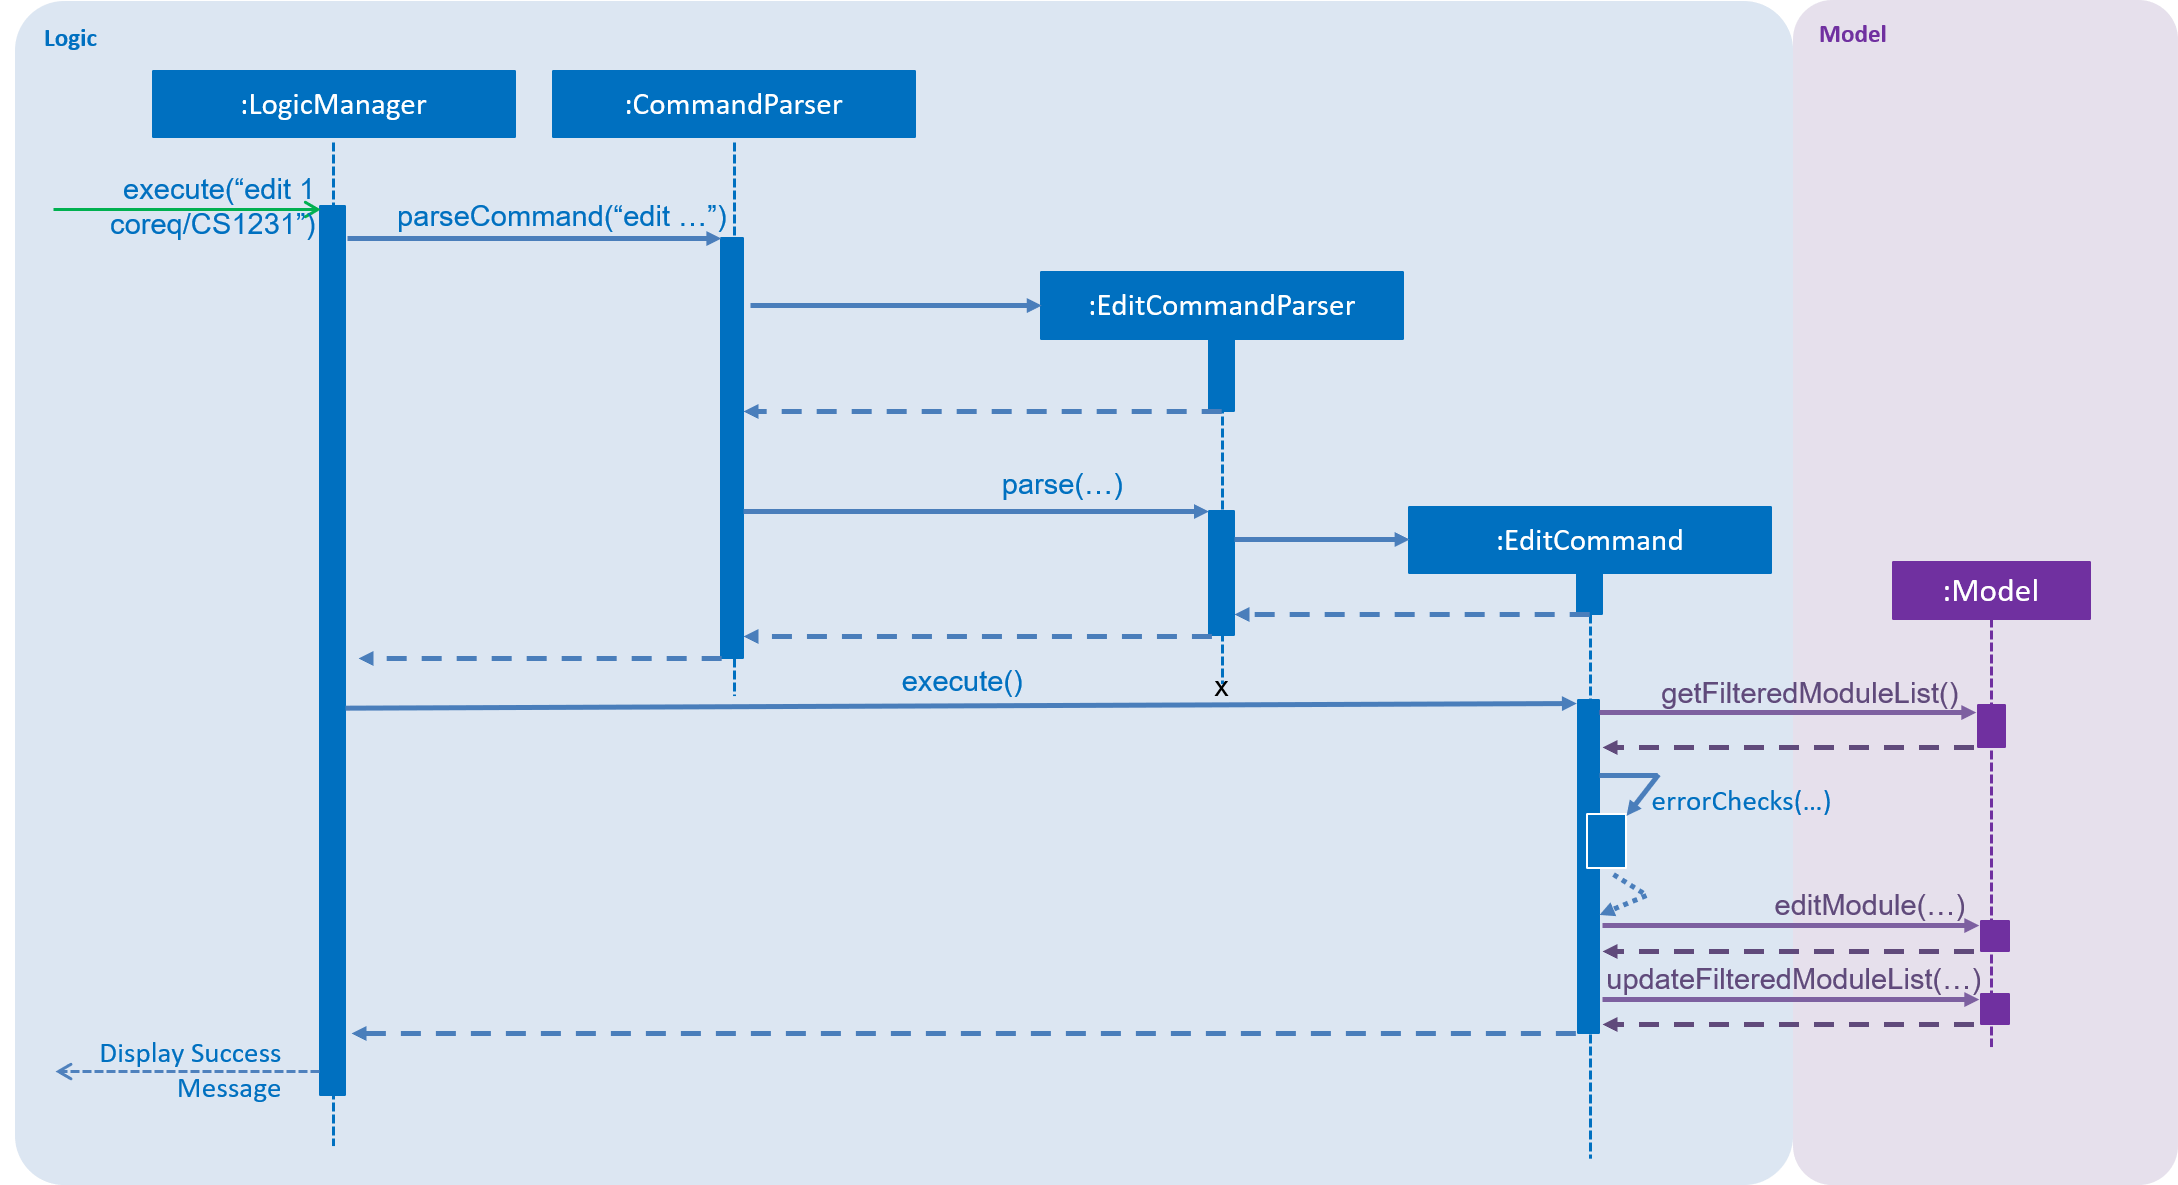
edit featureIf there are any changes made to the module’s code, Model#editModule(…) will cascade the edited module code to the rest of the Model objects (namely UniqueModuleList, UniqueDegreePlannerList, UniqueRequirementCategoryList) through Application.
-
When
Model#editModule(…)is invoked,Application#editModule(…)will be called. -
Application#setModule(…)is invoked to replace the original module with the edited module inUniqueModuleList. -
When setting the edited module in
UniqueModuleList,UniqueModuleListwill cascade the edited module code to all modules' co-requisites -
The edited module code is cascaded to
UniqueDegreePlannerasApplication#setModule(…)checks if the original module code exists in the degree planner, and if so, updates it accordingly. -
Similarly,
Application#setModule(…)also checks if the original module code exists in the requirement categories, and if so, updates it accordingly.

edit feature illustrating cascading of edited module code3.2.2. Design Considerations
Aspect: How should edited module code be cascaded down to other Model objects?
The table below shows comparisons between the two approaches.
Approach |
Pros |
Cons |
1. Implement cascading of edited module code in |
It makes sense for a class in Logic component to handle logic-related matters. |
|
2. Implement cascading of edited module code in |
It doesn’t create additional coupling with other Model components |
|
After weighing the pros and cons, approach 2 was chosen.
Firstly, doing so will reduce the need for additional coupling with other Model components (as compared to approach
1). Although it may seem strange to implement logic checks to achieve the desired cascading effect of the edited module
code in Application (a class in the Model component), implementing logic checks in Model can also be seen as a way
of maintaining data integrity. One such example is Java’s Set interface (Model), where each implementing class
ensures that there are no duplicate elements in the collection of data (i.e. implementing logic in model).
Similarly, implementing cascading of edited module code in Application is deemed to be similar to implement logic
in model for maintaining data integrity. As such, approach 2 is more suitable and was chosen.
3.3. Module co-requisites
3.3.1. Current Implementation
Module co-requisites are stored internally as Set<Code> within Module.
A Set<Code> is used instead of a List<Code> to ensure uniqueness and prevents duplicate co-requisites module codes.
Notice that Code is used in place of Module. This is to prevent storage of duplicated information when serializing UniqueModuleList.
AddCommand handles invalid cases by preventing adding a co-requisite module code that does not exists in the module list.
EditCommand handles invalid cases by ensuring that:
-
the edited co-requisite module code is not equivalent to the
Codeof the edited module -
the edited co-requisite module
Codeexists in the module listing
When a module is deleted, it is cascaded down to other modules, and is removed from other modules' co-requisites.
3.3.2. Design Considerations
Aspect: How should deletion of a module be cascaded down to other modules
The table below shows comparisons between the two approaches.
Approach |
Pros |
Cons |
1. Delete module code from other modules' corequisites in |
Implementing the cascading effect in |
|
2. Delete module code from other modules' corequisites in |
Convenient to implement. |
|
After weighing the pros and cons, approach 1 was chosen.
As we are expecting many similar names between modules in the university curriculum, if the user could only search
with an implicit logical OR, the user would not be able to find the desired modules effectively. This can drastically
reduce the effectiveness of the find command.
3.4. Find Feature
The find feature aims to help users to be able to easily locate any modules in our application. With a large number
of modules available to our users, find feature is essential. Currently, the find feature only supports searching
of module’s name, code, credits, tags and the semesters it is offered in.
This section shares the implementation and the design considerations gone through while enhancing the find feature. Details on how the find feature is implemented and how it supports more search parameters are also shared.
3.4.1. Overview
When a user invokes the find command. (e.g. find name/Programming || code/CS1231), the following steps are taken by
the program.
-
Extract out the text related to
findcommand -
Parse the text related to each
PREFIXindividually. -
Return a composite predicate for all attributes.
Step 1 is performed by the ApplicationParser class, and no special actions is needed for the find feature.
Step 2 and 3 are performed by BooleanExpressionParser#parse
The class diagram below shows the different components and constraints for find feature.
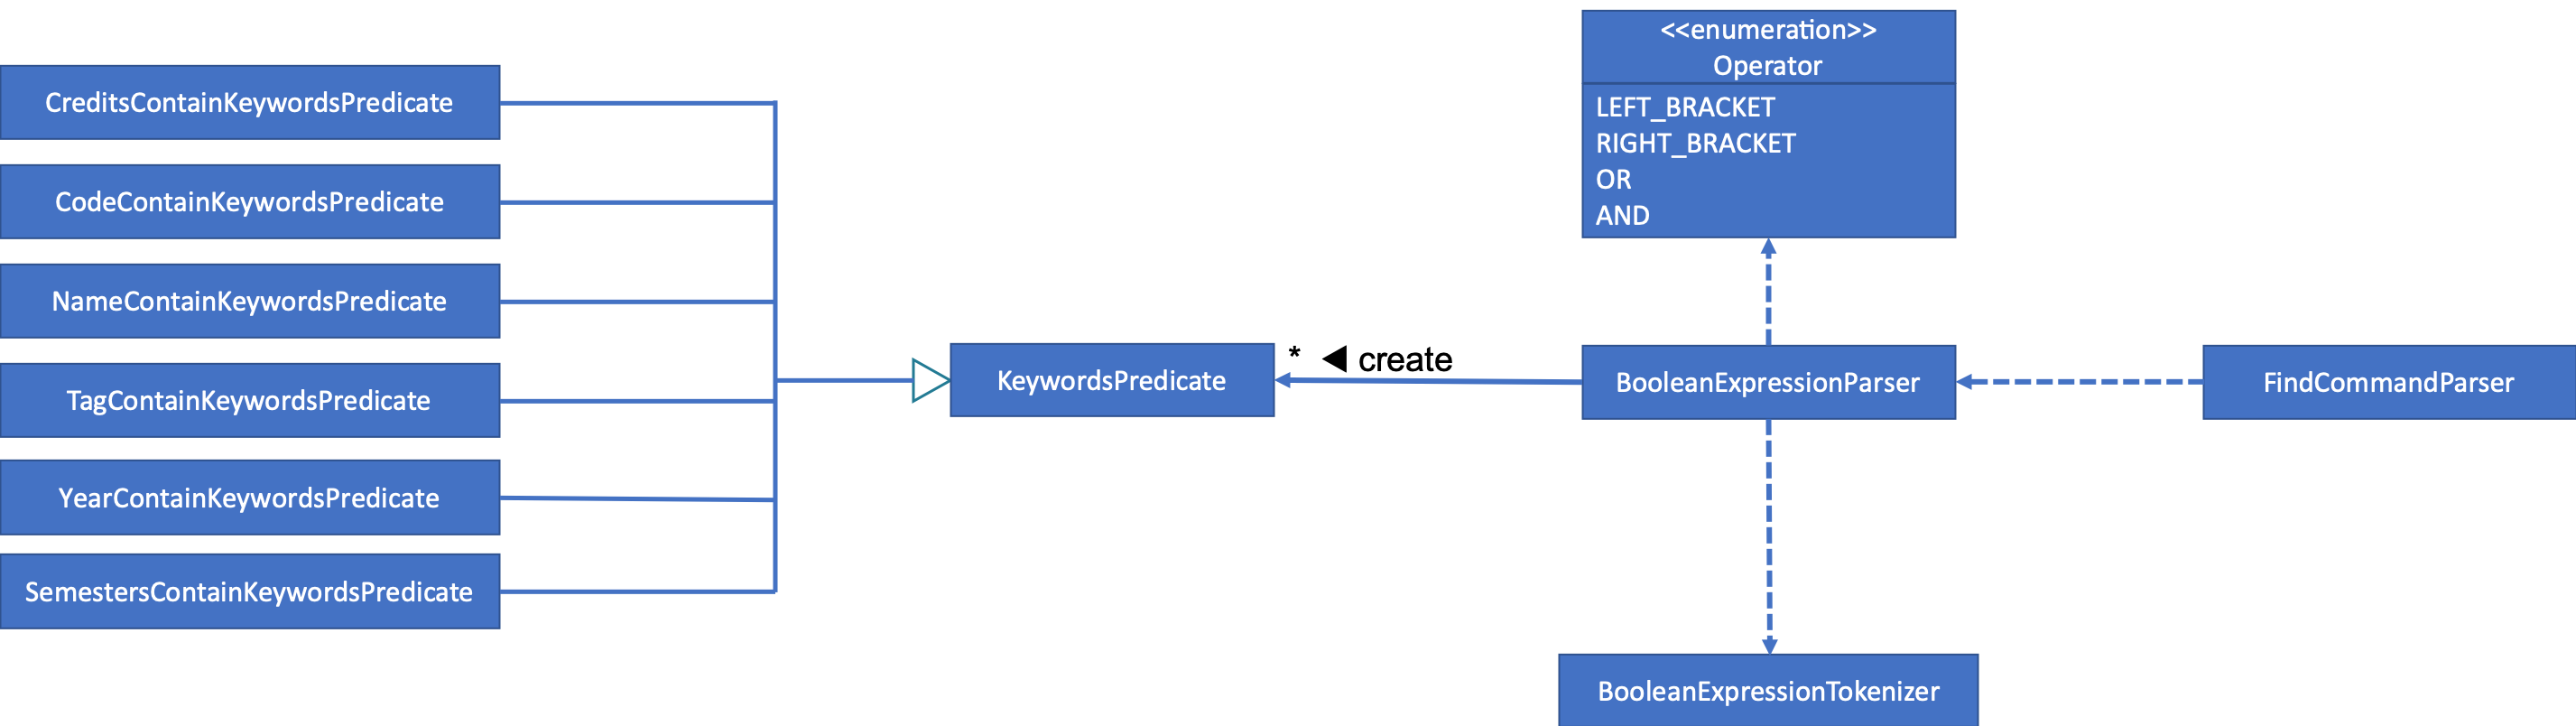
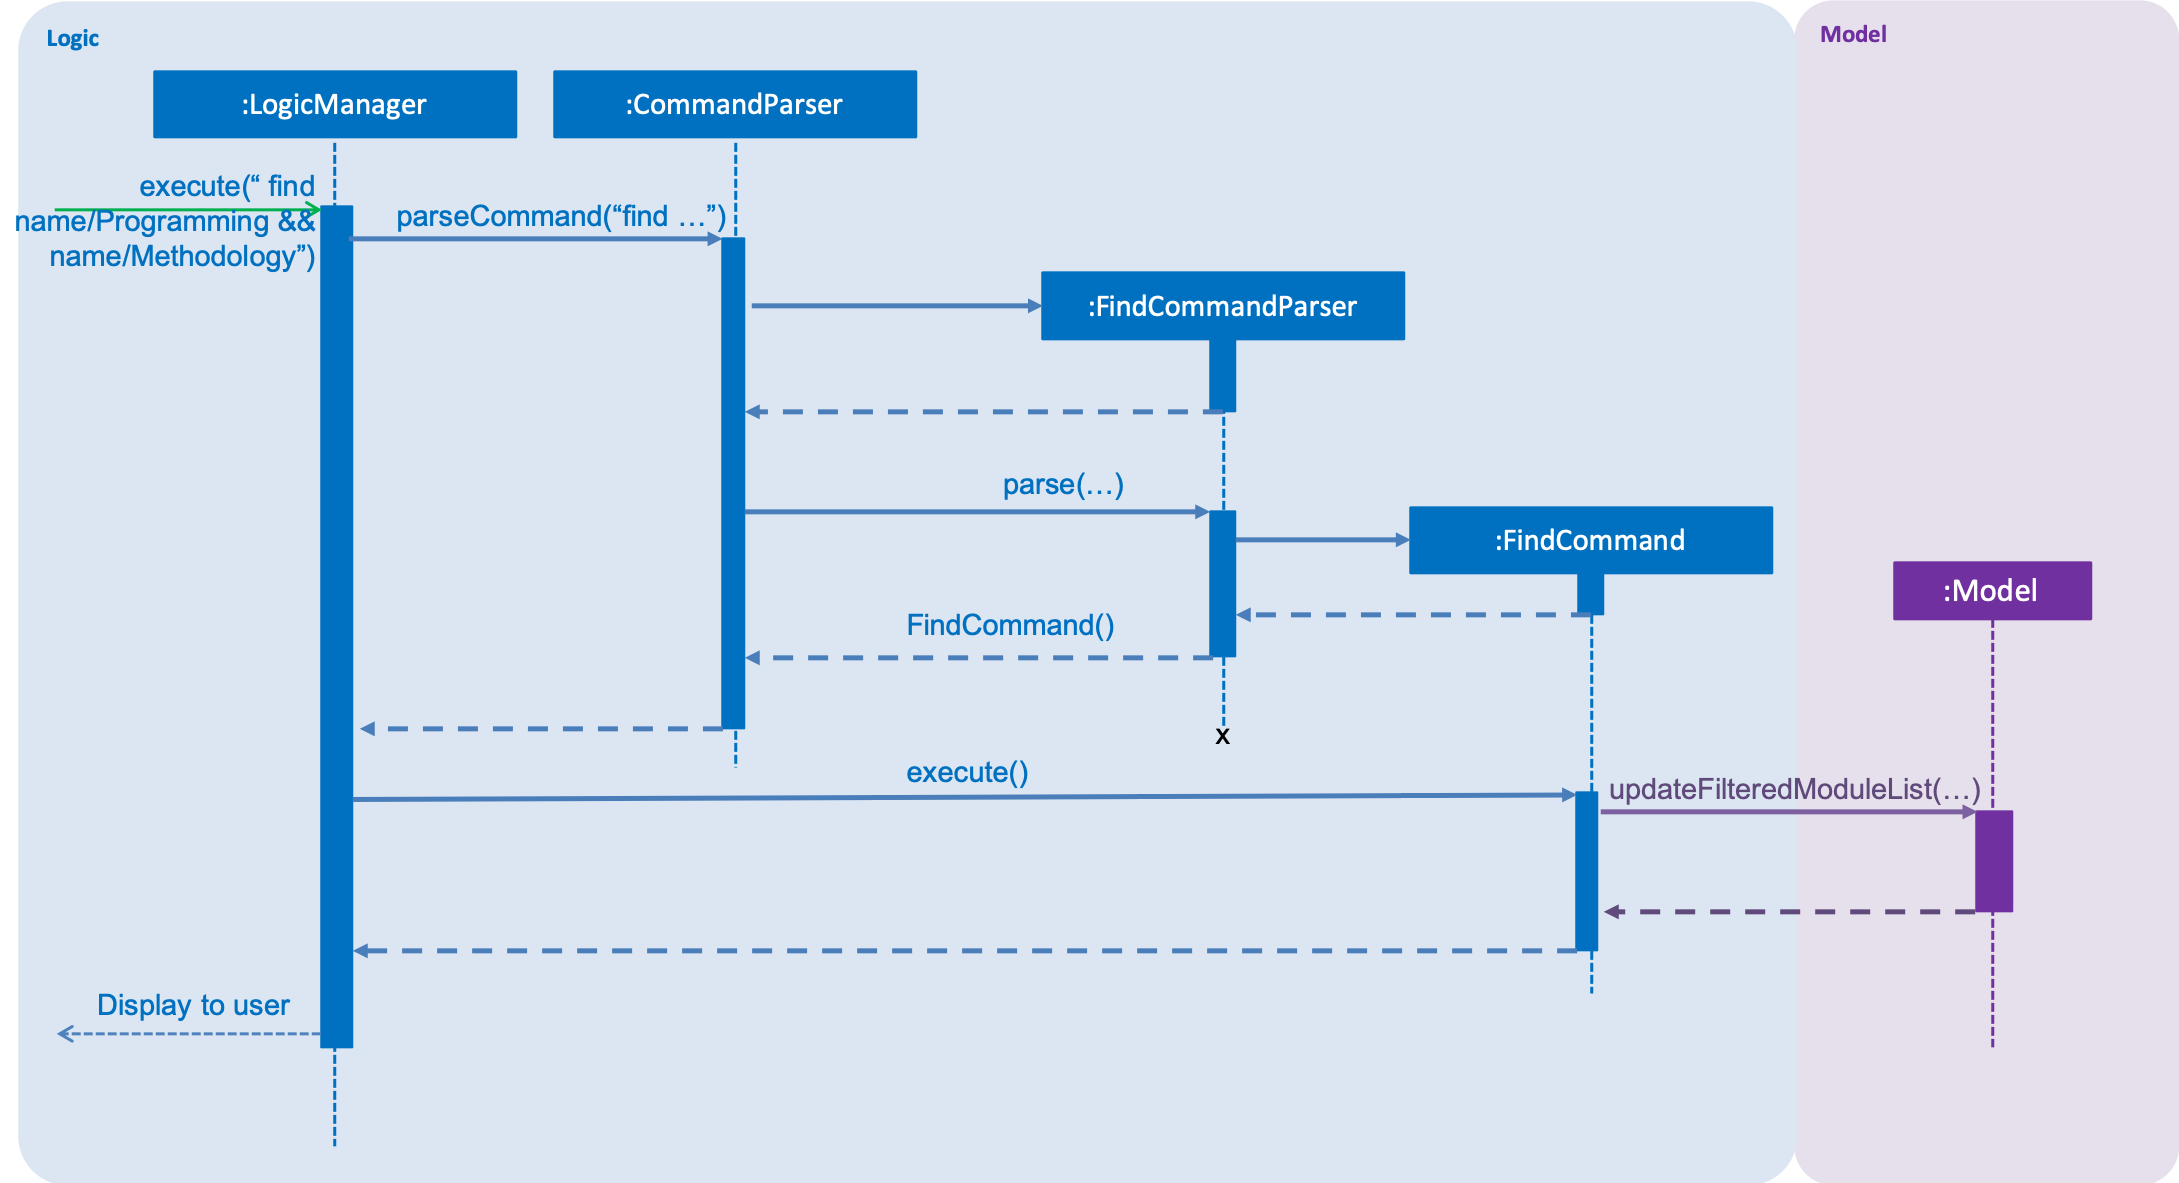
find feature3.4.2. Current Implementation
The FindCommandParser parses the strings of arguments provided by the user to retrieve a composite Predicate
which is used by FindCommand. A ParseException is thrown in the case if the input provided by the user does not
conform to the expected format.
The sequence diagram below shows the interaction within the Logic components.
The main implementation of this feature is split into two components. The Tokenizer and BooleanExpressionParser
-
Tokenizerhelps to split the user provided argument into tokens which could be used byBooleanExpressionParser. -
BooleanExpressionParsersimply performs Shunting-Yard algorithm on the boolean expression tokens provided by theTokenizerand maps them intoPredicatewhich could be used byFindCommand.
FindCommandParser calls BooleanExpressionParser#parse which handles the evaluation of the expression.
This process is achieved by the code snippet shown below.
String trimmedArgs = args.trim();
if (trimmedArgs.isEmpty()) {
    throw new ParseException(
            String.format(MESSAGE_INVALID_COMMAND_FORMAT, FindCommand.MESSAGE_USAGE));
}
Predicate<Module> predicate = BooleanExpressionParser.parse(args, PREFIXES);
return new FindCommand(predicate);
To support more parameters for our find feature. You can do the following steps.
-
Create a new
Predicateclass (e.g.NameContainsKeywordsPredicate) and define your expected behaviour in it. -
Ensure your
Predicateclass extendsKeywordsPredicate. -
Update
BooleanExpressionParser#getKeywordsPredicateto handle the creation of thePredicate. -
Update
CliSyntaxon the new prefix you would like for the new parameter. -
Update
FindCommandParserto take in the newPREFIX.
Your new parameter will now be supported after the above steps!
3.4.3. Tokenizer
This is represented by the class pwe.planner.logic.parser.BooleanExpressionTokenizer and is designed to extract
all argument with PREFIX and OPERATOR as a token.
This class is initialized with the input argument and prefixes and can be queried for token multiple times.
Each query will consume the previous token and returns the next available token.
This is similar to how java.util.Scanner works.
Design Consideration
After many rounds of experiment with StringTokenizer that is provided by native Java and ArgumentMultimap.
We found three main issues which could not be satisfied by either StringTokenizer or ArgumentMultimap.
-
ArgumentMultimapdoes not keep track of the order of each delimiter. They will only track if the delimiter exists. -
StringTokenizerhas a default delimiter as a whitespace, although we could change the delimiter and parse multiple delimiters. It does not suit our situation.
e.g.find name/AAAA code/BBBB.
This will return us 1 token.name/AAAA code/BBBB, which we cannot use to check due to the missingoperator.
We need the tokenizer to return us 2 tokensname/AAAAandcode/BBBBin order for us to know that the expression was invalid due to the missingoperator. -
StringTokenizercan take inPREFIXas delimiter, however, this will split the argument (i.e.code/CS1231) into two tokens,code/andCS1231.
Additional parsing is required before we are able to pass it toBooleanExpressionParser. This parsing creates more overhead as we have to ensure that the proper checks are done.
As such, our custom Tokenizer aims to solve these three issues.
The table below shows the differences among our Tokenizer, StringTokenizer and ArgumentMultimap
|
|
|
Respect the order of delimiters. |
Respect the order of delimiters |
Only keep track which delimiters are present. |
Support multiple delimiters. |
Support multiple delimiters. |
Support multiple delimiters. |
Splitting tokens is more flexible |
Only split token based on delimiters |
Does not split into token. |
3.4.4. Operator
This is represented by the class pwe.planner.logic.parser.Operator and defines all valid operators to be used in
BooleanExpressionParser.
The table below shows the valid operators that our application currently supports.
Operator |
Description |
Precedence |
|
Logical "AND" operation (both conditions A AND B must match) |
Highest |
|
Logical "OR" operation (either conditions A OR B must match) |
Lowest |
|
Search term surrounded by parenthesis will always be evaluated first. If there is a tie, the logical operator precedence will be taken into consideration. |
N.A |
To support more operators for our BooleanExpressionParser. The following steps should be performed.
-
Add the operator and give it precedence.
-
Update the mapping between
StringandOperatorinOperator#getOperatorFromString -
Update the logic of the new operator in
Operator#applyOperator -
Update
CliSyntax.OPERATORSto include the new operator.
3.4.5. Boolean Expression Parser
This is represented by the class pwe.planner.logic.parser.BooleanExpressionParser and is designed to map user
provided input into composite Predicate<Module>.
The following table shows the operators currently supported by BooleanExpressionParser(Highest precedence
first).
Operators |
Description |
|
Logical AND of two predicates |
|
Logical OR of two predicates. |
Parentheses ( and ) are also recognized and respected, and they may be nested to arbitrary depth. This is handled by
Shunting Yard algorithm which respects the precedence of each
operators when parsing.
The sequence diagram below shows the interactions between FindCommandParser and BooleanExpressionParser.
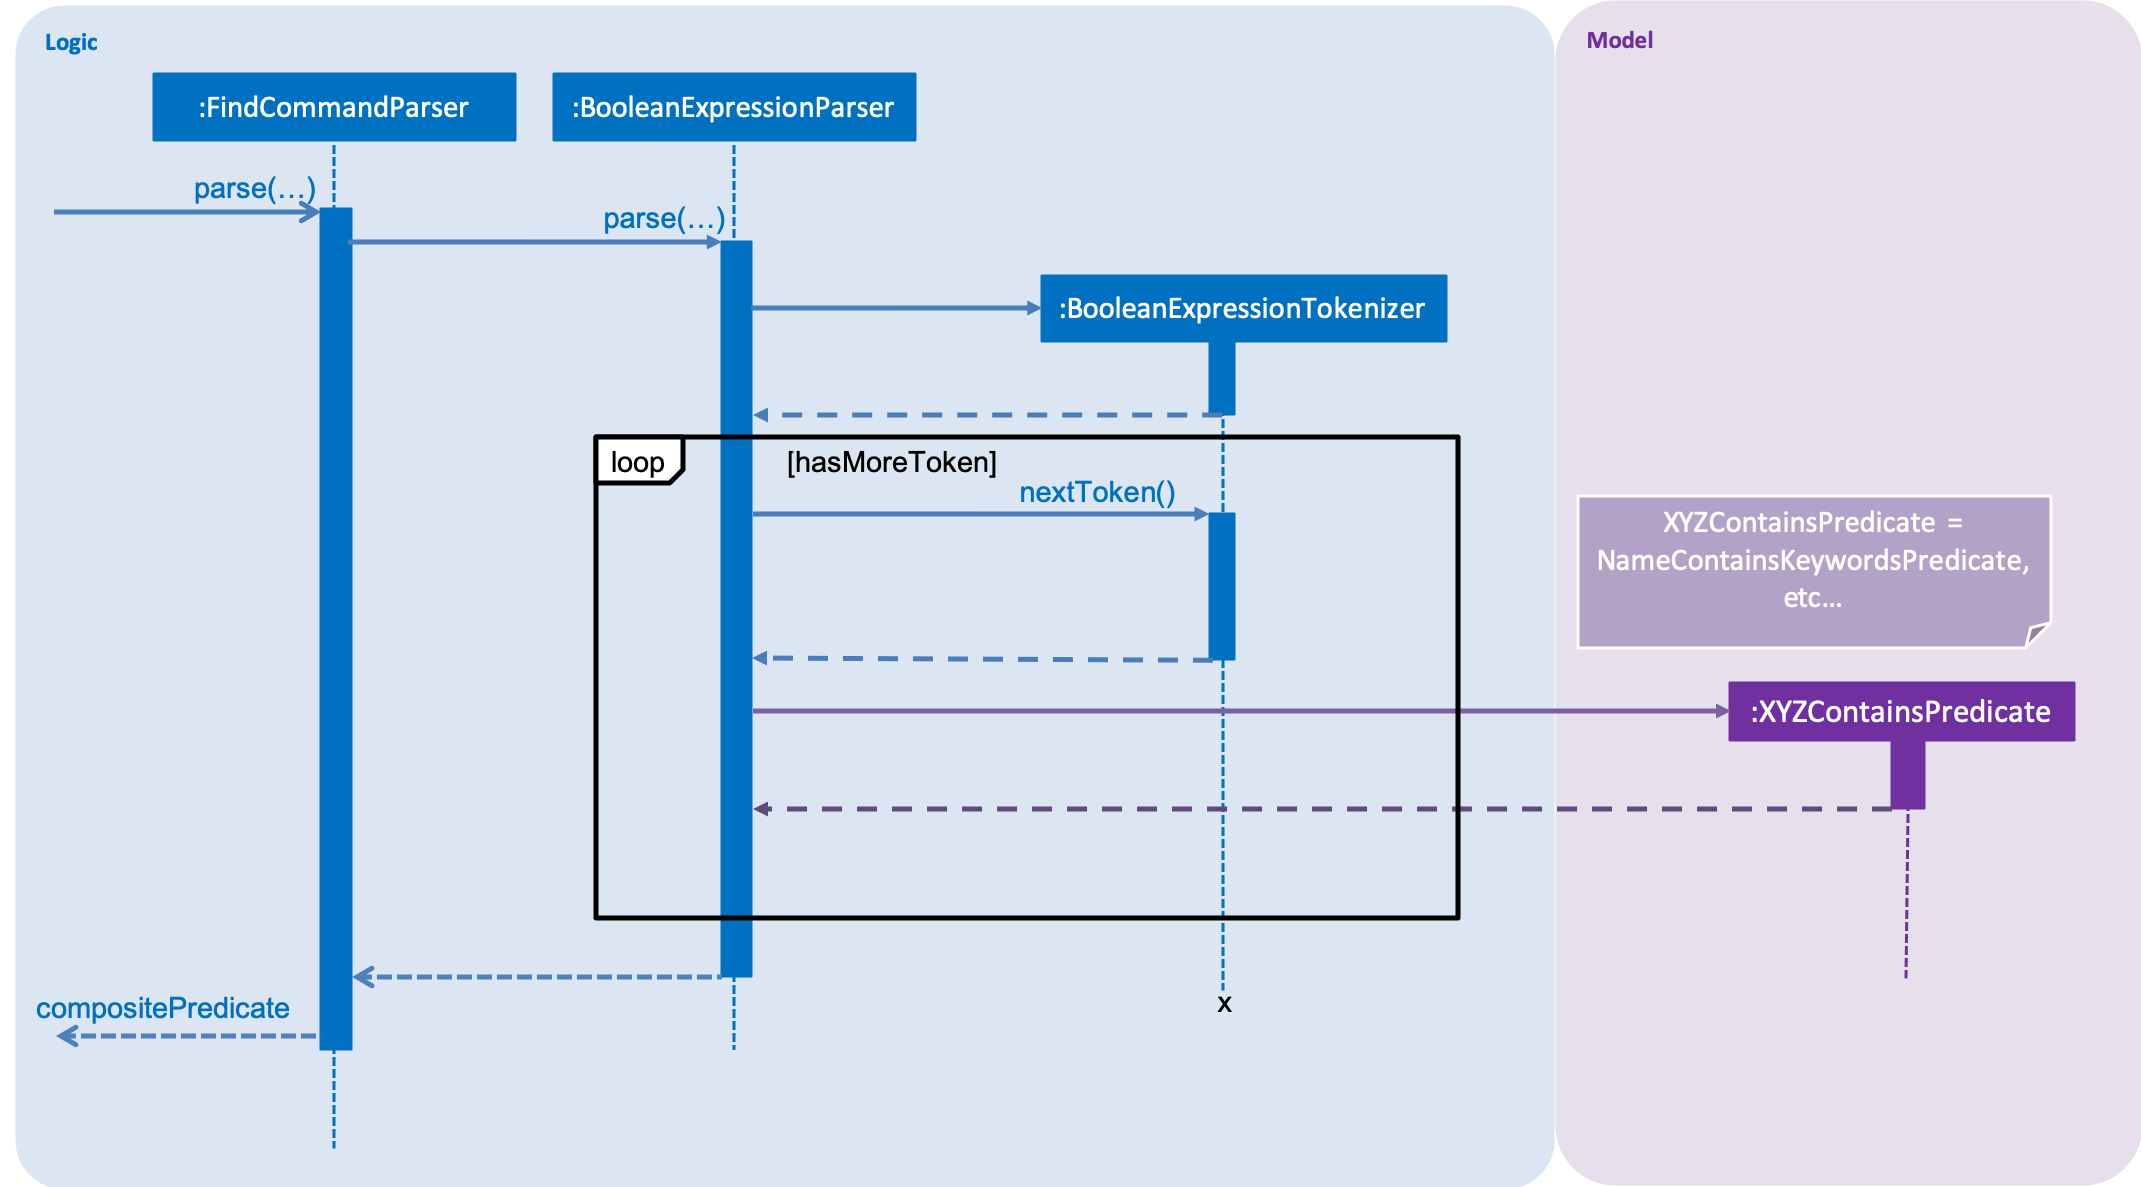
When FindCommandParser receives the provided user argument, it will carry out checks and pass the argument to
BooleanExpressionParser which will initialize a new Tokenizer that extracts the arguments as tokens.
BooleanExpressionParser will create a Predicate based on the Prefix in each token. If the token is an Operator,
BooleanExpressionParser will apply the operator on two Predicate to combine them into a composite Predicate.
|
See Section 3.4.3, “Tokenizer” for more details regarding the tokenizer. |
The process of how the predicate for each prefix is created is shown in the code snippet below.
ArgumentMultimap argMultimap =
        ArgumentTokenizer.tokenize(args, PREFIX_NAME, PREFIX_CODE, PREFIX_CREDITS);
KeywordsPredicate predicate = null;
if (argMultimap.getValue(PREFIX_NAME).isPresent()) {
    String nameKeyword = ParserUtil.parseName(argMultimap.getValue(PREFIX_NAME).get()).toString();
    predicate = new NameContainsKeywordsPredicate(List.of(nameKeyword));
} else if (argMultimap.getValue(PREFIX_CODE).isPresent()) {
    String codeKeyword = ParserUtil.parseCode(argMultimap.getValue(PREFIX_CODE).get()).toString();
    predicate = new CodeContainsKeywordsPredicate(List.of(codeKeyword));
} else if (argMultimap.getValue(PREFIX_CREDITS).isPresent()) {
    String creditKeyword = ParserUtil.parseCredits(argMultimap.getValue(PREFIX_CREDITS).get()).toString();
    predicate = new CreditsContainsKeywordsPredicate(List.of(creditKeyword));
} else {
    throw new ParseException(
            String.format(MESSAGE_INVALID_COMMAND_FORMAT, FindCommand.MESSAGE_USAGE));
}
return predicate;
3.4.6. Design Considerations
This section shares the design considerations we went through during the enhancing the existing find feature.
Aspect: Parsing of composite predicate
The table below shows comparisons between the two approaches.
Approach |
Pros |
Cons |
1. Implement an algorithm Shunting Yard that parses the complex boolean expression and returns a composite predicate. |
Find command can be very flexible. It can work with multiple parameters to search for the specific modules that the user wants. |
|
2. Do an implicit logical |
Very easy to implement |
|
After weighing both pros and cons, we decided to go with approach 1.
As we are expecting many similar names between modules in the university curriculum, if the user could only search
with an implicit logical OR, the user would not be able to find the desired modules effectively. This can drastically
reduce the effectiveness of the find command.
3.5. Requirement Add Feature
The requirement add feature in the application aims to help users to keep track and check if they have fulfilled a particular degree requirement category by adding module code(s) to the specified requirement category.
3.5.1. Current implementation
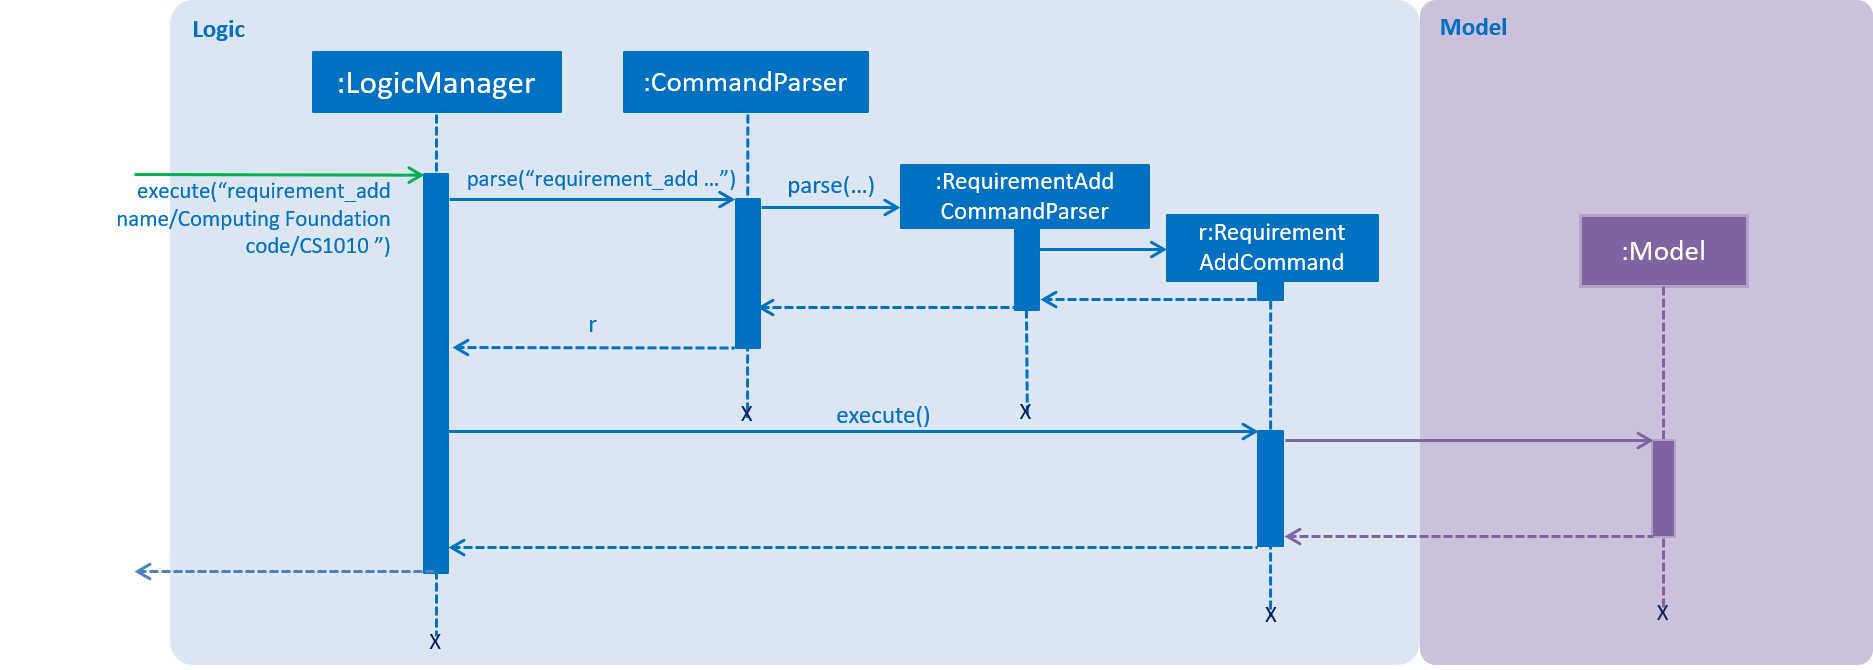
When the user invokes the requirement_add command, e.g. (requirement_add name/Mathematics code/MA1531).
The following steps are taken by the application.
1. The CommandParser invokes the RequirementAddCommandParser class to parse the user input provided.
The parsed data will then be used to create a RequirementAddCommand object and will be returned to
LogicManager.
|
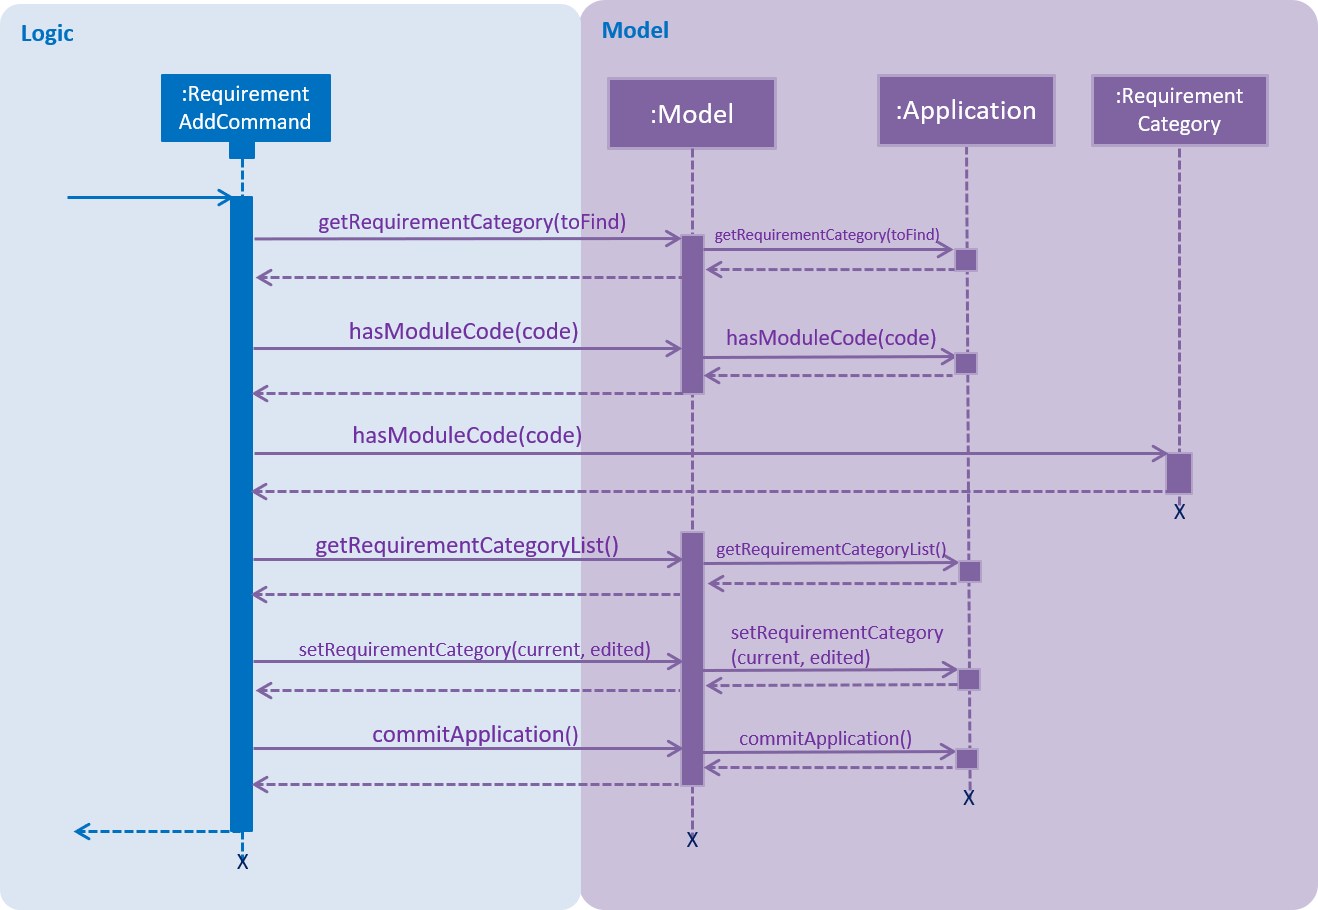
2. Upon receiving the RequirementAddCommand object, LogicManager would then invoke the RequirementAddCommand
class to pass the object received.
Once invoked, RequirementAddCommand will perform the following checks on the object received:
* Check if the degree requirement category exists in the application through getRequirementCategory
* Check if the module codes provided exists in the application through model.hasModuleCode
* Check if the module codes have already been added to other degree requirement categories
* Check if the module codes have already been added to the specified degree requirement category through
RequirementCategory.hasModuleCode
|
|
3. After passing all of the above checks, RequirementAddCommand updates the context in Model through
setRequirementCategory.
4. In addition to adding module code(s) to the specified degree requirement category, the RequirementAddCommand
class also saves the current database state through commitApplication (for undo/redo functions).
The sequence diagram below shows how this command interacts with the Logic components as described above.
|
3.5.2. Design Considerations
This section describes the various design considerations the taken when implementing the requirement_add
feature.
Aspect: Choice of what is stored in the requirement category storage file
The table below shows a comparison between the two approaches that could have been implemented.
Approach |
Pros |
Cons |
1. Storing only the module codes in the requirement category storage file |
|
|
2. Storing all information related to the modules but only the module code is displayed |
|
|
After evaluating the pros and cons of both approaches, we have decided to implement Approach 1.
The main reason is that all module information would be duplicated again in the requirement category storage file. This would effectively make the module storage file redundant as the information can be found in the requirement category storage file.
In addition, when a module information is updated, we have to ensure that the information in both storage files are updated and consistent to avoid any conflicting information.
Another factor that heavily impacted the decision would be that each module is uniquely identified by a module code. Hence, by storing the module code only, the module’s information can be easily obtained.
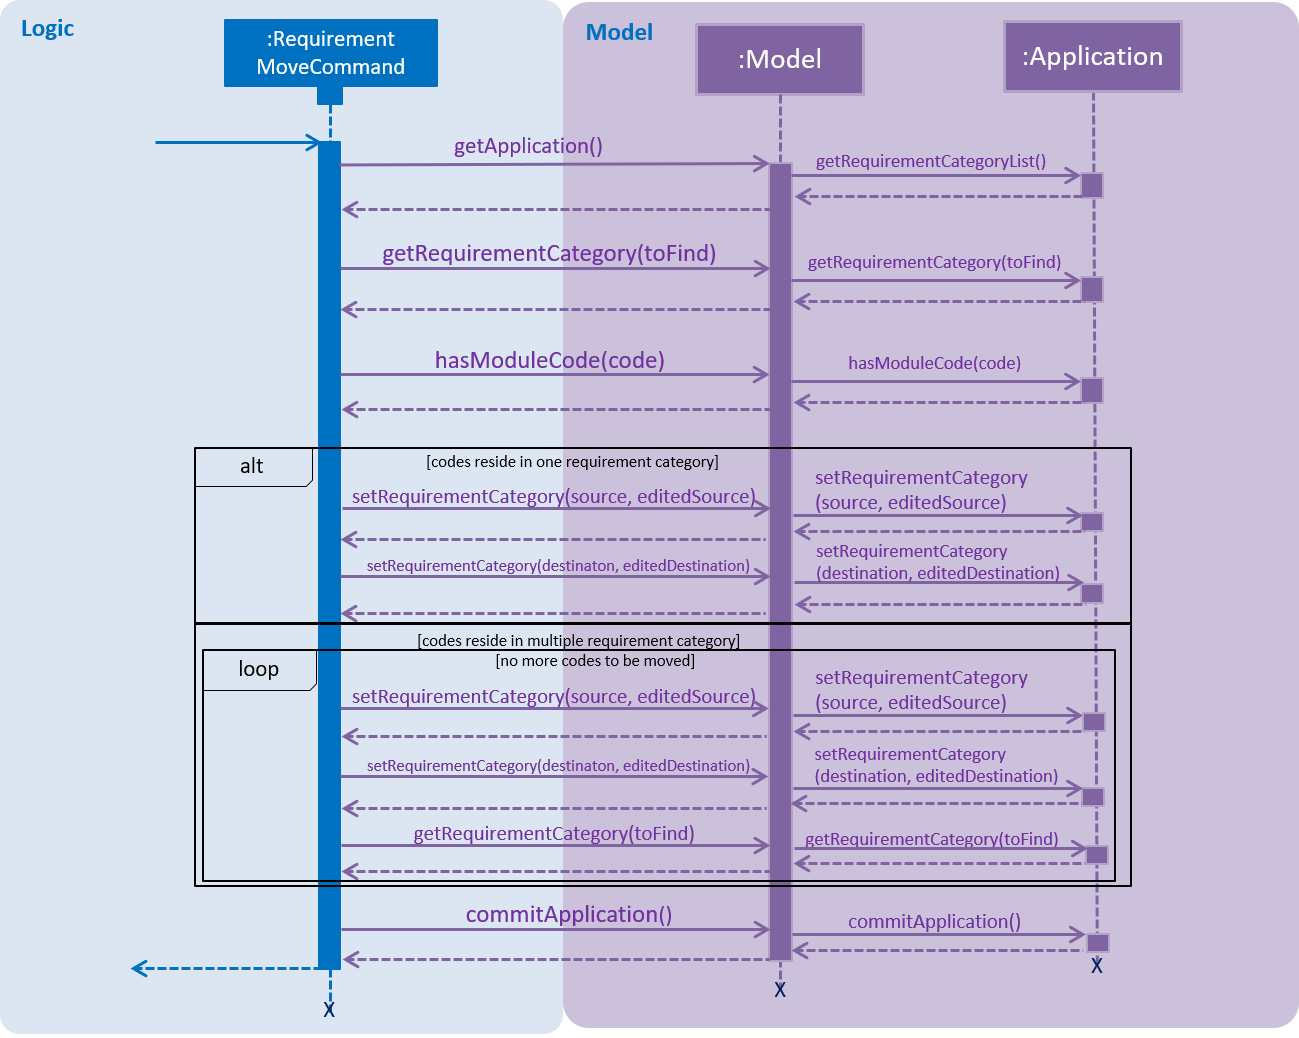
3.6. Requirement Move Feature
The requirement move feature in the application aims to help users to be able to move module code(s) from any degree requirement category to the specified requirement category.
3.6.1. Current implementation
When the user invokes the requirement_move command, e.g. (requirement_move name/Mathematics code/CS1231).
The following steps are taken by the application.
1. The CommandParser invokes the RequirementMoveCommandParser class to parse the user input provided.
The parsed data will then be used to create a RequirementMoveCommand object. The RequirementMoveCommand object
will then be returned to LogicManager.
|
2. Upon receiving the RequirementMoveCommand object, LogicManager would then invoke the RequirementMoveCommand
class to pass the object received.
Once invoked, RequirementMoveCommand will perform the following checks on the
object received:
* Check if the degree requirement category specified exists in the application through getRequirementCategory
* Check if the module code(s) provided exists in the application through model.hasModuleCode
* Check if the module code(s) provided already been added to the degree requirement category
|
|
3. After passing all of the above checks, RequirementMoveCommand determines if the modules code(s) to be moved
belongs
to a single degree requirement category or from multiple degree requirement categories
4. If the module code(s) belongs to a single degree requirement category, RequirementMoveCommand will move all the
module code(s) specified at once.
If the module code(s) belong to multiple degree requirement categories, RequirementMoveCommand will move the
module code(s) specified at one by one
5. In addition to adding module code(s) to the specified degree requirement category, the RequirementMoveCommand
class
also saves the current database state through commitApplication (for undo/redo functions).
The sequence diagram below shows how this command interacts with the Logic components as described above.
|

3.6.2. Design Considerations
This section describes the various design considerations the taken when implementing the requirement_move
feature.
Aspect: To include a check to determine if the module code(s) specified come froms a single source degree requirement category
The table below shows a comparison between the two approaches that could have been implemented.
Approach |
Pros |
Cons |
1. Implementing to check if the module code(s) comes from a single source |
|
|
2. Not implementing to check if the module code(s) comes from a single source |
|
|
After evaluating the pros and cons of both approaches, we have decided to implement Approach 1.
The main reason is that it has a slight performance boost for the application as all the module code(s) can be moved together at once, reducing the overall overhead.
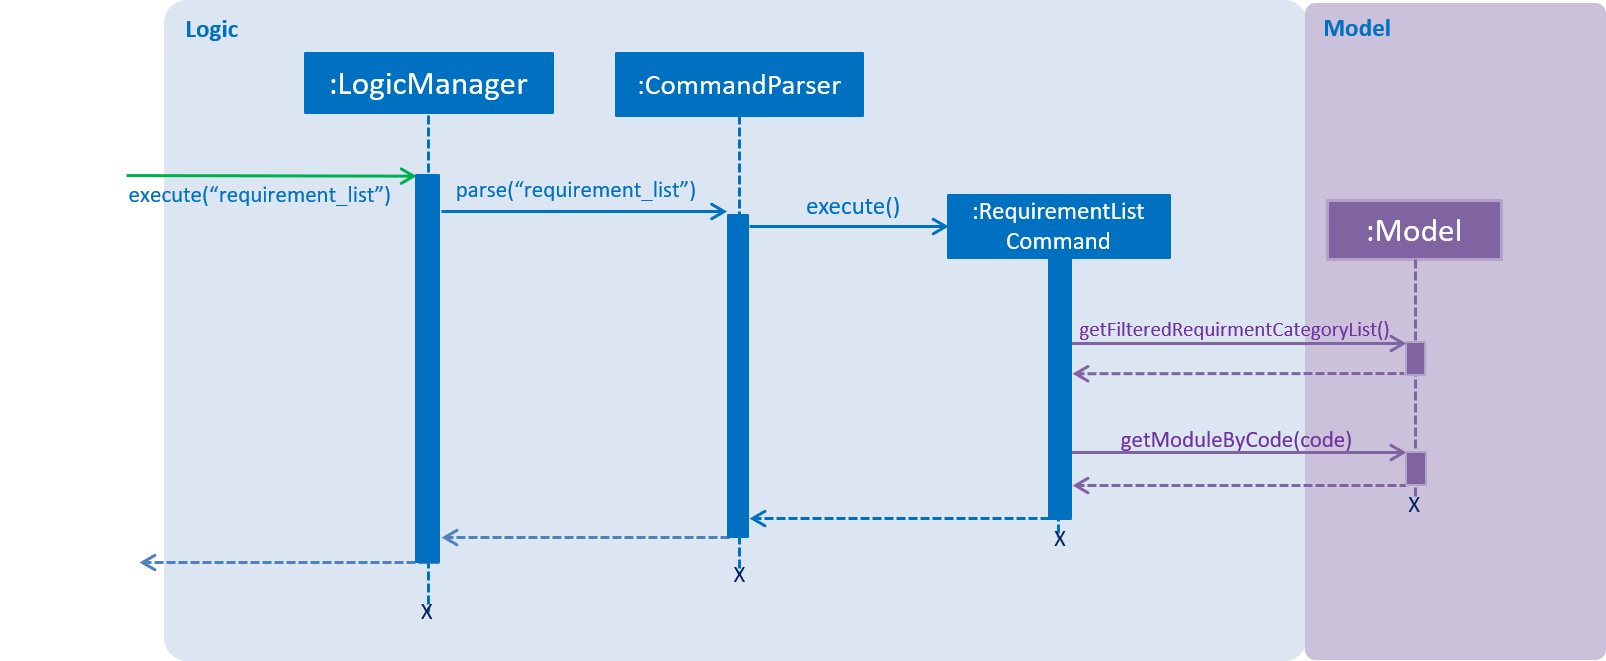
3.7. Requirement List Feature
The requirement list feature in the application allow users to display all requirement categories and the module code(s) that have been added to the requirement categories.
3.7.1. Current implementation
The requirement_list command requires no additional input other than the command itself.
When the user executes the requirement_list command, the following steps are taken by the the application.
1. The CommandParser invokes the RequirementListCommand class
2. When the RequirementListCommand class is invoked, it will perform the following actions before displaying the
output to the user:
-
Obtain a list of all the requirement categories and the modules added to each requirement category in the application through
getFilteredRequirementCategoryList -
Obtain the module credit information for every module added into each requirement category through
getModuleByCode
3. Once the information has been populated, the application will then display all requirement categories, the current credit count for each requirement category as well as the module(s) added to each requirement category.
|
If there are no modules added to a requirement category, the application will display |
The sequence diagram below shows the interaction with the Logic components as described above.
|
You can click on the image below, so that it is enlarged in a new tab (only works on github) |
3.7.2. Design Considerations
This section describes the various design considerations the taken when implementing the requirement_list
feature.
Aspect: Tracking the current amount of credits in a requirement category
The table below shows a comparison between the two approaches that could have been implemented.
Approach |
Pros |
Cons |
1. Creating a dedicated attribute to track the current amount credits of a requirement category |
|
|
2. Calculating the current amount of credits of a requirement category when needed |
|
|
After evaluating the pros and cons of both approaches, the group decided that Approach 2 was to be implemented.
The determining factor was that the module’s credits can be easily obtain. Hence the current amount of credits for a particular requirement category can be easily calculated as and when needed.
Furthermore, when a module’s credits is changed, we have to ensure that the information in the requirement category storage file is updated as well. Which is hard to maintain as the requirement category containing the module code must first be retrieved for the attribute to be updated.
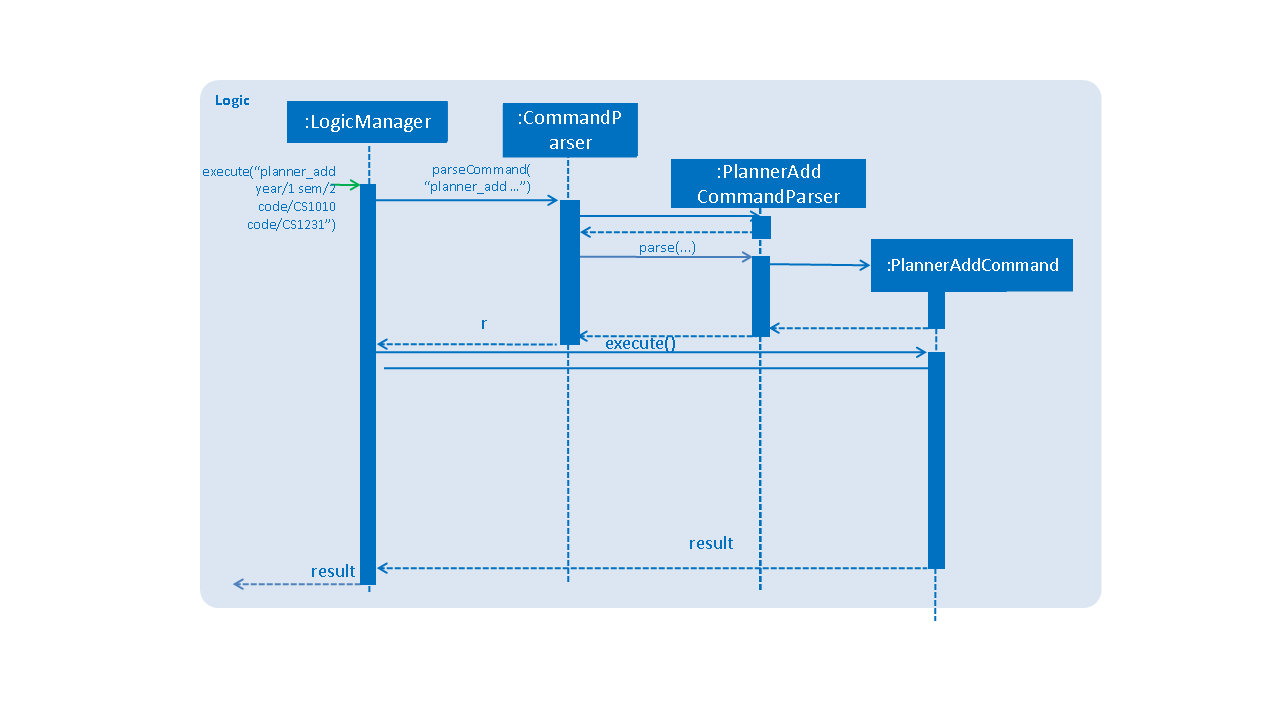
3.8. Planner Add Feature
The planner_add command in PWE is used to add module code(s) to the degree plan.
3.8.1. Current implementation
The planner_add command requires the PlannerAddCommandParser class to parse the user input provided. The
parsed data will then be passed to the PlannerAddCommand class.
The input should contain the year and semester of the degree plan as well as the module code(s) to be added.
PlannerAddCommandParser will throw an error if the user input does not match the command format.
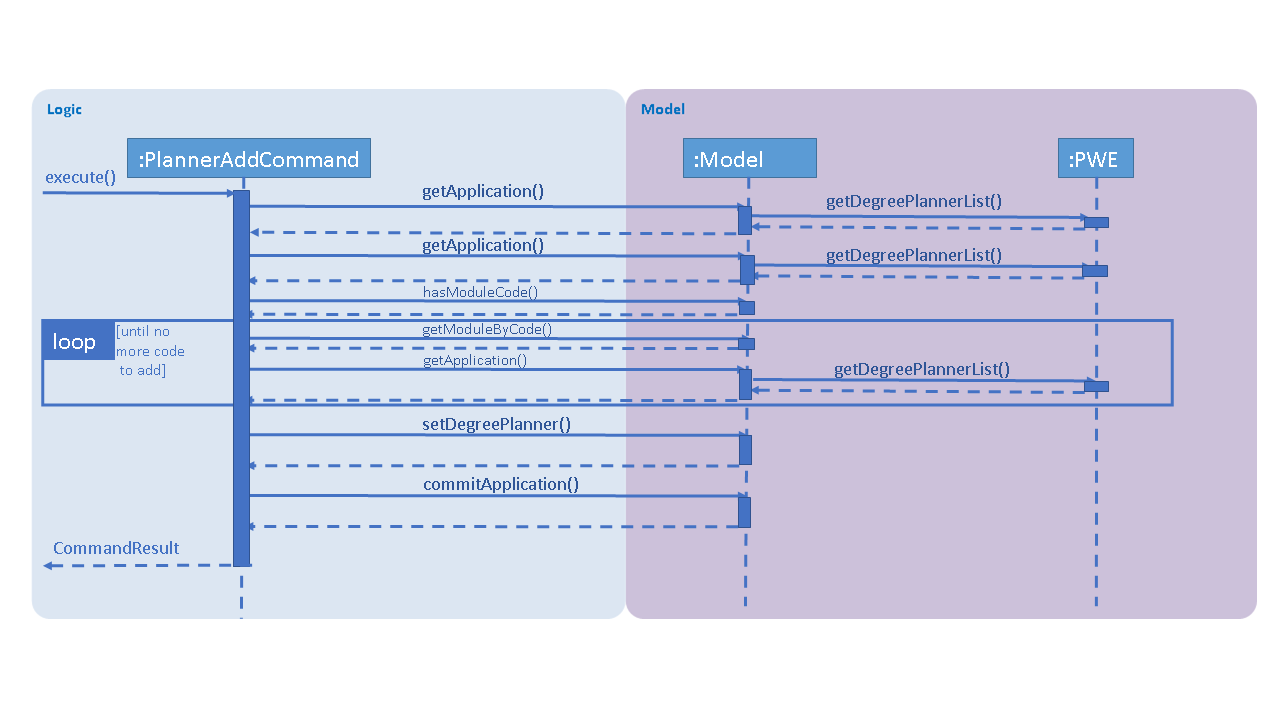
When PlannerAddCommand receives the parsed data, it will perform the following checks:
-
Check if the year and semester exist in the degree plan
-
Check if the module codes provided exist in PWE through
model.hasModuleCode -
Check if the module codes have already been added to the degree plan
-
Check if the co-requisites of modules provided already exist in other semesters of the degree plan
PlannerAddCommand will throw an error if any of the above checks fails.
After passing all of the above checks, PlannerAddCommand updates the context in ModelManager through
setDegreePlanner.
In addition to adding module code(s) to the degree plan, the PlannerAddCommand class also saves the
current database state through commitApplication (for undo/redo functions).
3.8.2. Design Considerations
Aspect: Choice of whether to deal with certain possible errors when the application gets modified.
-
Alternative 1 (current choice): Checking for invalid co-requisites as well as non-existent year and semester in degree plan.
Pros |
Software is more secure against possible errors. |
Cons |
Harder to maintain. |
-
Alternative 2: Skipping checks for invalid co-requisites as well as non-existent year and semester in degree plan.
Pros |
Easier to maintain. |
Cons |
When certain parts of the software get modified, some errors may occur with this command. For instance, a user may use |
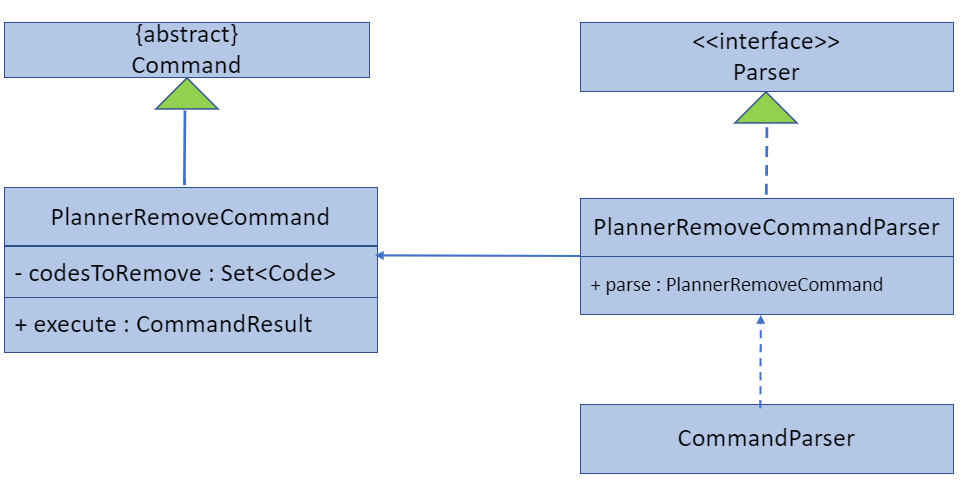
3.9. Planner Remove Feature
The planner_remove command in PWE is used to remove module code(s) from the degree plan.
3.9.1. Current implementation
The planner_remove command requires the PlannerRemoveCommandParser class to parse the user input provided. The
parsed data will then be passed to the PlannerRemoveCommand class.
The input should contain the module code(s) to be removed.
PlannerRemoveCommandParser will throw an error if the user input does not match the command format.
When PlannerRemoveCommand receives the parsed data, it will perform the following checks:
-
Check if the module codes to remove exist in the degree plan.
PlannerRemoveCommand will throw an error if any of the above checks fails.
After passing all of the above checks, PlannerRemoveCommand updates the context in ModelManager through
setDegreePlanner.
In addition to removing module code(s) from the degree plan, the PlannerRemoveCommand class also saves the
current database state through commitApplication (for undo/redo functions).
3.9.2. Design Considerations
Aspect: Choice of whether to use getDegreePlannerByCode method for removing module codes.
-
Alternative 1 (current choice): Looping through all semesters of the degree plan instead of using
getDegreePlannerByCodeto identify the relevant semesters of the codes to remove.
Pros |
Simpler code. |
Cons |
May loop through extra semesters when there are few module codes to remove. |
-
Alternative 2: Using
getDegreePlannerByCodemethod to identify the relevant semesters containing the code to remove. Removing the codes in the selected semester only.
Pros |
When there are few module codes to remove, the method may incur in slightly less overhead. |
Cons |
When there are N modules to remove, while the current method only needs 16 (total number of semesters) outer loops,
this alternative method needs N outer loops. Moreover, |
3.10. Planner Move Feature
The planner_move command aims to provide functionality for users to move a module between academic semesters in the
degree plan along with its co-requisites.
This section shares the implementation and design considerations made during the enhancement of the planner_move
feature.
3.10.1. Overview
As the users often encounter situations where they decide to take the modules in other semesters after they have
completed their degree planning, the planner_move feature is essential to have.
Current planner_move feature supports the moving of a module along with its co-requisites given the module and
its co-requisites are offered in the semester the users wants to move to.
3.10.2. Current Implementation
When a user execute the planner_move command (e.g. planner_move year/1 sem/2 code/CS1010), the following steps
are taken by the application.
Given below is a sequence diagram for moving a module that illustrates the interactions among PlannerMoveCommand,
PlannerMoveCommandParser and Model:
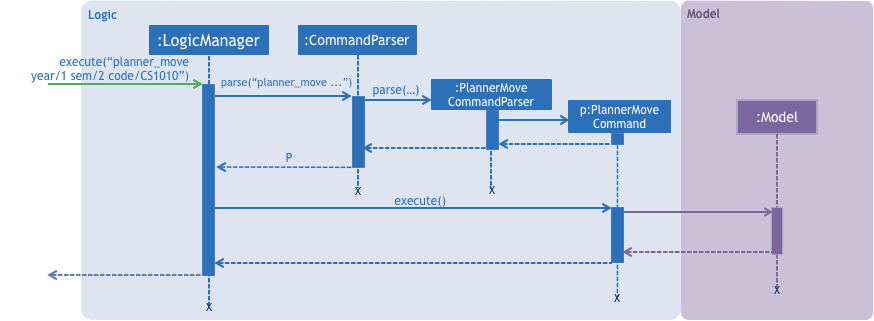
Step 1. The PlannerMoveCommandParser#parse method is invoked. The PlannerMoveCommandParser receives the command with
the arguments as a string.
Step 2. The PlannerMoveCommandParser parses the text related to each PREFIX and constructs the PlannerMoveCommand
. If more than one of each kind of PREFIX (e.g. year/1 sem/2 code/CS1231 code/CS1010) is provided, only text related
to last of each PREFIX (e.g. year/1 sem/2 code/CS1010) will be parsed.
|
Step 3. The PlannerMoveCommand with YEAR, SEMESTER and CODE specified by the user is returned.
Step 4. The PlannerMoveCommand#execute method is invoked.
Given below is a sequence diagram that illustrates the interactions among PlannerMoveCommand, Model and
Application:
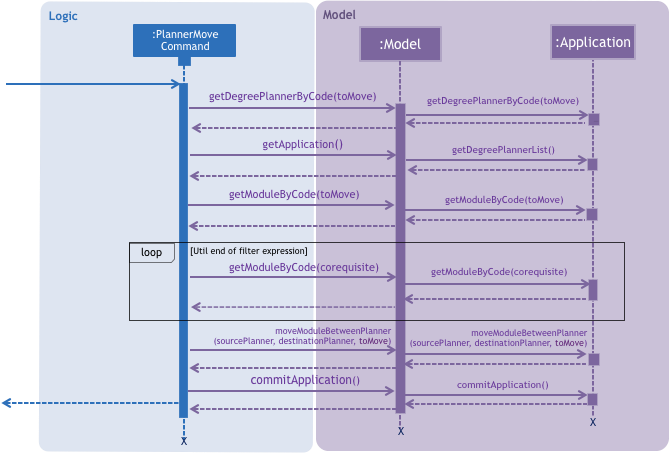
During this step, the following methods are carried out in the order:
-
The
getDegreePlannerByCodemethod will be called to check if there exists any academic semester in degree plan that has the parsed module code. -
The
getApplicationmethod will be called followed by thegetDegreePlannerListmethod will be called by the model to retrieve the list of academic semesters available in the degree plan. Then,filterwill be carried out with the help ofDegreePlanner#isSameDegreePlannerto locate the academic semester the user wants to move the module to.
|
|
-
The
getModuleByCodemethod will be called to returnModuleobject having the codetoMove. Then, theModuleobject will be used to retrieve the semesters the module is available in with thegetSemestersmethod to check if the module is offered in the academic semester the user is trying to move to. -
The
getModuleByCodemethod will be called in a loop during thefilterto find out all the module’s co-requisites not offered in the academic semester the user is trying to move to.
|
Any violations in the checks will result in throwing of an error message. |
Step 5. The Model is updated.
|
Step 6. A CommandResult object is returned.
3.10.3. Design Considerations
Aspect: How should searching of the degree plan based on the year and the semester provided to be done
-
Alternative 1 (current choice): Construct
DegreePlannerobject with the year and the semester provided and useDegreePlanner#isSameDegreePlannerto compare and search for the corresponding degree plan.
Pros |
There is no need to create any method that may create unnecessary coupling. |
Cons |
There is a need to create a |
-
Alternative 2: Create
getDegreePlannermethod which retrievesDegreePlannerobject based on the year and the semester provided.
Pros |
Easy to implement. |
Cons |
The method will create unnecessary couplings between |
3.11. Planner Show Feature
Planner show feature aims to help users to be able to easily locate and display any academic semesters in the degree plan which is in our application. We support the displaying of degree planners based on year, semester and boolean expressions. This enables our users to display only specific academic semesters in the degree plan that they want.
3.11.1. Overview
When a user invokes the planner_show command. (e.g. planner_show y/YEAR && s/SEMESTER), the following steps
are taken by the program.
-
Extract the text related to
planner_showcommand (e.g.y/YEAR && s/SEMESTER) -
Parse the text related to each
PREFIXindividually. -
Return a composite predicate for all attributes.
Step 1 is performed by the ApplicationParser class.
Step 2 and 3 are performed by BooleanExpressionParser#parse.
3.11.2. Current Implementation
-
Show degree planner(s) by year i.e.
planner_show y/YEARreturns degree planner(s) having its year matches the year given -
Show degree planner(s) by semester i.e.
planner_show s/SEMESTERreturns degree planner(s) having its semester matches the semester given -
include
yearandsemesterattributes in oneplanner_showcommand and list degree planner(s) i.e.planner_show y/YEAR s/SEMESTERreturns module having its year or semester matches the given year and semester
3.11.3. Design Considerations
Aspect: How to parse multiple attributes
-
Alternative 1 (current choice): Parse the text related to each
PREFIXindividually usingBooleanExpressionParser
Pros |
User is able to have more flexible search. |
Cons |
More time and work needed for developer to implement. |
-
Alternative 2: Parse the text related to each
PREFIXat one go without usingBooleanExpressionParser
Pros |
Easy to implement. |
Cons |
Additional overhead needed and inconsistent in the application’s commands since |
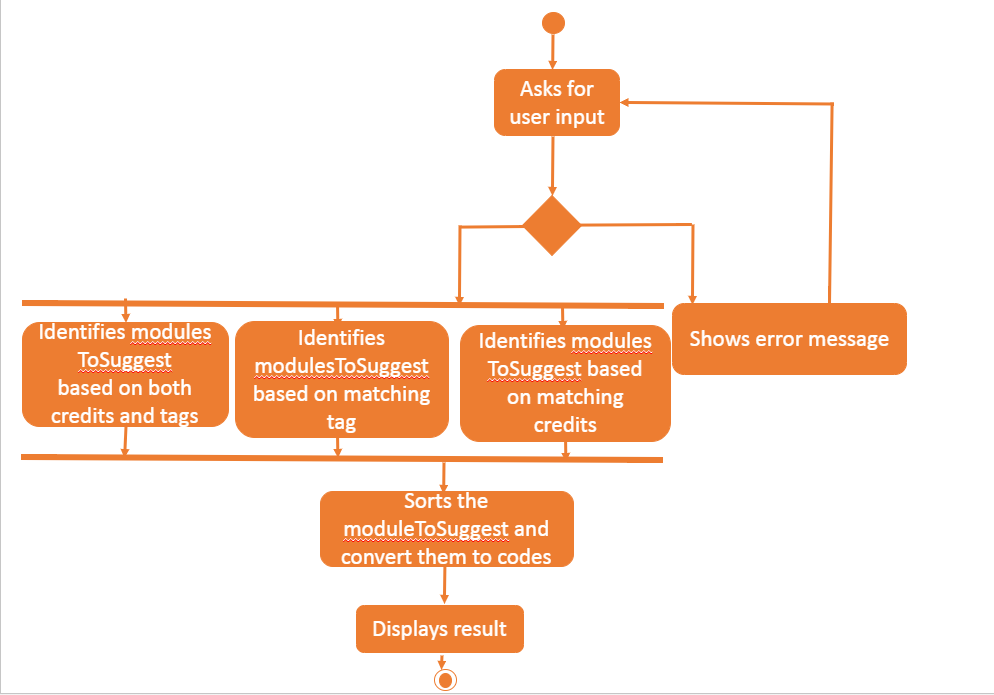
3.12. Planner Suggest Feature
The planner_suggest command in PWE is used to suggest module code(s) to add to the degree plan.
3.12.1. Current implementation
The planner_suggest command requires the PlannerSuggestCommandParser class to parse the user input provided. The
parsed data will then be passed to the PlannerSuggestCommand class.
The input should contain the desirable credits. Another optional input is the desirable tags.
PlannerSuggestCommandParser will throw an error if the user input does not match the command format.
After passing the above check, PlannerSuggestCommand will make the result box display 3 lists of modules. The first list
is the main recommendation list that sorts the modules in a specific way and displays maximum 10 most recommended modules.
The second and the third list respectively displays the modules with matching tags and modules with matching credits. The
modules in the two lists should also exist in the main recommendation list.
If tag is supplied as a parameter in input, modules will be sorted according to tags first. Modules with greater number
of tags that match the desirable tags will be prioritized. If tie, modules with credits closer to the desirable credits
will be prioritized. If tie again, modules will be sorted according to alphabetical order.
3.12.2. Design Considerations
Aspect: Choice of where to put ModuleToSuggest class.
-
Alternative 1 (current choice): Put
ModuleToSuggestas inner class ofPlannerSuggestCommandclass.
Pros |
Cleaner model for the Application. |
Cons |
The inner class has access to the private and protected members of the outer class, which can be unnecessary. |
-
Alternative 2: Put
ModuleToSuggestas a separate class apart fromPlannerSuggestCommandclass.
Pros |
Better encapsulation for |
Cons |
As no other class needs to access the |
3.13. Logging
We are using java.util.logging package for logging. The LogsCenter class is used to manage the logging levels and logging destinations.
-
The logging level can be controlled using the
logLevelsetting in the configuration file (See Section 3.14, “Configuration”) -
The
Loggerfor a class can be obtained usingLogsCenter.getLogger(Class)which will log messages according to the specified logging level -
Currently log messages are output through:
Consoleand to a.logfile.
Logging Levels
-
SEVERE: Critical problem detected which may possibly cause the termination of the application -
WARNING: Can continue, but with caution -
INFO: Information showing the noteworthy actions by the App -
FINE: Details that is not usually noteworthy but may be useful in debugging e.g. print the actual list instead of just its size
3.14. Configuration
Certain properties of the application can be controlled (e.g user prefs file location, logging level) through the configuration file (default: config.json).
4. Documentation
We use asciidoc for writing documentation.
| We chose asciidoc over Markdown because asciidoc, although a bit more complex than Markdown, provides more flexibility in formatting. |
4.1. Editing Documentation
See UsingGradle.adoc to learn how to render .adoc files locally to preview the end result of your edits.
Alternatively, you can download the AsciiDoc plugin for IntelliJ, which allows you to preview the changes you have made to your .adoc files in real-time.
4.2. Publishing Documentation
See UsingTravis.adoc to learn how to deploy GitHub Pages using Travis.
4.3. Converting Documentation to PDF format
We use Google Chrome for converting documentation to PDF format, as Chrome’s PDF engine preserves hyperlinks used in webpages.
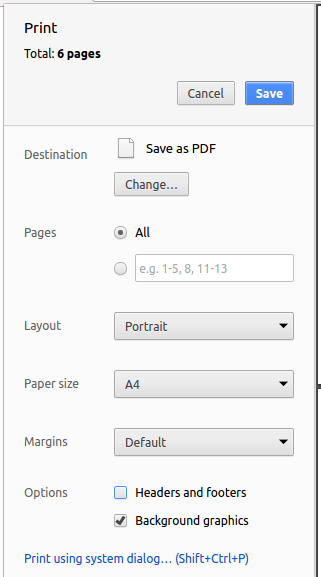
Here are the steps to convert the project documentation files to PDF format.
-
Follow the instructions in UsingGradle.adoc to convert the AsciiDoc files in the
docs/directory to HTML format. -
Go to your generated HTML files in the
build/docsfolder, right click on them and selectOpen with→Google Chrome. -
Within Chrome, click on the
Printoption in Chrome’s menu. -
Set the destination to
Save as PDF, then clickSaveto save a copy of the file in PDF format. For best results, use the settings indicated in the screenshot below.
4.4. Site-wide Documentation Settings
The build.gradle file specifies some project-specific asciidoc attributes which affects how all documentation files within this project are rendered.
Attributes left unset in the build.gradle file will use their default value, if any.
|
| Attribute name | Description | Default value |
|---|---|---|
|
The name of the website. If set, the name will be displayed near the top of the page. |
not set |
|
URL to the site’s repository on GitHub. Setting this will add a "View on GitHub" link in the navigation bar. |
not set |
|
Define this attribute if the project is an official SE-EDU project. This will render the SE-EDU navigation bar at the top of the page, and add some SE-EDU-specific navigation items. |
not set |
4.5. Per-file Documentation Settings
Each .adoc file may also specify some file-specific asciidoc attributes which affects how the file is rendered.
Asciidoctor’s built-in attributes may be specified and used as well.
Attributes left unset in .adoc files will use their default value, if any.
|
| Attribute name | Description | Default value |
|---|---|---|
|
Site section that the document belongs to.
This will cause the associated item in the navigation bar to be highlighted.
One of: * Official SE-EDU projects only |
not set |
|
Set this attribute to remove the site navigation bar. |
not set |
4.6. Site Template
The files in docs/stylesheets are the CSS stylesheets of the site.
You can modify them to change some properties of the site’s design.
The files in docs/templates controls the rendering of .adoc files into HTML5.
These template files are written in a mixture of Ruby and Slim.
|
Modifying the template files in |
5. Testing
5.1. Running Tests
There are three ways to run tests.
| The most reliable way to run tests is the 3rd one. The first two methods might fail some GUI tests due to platform/resolution-specific idiosyncrasies. |
Method 1: Using IntelliJ JUnit test runner
-
To run all tests, right-click on the
src/test/javafolder and chooseRun 'All Tests' -
To run a subset of tests, you can right-click on a test package, test class, or a test and choose
Run 'ABC'
Method 2: Using Gradle
-
Open a console and run the command
gradlew clean allTests(Mac/Linux:./gradlew clean allTests)
| See UsingGradle.adoc for more info on how to run tests using Gradle. |
Method 3: Using Gradle (headless)
Thanks to the TestFX library we use, our GUI tests can be run in the headless mode. In the headless mode, GUI tests do not show up on the screen. That means the developer can do other things on the Computer while the tests are running.
To run tests in headless mode, open a console and run the command gradlew clean headless allTests (Mac/Linux: ./gradlew clean headless allTests)
5.2. Types of tests
We have two types of tests:
-
GUI Tests - These are tests involving the GUI. They include,
-
System Tests that test the entire App by simulating user actions on the GUI. These are in the
systemtestspackage. -
Unit tests that test the individual components. These are in
pwe.planner.uipackage.
-
-
Non-GUI Tests - These are tests not involving the GUI. They include,
-
Unit tests targeting the lowest level methods/classes.
e.g.pwe.planner.commons.StringUtilTest -
Integration tests that are checking the integration of multiple code units (those code units are assumed to be working).
e.g.pwe.planner.storage.StorageManagerTest -
Hybrids of unit and integration tests. These test are checking multiple code units as well as how the are connected together.
e.g.pwe.planner.logic.LogicManagerTest
-
5.3. Troubleshooting Testing
Problem: HelpWindowTest fails with a NullPointerException.
-
Reason: One of its dependencies,
HelpWindow.htmlinsrc/main/resources/docsis missing. -
Solution: Execute Gradle task
processResources.
Problem: Keyboard and mouse movements are not simulated on macOS Mojave, resulting in GUI Tests failure.
-
Reason: From macOS Mojave onwards, applications without
Accessibilitypermission cannot simulate certain keyboard and mouse movements. -
Solution: Open
System Preferences, clickSecurity and Privacy→Privacy→Accessibility, and check the box besideIntellij IDEA.
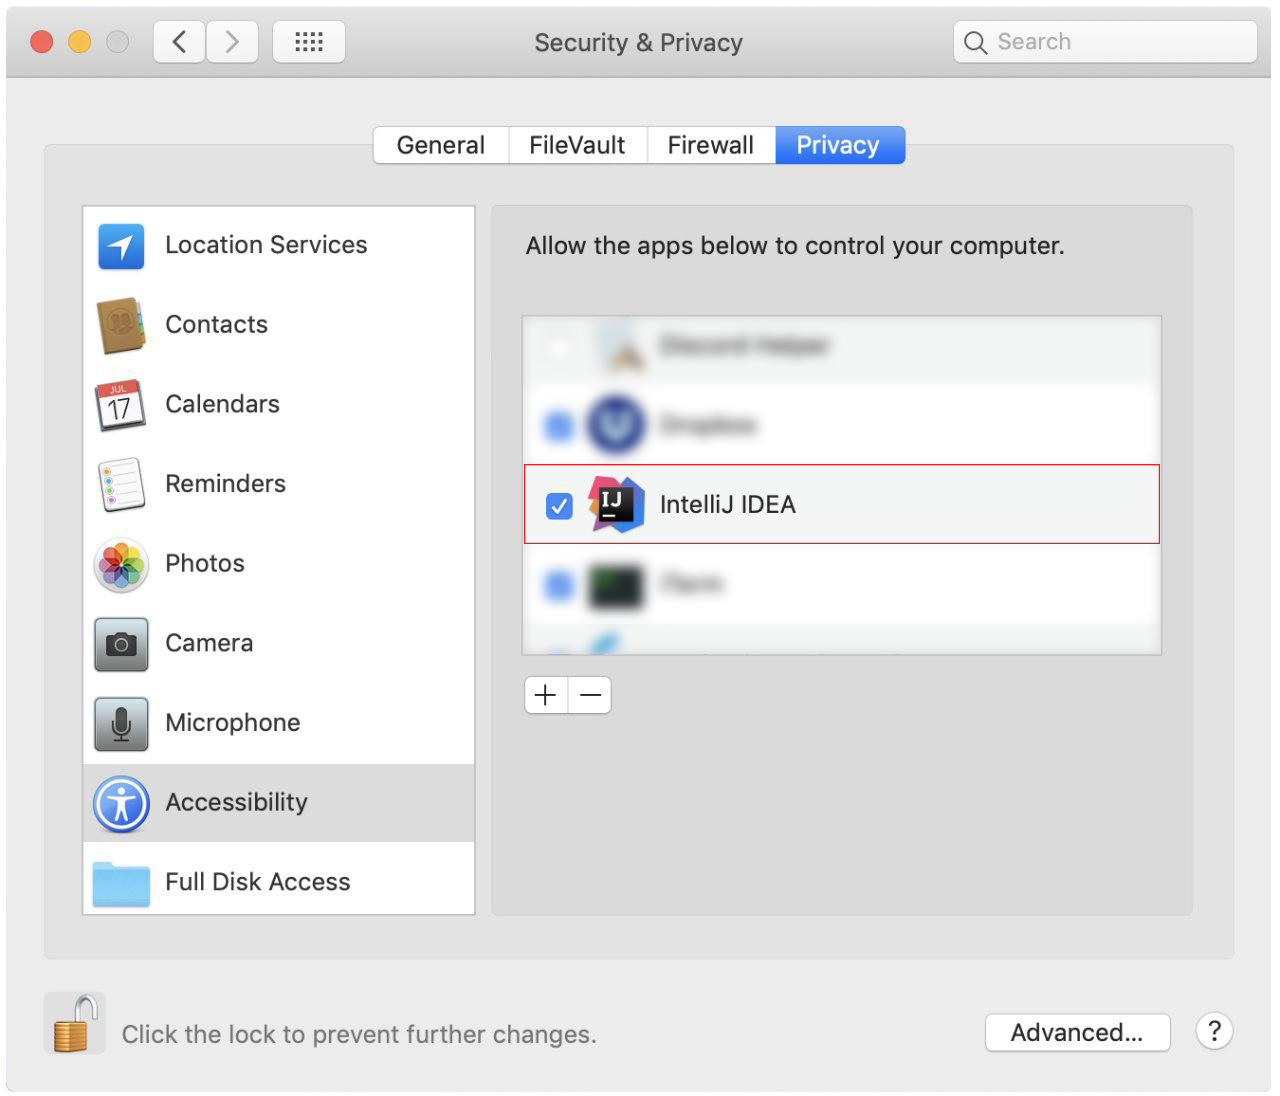
Accessibility permission is granted to IntelliJ IDEA6. Dev Ops
6.1. Build Automation
See UsingGradle.adoc to learn how to use Gradle for build automation.
6.2. Continuous Integration
We use Travis CI and AppVeyor to perform Continuous Integration on our projects. See UsingTravis.adoc and UsingAppVeyor.adoc for more details.
6.3. Coverage Reporting
We use Coveralls to track the code coverage of our projects. See UsingCoveralls.adoc for more details.
6.4. Documentation Previews
When a pull request has changes to asciidoc files, you can use Netlify to see a preview of how the HTML version of those asciidoc files will look like when the pull request is merged. See UsingNetlify.adoc for more details.
6.5. Making a Release
Here are the steps to create a new release.
-
Update the version number in
MainApp.java. -
Generate a JAR file using Gradle.
-
Tag the repo with the version number. e.g.
v0.1 -
Create a new release using GitHub and upload the JAR file you created.
6.6. Managing Dependencies
A project often depends on third-party libraries. For example, PlanWithEase depends on the Jackson library for JSON parsing. Managing these dependencies can be automated using Gradle. For example, Gradle can download the dependencies automatically, which is better than these alternatives:
-
Include those libraries in the repo (this bloats the repo size)
-
Require developers to download those libraries manually (this creates extra work for developers)
Appendix A: Product Scope
Target user profile:
-
National University of Singapore (NUS) Information Security freshmen
-
does not plan to undertake special programs such as NOC, BComp Dissertation, Co-Op programme, etc.
-
has a need to plan modules to be taken during University life
-
prefer desktop apps over other types
-
can type fast
-
prefers typing over other means of input
-
is reasonably comfortable using CLI apps
Value proposition:
-
Helps information security freshman plan their modules quickly and more conveniently.
-
Automatically check module pre-requisites to avoid module conflicts.
-
Provide an informed decision so that information security freshmen are able to decide which module to take at which semester.
Appendix B: User Stories
Priorities: High (must have) - * * *, Medium (nice to have) - * *, Low (unlikely to have) - *
| Priority | As a … | I want to … | So that I can… |
|---|---|---|---|
|
user |
add modules |
keep a list of modules that I want to take |
|
user |
delete modules |
remove modules that I am not interested in taking |
|
user |
edit modules |
edit the modules' details if there are any changes |
|
user |
list all modules |
have an overview of all the modules that are added |
|
user |
find modules that are already added |
know if I have previously added them |
|
user |
mark modules that are exempted |
keep track of exempted modules |
|
user |
add modules into my degree plan |
know which modules to bid/take in future |
|
user |
remove modules from my degree plan |
remove modules that I am not interested in taking |
|
user |
move my modules to other academic semester in my degree plan |
update my plan if there are any changes |
|
user |
mark those modules that are exempted in the module plan |
keep track of exempted modules |
|
user |
list my degree planner |
have an overview of my current plan |
|
user |
add module codes into different degree requirement categories |
classify the modules according to their categories |
|
user |
remove module codes from the degree requirement categories |
remove them if I made a mistake |
|
user |
move modules codes from a degree requirement categories to another |
easily move them around |
|
user |
see all the degree requirement categories |
get an overview of what modules fall under what categories |
|
user |
undo my previous command |
easily revert back if a command was entered wrongly |
|
user |
redo my previous command |
reverse my undo command if I have changed my opinion |
|
user |
choose to overload/underload modules in a semester |
manage my workload better |
|
user |
know the modules to put inside the degree plan |
find out the suitable modules to take easily |
|
user |
generate my own module plan |
easily plan which modules to take during university life |
|
user |
export my data from the application |
reuse the existing data on other devices |
|
user |
import existing data into application |
utilise existing data that was previously created |
Appendix C: Use Cases
(For all use cases below, the System is the PlanWithEase Application and the Actor is the user, unless
specified otherwise)
Use Case: Clear All Modules in Application
MSS
-
User requests to clear all modules in the module list
-
Application clear all modules in the module list
Use case ends.
Extensions
-
None
Use case: Add a Module to Module List
MSS
-
User requests to add a module to the module list
-
Application adds the module into the module list
Use case ends.
Extensions
-
1a. The given input is invalid.
-
1a1. Application shows an error message that given input is invalid.
Use case ends.
-
-
1b. The module already exists in the module list.
-
1b1. Application shows an error message that module specified by user already exists in module list.
Use case ends.
-
-
1c. The module to be added has a corequisite that does not exists in the module list.
-
1c1. Application shows an error message that module specified by user has a non-existent corequisite.
Use case ends.
-
-
1d. The module to be added has a corequisite that exists in the degree plan.
-
1d1. Application shows an error message that module specified by user has a corequisite that exists in the degree plan.
Use case ends.
-
Use Case: Edit a Module in Application
MSS
-
User requests to list modules
-
Application shows a list of modules
-
User requests to edit a specific module in the module list
-
Application update the module in the module list
Use case ends.
Extensions
-
2a. The list is empty.
Use case ends.
-
3a. The given index is invalid.
-
3a1. Application shows an error message.
Use case resumes at step 2.
-
-
3b. The module already exists in the module list.
-
3b1. Application shows an error message that module specified by user already exists in module list.
Use case ends.
-
Use Case: Delete a Module in Application
MSS
-
User requests to list modules
-
Application shows a list of modules
-
User requests to delete a specific module in the module list
-
Application deletes the module in the module list
Use case ends.
Extensions
-
2a. The list is empty.
Use case ends.
-
3a. The given index is invalid.
-
3a1. Application shows an error message.
Use case resumes at step 2.
-
Use Case: List All Modules in Application
MSS
-
User requests to list all modules in the module list
-
Application shows a list of all modules in the module list
Use case ends.
Extensions
-
None
Use case: Find a module in Application
Guarantee(s):
-
Modules will be listed if the input from the user is valid and can be matches the existing entries in the module list.
MSS
-
User requests to find modules with their keyword of choice.
-
Application shows a list of modules matched the keyword.
Use case ends.
Extensions
-
1a. The given input is invalid.
-
1a1. Application shows an error message that given input is invalid.
Use case ends.
-
Use case: Add module(s) to degree plan
MSS
-
User requests to add module(s) into the Application’s degree plan
-
Application adds the module(s) into the degree plan
Use case ends.
Extensions
-
1a. The given input is invalid.
-
1a1. Application shows an error message that given input is invalid.
Use case ends.
-
-
1b. The module(s) already exists in the degree plan.
-
1b1. Application shows an error message that the module(s) specified by user already exists in the degree plan.
Use case ends.
-
-
1c. The module(s) does not exist in the module list.
-
1c1. Application shows an error message that the module(s) specified by user does not exist in the module list.
Use case ends.
-
Use case: Remove module(s) from degree plan
MSS
-
User requests to list modules in the Application’s degree plan
-
Application shows a list of modules in the degree plan
-
User requests to remove module(s) from the degree plan
-
Application removes the module(s) from the degree plan
Use case ends.
Extensions
-
2a. The list is empty.
Use case ends.
-
3a. The given input is invalid.
-
3a1. Application shows an error message that given input is invalid.
Use case resumes from step 2.
-
-
3b. The module(s) does not exist in the degree plan.
-
3b1. Application shows an error message that the module(s) specified by user does not exist in the degree plan.
Use case resumes from step 2.
-
Use case: Move module between academic semesters in degree plan
MSS
-
User requests to move a specific module to another academic semester in the degree plan
-
Application updates the degree plan
Use case ends.
Extensions
-
1a. The specified academic semester is empty.
Use case ends.
-
1b. The given input is invalid.
-
1b1. Application shows an error message.
Use case ends.
-
-
1c. The module is already in the academic semester the user wants to move to.
Use case resumes at step 2.
Use case: List all degree planners
MSS
-
Student requests to list all the Application’s degree planners
-
Application shows a list of all the degree planners
Use case ends.
Use case: List a specific degree planner
MSS
-
Student requests to list a specific Application’s degree planner
-
Application shows a list of the specific degree planner
Use case ends.
Extensions
-
1a. The given input is invalid.
-
1a1. Application shows an error message that given input is invalid.
Use case resumes from step 1.
-
Use case: Identify modules to add to degree plan
Guarantee(s):
-
Modules will be listed if the input from the user is valid and can match the existing entries in the module list.
MSS
-
User requests to find modules to put inside the degree plan with their criteria of choice.
-
Application shows a list of modules sorted according to the given criteria, filtering off the modules already existing inside the degree plan.
Use case ends.
Extensions
-
1a. The given input is invalid.
-
1a1. Application shows an error message that given input is invalid.
Use case ends.
-
Use case: Add a module to degree requirement category
MSS
-
User requests to add a module into the Application’s degree requirement category
-
Application adds the module into the degree requirement category
Use case ends.
Extensions
-
1a. The given input is invalid.
-
1a1. Application shows an error message that given input is invalid.
Use case ends.
-
-
1b. The requirement category does not exist in the Application.
-
1b1. Application shows an error message that the requirement category specified by the user does not exist.
Use case ends.
-
-
1c. The module already exists in the degree requirement category.
-
1c1. Application shows an error message that module specified by user already exists in degree requirement category.
Use case ends.
-
Use case: Delete module from degree requirement category
MSS
-
User requests to delete a specific module in the degree requirement category
-
Application deletes the module in the degree requirement category
Use case ends.
Extensions
-
1a. The given input is invalid.
-
1a1. Application shows an error message that given input is invalid.
Use case ends.
-
-
1b. The requirement category does not exist in the Application.
-
1b1. Application shows an error message that the requirement category specified by the user does not exist.
Use case ends.
-
-
1c. The module does not exists in the specified degree requirement category.
-
1c1. Application shows an error message that module specified by user does not exist in degree requirement category.
Use case ends.
-
Use case: Move module in degree requirement category
MSS
-
User requests to list modules in the Application’s degree requirement category
-
Application shows a list of modules in the degree requirement category
-
User requests to move a specific module to another academic semester in the degree requirement category
-
Application update the degree requirement category
Use case ends.
Extensions
-
2a. The list is empty.
Use case ends.
-
3a. The given input is invalid.
-
3a1. Application shows an error message.
Use case resumes at step 2.
-
Use case: List all degree requirement categories
MSS
-
Student requests to list all the Application’s degree requirement categories
-
Application shows a list of all the degree requirement categories
Use case ends.
Extensions
-
None
Appendix D: Non Functional Requirements
-
The application should work on any mainstream OS as long as it has Java
9installed. -
The application should work on both 32-bit and 64-bit environments.
-
The application should work without requiring an installer.
-
The application should work without requiring an Internet connection.
-
The application should work should be able to hold up to 100 modules without a noticeable sluggishness in performance for typical usage.
-
For a user with above average typing speed for regular English text (i.e. not code, not system admin commands), he/she should be able to accomplish most of the tasks faster using commands than using the mouse.
-
The module and degree requirement information should be stored on the local filesystem and are able to be persisted across different runs of the application.
-
The application should have good user documentation, which details all aspects of the application to assist new users in learning how to use the application.
-
The application should have good developer documentation to allow new developers to understand the design of the application easily.
-
The application’s functionalities should be easily testable.
Appendix E: Glossary
- Mainstream OS
-
Windows, Linux, Unix, OS-X
- Overload
-
Taking above the workload of 22MC per academic semester
- Underload
-
Taking below the workload of 18MC per academic semester
- Degree planner
-
A planner that allows user to decide what modules to take during a specific academic semester
- Degree requirement category
-
A category that allows classifying of modules based on the University Requirement
Appendix F: Instructions for Manual Testing
Given below are instructions to test the app manually.
| These instructions only provide a starting point for testers to work on; testers are expected to do more exploratory testing. |
F.1. Launch and Shutdown
-
Initial launch
-
Download the jar file and copy into an empty folder
-
Double-click the jar file
Expected: Shows the GUI with a set of sample contacts. The window size may not be optimum.
-
-
Saving window preferences
-
Resize the window to an optimum size. Move the window to a different location. Close the window.
-
Re-launch the app by double-clicking the jar file.
Expected: The most recent window size and location is retained.
-
F.2. Adding a module
-
Adding a module while all modules are listed
-
Prerequisites: Populate module list with sample data using
resetcommand, then list all modules using thelistcommand. -
Test case:
add code/AA1111 name/ABC credits/4
Expected: New module (AA1111 ABC) is added into the module list. Details of the added module shown in the status message. Timestamp in the status bar is updated. -
Test case:
add code/CS1010 name/DEF credits/4
Expected: Module is not added into the module list (ModuleCS1010already exists in the module list). Error details shown in the status message. Status bar remains the same. -
Test case:
add code/AA1111 name/DEF credits/4
Expected: Module is not added into the module list (ModuleAA1111already exists in the module list). Error details shown in the status message. Status bar remains the same.
-
F.3. Editing a module
-
Editing a module while all modules are listed
-
Prerequisites: Populate module list with sample data using
resetcommand, then list all modules using thelistcommand. -
Test case:
edit 1 code/CS1111
Expected: Module code CS1010 is edited to CS1111 in the module list, requirement categories, degree plan. Details of the edited module shown in the status message. Timestamp in the status bar is updated. -
Test case:
edit 2 name/ABC
Expected: Module name of 2nd module in module list (CS1231 Discrete Structures) is edited to ABC in the module list and degree plan. Details of the edited module shown in the status message. Timestamp in the status bar is updated. -
Test case:
edit 5 coreq/
Expected: Module name of 5th module in module list (CS2101 Effective Communications for Computing Professionals) is edited to None in the module list. CS2113T’s co-requisites will also be updated to None. Details of the edited module shown in the status message. Timestamp in the status bar is updated. -
Test case:
edit 1 coreq/CS1231
Expected: Module is not edited, as moduleCS1010andCS1231are in different semesters of the degree plan, and hence cannot be updated to be co-requisites. Error details shown in the status message. Status bar remains the same.
-
F.4. Deleting a module
-
Deleting a module while all modules are listed
-
Prerequisites: Populate module list with sample data using
resetcommand, then list all modules using thelistcommand. -
Test case:
delete 1
Expected: First module (CS1010) is deleted from the module list and year 1 semester 1 of the degree plan. Details of the deleted module shown in the status message. Timestamp in the status bar is updated. -
Test case:
delete 5
Expected: Fifth module (CS2101) module is deleted from the module list and year 2 semester 1 of the degree plan. CS2113T module co-requisites is updated to None. Error details shown in the status message. Status bar remains the same. -
Test case:
delete 0
Expected: No module is deleted. Error details shown in the status message. Status bar remains the same. -
Other incorrect delete commands to try:
delete,delete x(where x is larger than the list size)
Expected: Similar to previous.
-
F.5. Adding module(s) to the degree plan
-
Adding valid module(s).
-
Prerequisites: Populate module list with sample data using
resetcommand, then list all modules using thelistcommand. -
Test case:
planner_add year/1 sem/1 code/CS1010 code/CS1231
Expected: Module codesCS1010andCS1231will be added to year 1 semester 1 of the degree plan.
-
-
Adding module(s) with bad bad parameters.
-
Prerequisites: Populate module list with sample data using
resetcommand, then list all modules using thelistcommand. -
Test case:
planner_add invalid/1 sem/1 code/CS1010 code/CS1231
Expected: Invalid command format.
-
-
Adding module(s) with invalid values.
-
Prerequisites: Populate module list with sample data using
resetcommand, then list all modules using thelistcommand. -
Test case:
planner_add year/-1 sem/1 code/CS1010 code/CS1231
Expected: A message that indicates the valid value range of year.
-
F.6. Removing module(s) from the degree plan
-
Removing valid module(s).
-
Prerequisites: List all academic semesters using the
planner_listcommand. -
Test case:
planner_remove code/CS1010 code/CS1231
Expected: Module codesCS1010andCS1231will be removed from the degree plan.
-
-
Removing module(s) with bad bad parameters.
-
Prerequisites: List all academic semesters using the
planner_listcommand. -
Test case:
planner_remove invalid/CS1010 code/CS1231
Expected: Invalid command format.
-
F.7. Using the degree plan to suggest module(s) to take
-
Suggesting valid module(s).
-
Prerequisites: Populate module list with sample data using
resetcommand, then list all modules using thelistcommand. -
Test case:
planner_suggest credits/1
Expected: Maximum 10 modules recommended in a specially sorted order. -
Test case:
planner_suggest credits/1 tag/maths
Expected: Maximum 10 modules recommended in a specially sorted order.
-
F.8. Find modules
-
Find modules in the module list using one parameter.
-
Prerequisites: Populate module list with sample data using
resetcommand, then list all modules using thelistcommand. -
Test case:
find name/programming
Expected: Module list will displays all the modules whose name containsprogramming.
Number of modules found is shown in the result box -
Test case:
find name/PROGRAMMING
Expected: Module list will displays all the modules whose name containsprogramming.
Number of modules found is shown in the result box.
This will have the same results as the previous test case. -
Test case:
find code/CS1231
Expected: Module list will displays all the modules whose code matchesCS1231.
Number of modules found is shown in the result box. -
Test case:
find credits/4
Expected: Module list will displays all the modules which assigned4modular credits.
Number of modules found is shown in the result box. -
Test case:
find tag/algorithm
Expected: Module list will displays all the modules which has the tagalgorithm.
Number of modules found is shown in the result box. -
Test case:
find sem/2
Expected: Module list will displays all modules offered in semesters2.
Number of modules found is shown in the result box.
-
-
Find modules in the module list using multiple parameters.
-
Prerequisites: Populate module list with sample data using
resetcommand, then list all modules using thelistcommand. -
Test case:
find name/programming || name/discrete
Expected: Module list will displays all the modules whose name containsprogrammingordiscrete.
Number of modules found is shown in the result box. -
Test case:
find name/discrete || name/programming
Expected: Module list will displays all the modules whose name containsprogrammingordiscrete.
Number of modules found is shown in the result box.
This will have the same results as the previous test case. -
Test case:
find name/programming && name/methodology
Expected: Module list will displays all the modules whose name containsprogrammingandmethodology.
Number of modules found is shown in the result box. -
Test case:
find name/programming && sem/2
Expected: Module list will displays all the modules whose name containsprogrammingand is offered in semester 2 only. -
Test case:
find (name/programming || name/algorithm) && sem/2Expected: Module list will displays all the module whose name contains eitherprogrammingoralgorithmand is offered in semesters 2.
Number of modules found is shown in the result box.
-
-
Find modules with bad parameters.
-
Prerequisites: Populate module list with sample data using
resetcommand, then list all modules using thelistcommand. -
Test case:
find nonExist/
Expected: Invalid command format!
A guide on how to use the command will be displayed in the result box.
-
-
Find modules with invalid values.
-
Prerequisites: Populate module list with sample data using
resetcommand, then list all modules using thelistcommand. -
Test case:
find code/ZZZZZZ
Expected: A guide on how the accepted value forcodewill be displayed in the result box.
-
F.9. Moving a module in the degree plan
-
Moving a module in the degree plan while all modules are listed
-
Prerequisites: List all academic semesters using the
planner_listcommand. All academic semesters present in the degree plan. Application is started with the sample data without any modification in the data. -
Test case:
planner_move year/1 sem/1 code/CS1010
Expected: CS1010 module remains in Year 1 Semester 1 of the degree plan. Success message will be shown in the status message. Timestamp in the status bar is updated. -
Test case:
planner_move year/1 sem/2 code/CS1010
Expected: CS1010 module is moved from Year 1 Semester 1 to Year 1 Semester 2 of the degree plan. Success message will be shown in the status message. Timestamp in the status bar is updated. -
Test case:
planner_move year/1 sem/2 code/CS2101
Expected: CS2101 module is moved along with its co-requisite CS2113T to Year 1 Semester 2 of the degree plan. Success message will be shown in the status message. Timestamp in the status bar is updated. -
Other incorrect
planner_movecommands to try:-
planner_move year/x sem/y code/CS1010(where x or y is larger than 4)
Expected: Error message is displayed. -
planner_move year/1 sem/3 code/CS2101
Expected: Error message is displayed since CS2101 module is not offered in semester 3 based on the module list.
-
-
F.10. Showing the academic semesters in the degree plan
-
Showing some academic semesters in the degree plan based on the condition
-
Prerequisites: List all academic semesters using the
planner_listcommand. All academic semesters present in the degree plan. -
Test case:
planner_show year/1
Expected: Only the academic semesters with year1are displayed. -
Test case:
planner_show sem/1
Expected: Only the academic semesters with semester1are displayed. -
Test case:
planner_show year/1 || year/2
Expected: Only the academic semesters with year1or year2are displayed. -
Test case:
planner_show sem/1 || sem/2
Expected: Only the academic semesters with semester1or semester2are displayed. -
Test case:
planner_show year/1 && ( sem/1 || sem2 )
Expected: Only the academic semesters with year1and semester 1 or semester 2 are displayed. -
Other incorrect
planner_showcommands to try:-
planner_show year/x, (where x is larger than 4)
Expected: Error message is displayed. -
planner_show sem/x, (where x is larger than 4)
Expected: Error message is displayed. -
planner_show sem/1 sem/2
Expected: Error message is displayed since there is no boolean expression in between. -
planner_show sem/1 ((,
Expected: Error message is displayed. -
planner_show sem/2 & yea/1,
Expected: Error message is displayed. -
planner_show sem/2 | yea/1,
Expected: Error message is displayed.
-
-
F.11. Listing all the academic semesters in the degree plan
-
Listing all the academic semesters in the degree plan when only some academic semesters are listed
-
Prerequisites: List some academic semesters using the
planner_showcommand (e.g.planner_show year/1). All academic semesters present in the degree plan. -
Test case:
planner_list
Expected: All the academic semesters are listed in the degree plan.
-
F.12. Degree Requirement Category
-
Adding a module to a degree requirement category
-
Prerequisites:
-
Create a new module using the
addcommand with the modular code ofCS9999 -
Ensure that the newly created module does not have corequisite of another module
-
The newly created module do not belong to any degree requirement categories
-
-
Test case:
requirement_add name/Computing Foundation code/CS9999
Expected: The module is added to the specified degree requirement category.
Details of the module added to the degree requirement category is shown in the application result box. -
Test case:
requirement_add name/Computing Foundation code/CS9999
This test case is to be tested after the above test case
Expected: Application displays an error message saying that the module is already in the degree requirement category
Details of the error message is shown in the application result box. -
Test case:
requirement_add name/Computing ddddd code/CS9999
Expected: Application displays an error message saying that the specified degree requirement category does not exist
Details of the error message is shown in the application result box.
-
-
Removing a module from the degree requirement category
-
Prerequisites:
-
Create a new module using the
addcommand with the modular code ofCS9999 -
Ensure that the newly created module does not have corequisite of another module
-
Add the newly created module to a degree requirement category
-
-
Test case:
requirement_remove code/CS9999
Expected: The module is removed from the degree requirement category. Details of the deleted module is shown in the application result box. -
Test case:
requirement_remove code/CS9999
This test case is to be tested after the above test case
Expected: Application displays an error message saying that the module does not exist in the degree requirement category
Details of the error message is shown in the application result box.
-
-
Moving a module to a degree requirement category
-
Prerequisites: Module to be moved must already be added to a degree requirement category.
-
Create a new module using the
addcommand with the modular code ofCS9999 -
Ensure that there no modules with the modular code of
CS9998in the application -
Ensure that the newly created module does not have corequisite of another module
-
Add the newly created module to a degree requirement category
-
-
Test case:
requirement_move name/Computing Breadth code/CS9999
Expected: The module is moved to the specified degree requirement category. Details of the moved module is shown in the application result box. -
Test case:
requirement_move name/Computing ddddd code/CS9999
Expected: Application displays an error message saying that the specified degree requirement category does not exist
Details of the error message is shown in the application result box. -
Test case:
requirement_move name/Computing Breadth code/CS9998
Expected: Application displays an error message saying that no such module exists in the application
Details of the error message is shown in the application result box.
-
-
Listing all the degree requirement category in the application
-
Prerequisites: NIL.
-
Test case:
requirement_list
Expected: All the degree requirement categories in the applications, including the current modular credit count and the module code(s) added to the degree requirement categories is listed in the application result box.
-