By: Team T09-1 Since: Feb 2019 Licence: MIT
1. Introduction
PlanWithEase (PWE) is an application designed to help National University of Singapore (NUS) Information Security freshmen in creating a comprehensive degree plan according to the degree requirements.
PWE is optimized for those who prefer using a Command Line Interface (CLI). The commands used to interact with PWE are designed to be simple and intuitive, so even those who are unfamiliar with CLI can use PWE with ease.
PWE also comes with a clean Graphical User Interface (GUI) that presents information in an organized manner.
Interested in using PWE to plan your degree easily? Jump to Section 3, “Quick Start” to get started!
2. Understanding This User Guide
2.1. Basic Information
This user guide provides a quick start guide for you to easily setup and install PlanWithEase.
You can find all the details of PlanWithEase's features, tips, frequently asked questions and a summary of the available commands.
To navigate between the different sections easily, you can use the Table of Contents above.
The following symbols are used throughout this user guide:
|
This symbol denotes information that you may want to take note of. |
|
This symbol denotes a tip which you may find useful when using our application. |
|
This symbol denotes a warning message which you need to be careful of when using our application. |
Additionally, you may also encounter the following text styles:
-
Commands, parameters and file paths will be in this
format -
Important messages will be bold
-
Undoable command will be in italics
-
Keyboard buttons will be referred to as such: F1
2.2. Navigating Around Our Application
PlanWithEase comes with a very clean and easy to use Graphical User Interface, so don’t worry even if you are a new user! You can expect to navigate around our application with ease!
PlanWithEase has five main sections that you’ll need to know before you get started!.
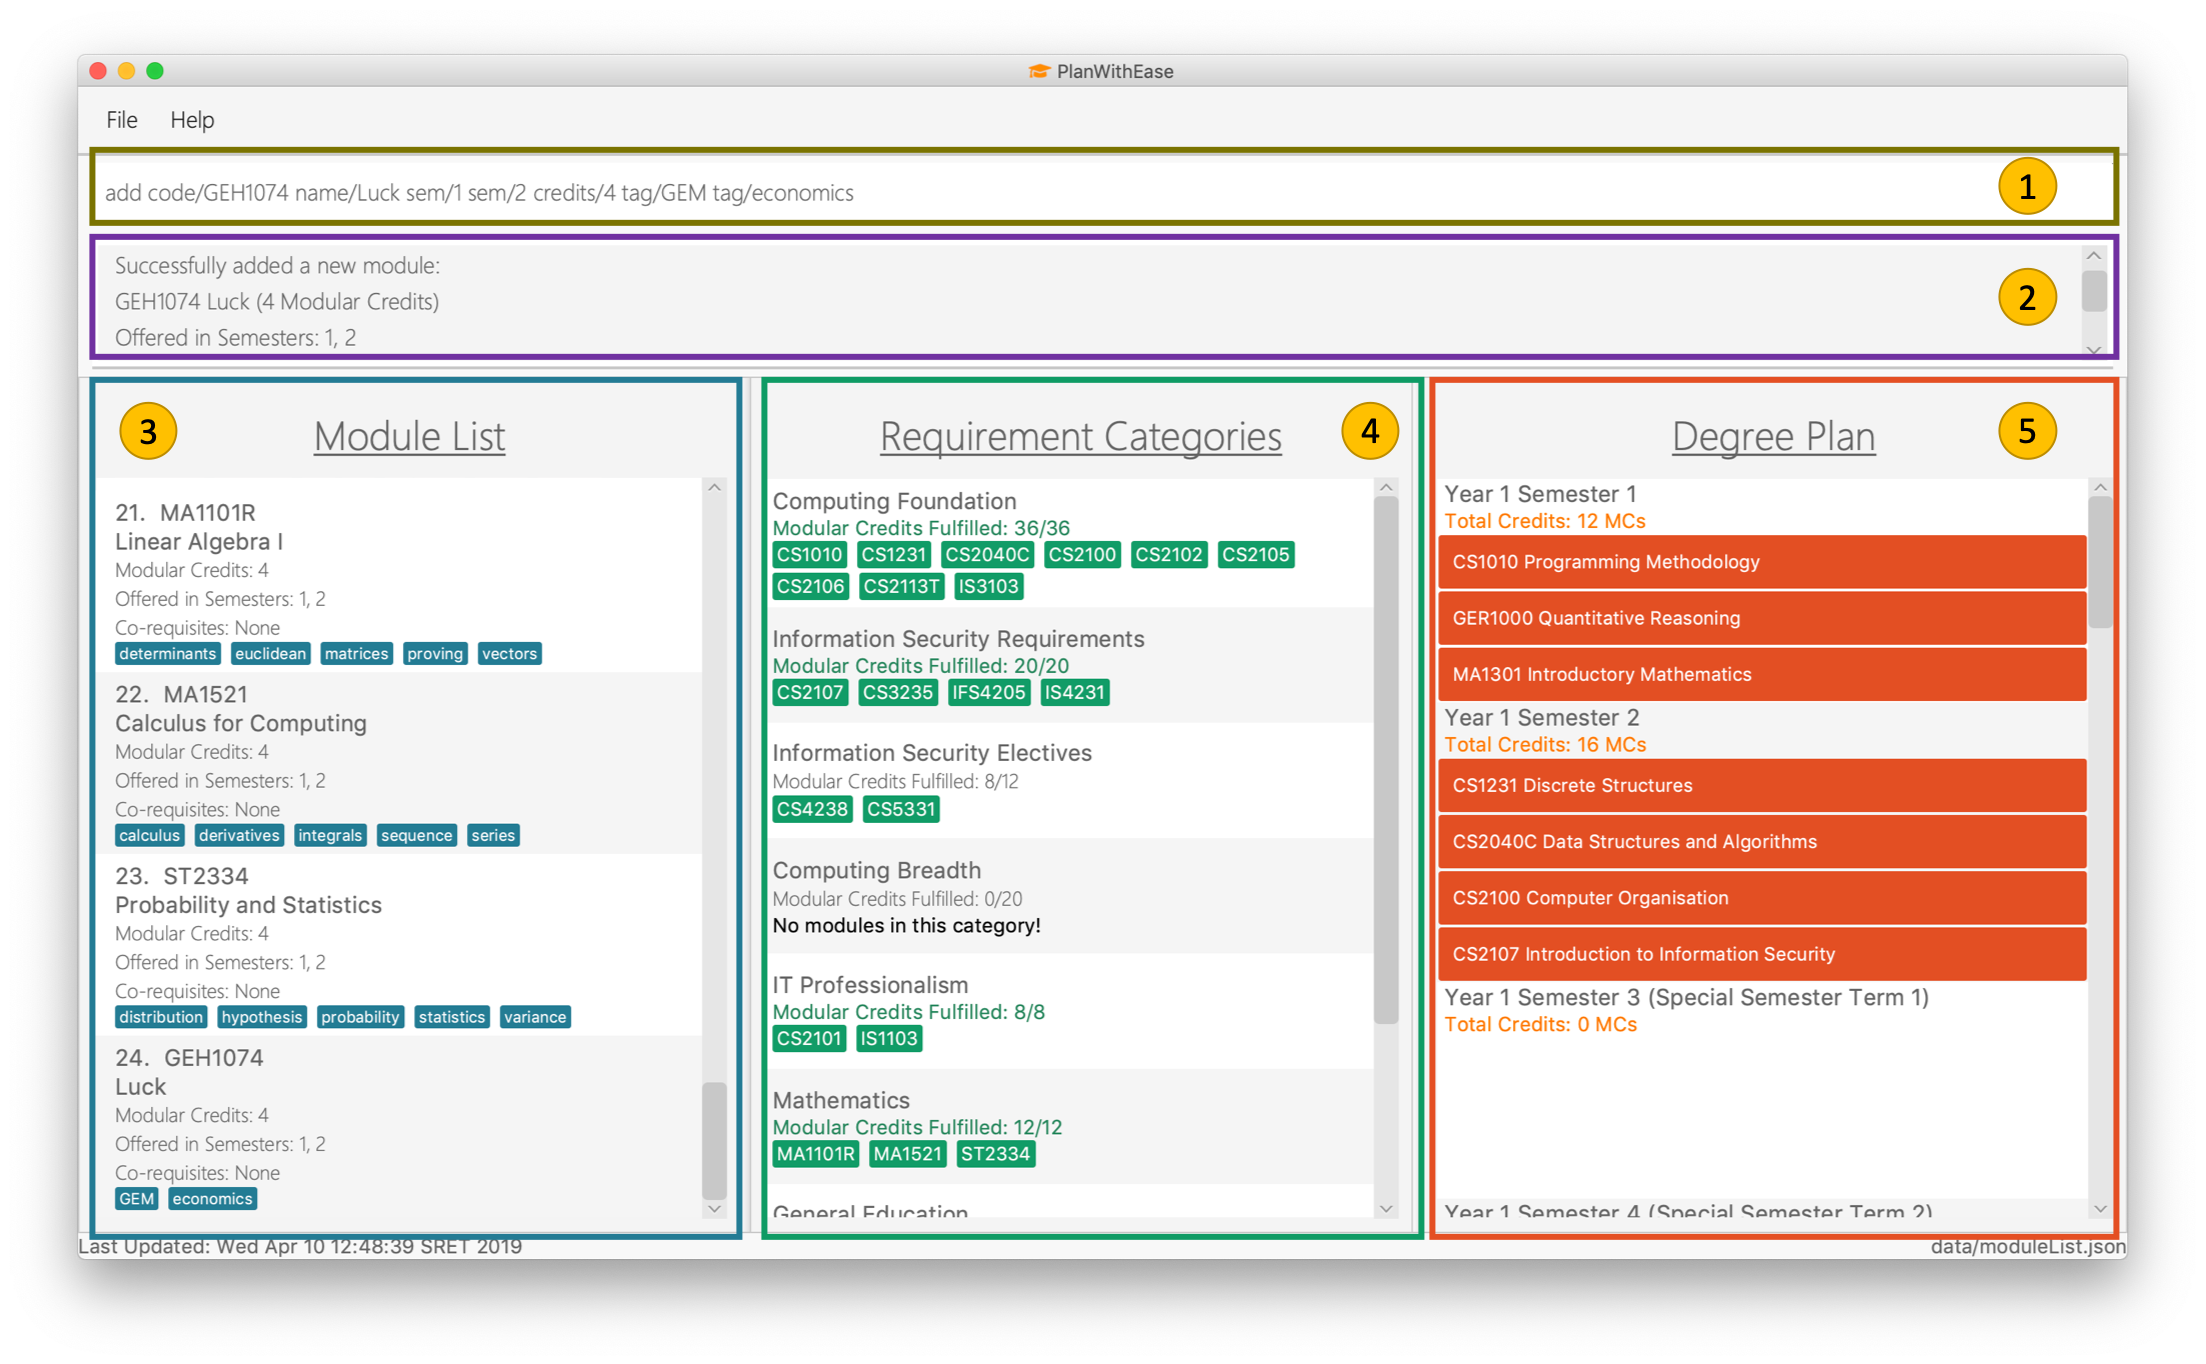
The five main sections are explained below.
Section |
Name |
Description |
1 |
Command Box |
This is where you can enter and run commands. |
2 |
Result Box |
This provides you with information on whether a command is successful. If there are errors when running the command, information on how to rectify the errors will also be displayed in here. |
3 |
Module List |
This is where you can view the details of all the modules. You can use the commands in Section 4.2, “Module Management” to make changes to the Module List. |
4 |
Requirement Categories |
This is where you can view your degree progress. You can use the commands in Section 4.3, “Requirement Tracker” to make changes to the Requirement Categories. |
5 |
Degree Plan |
This is where you can view your degree plan. You can use the commands in Section 4.4, “Degree Plan Management” to make changes to the Degree Plan. |
3. Quick Start
-
Ensure you have Java version 9 installed in your Computer.
-
Download the latest
PWE.jarhere. -
Copy the file to the folder you want to use as the home folder for PlanWithEase.
-
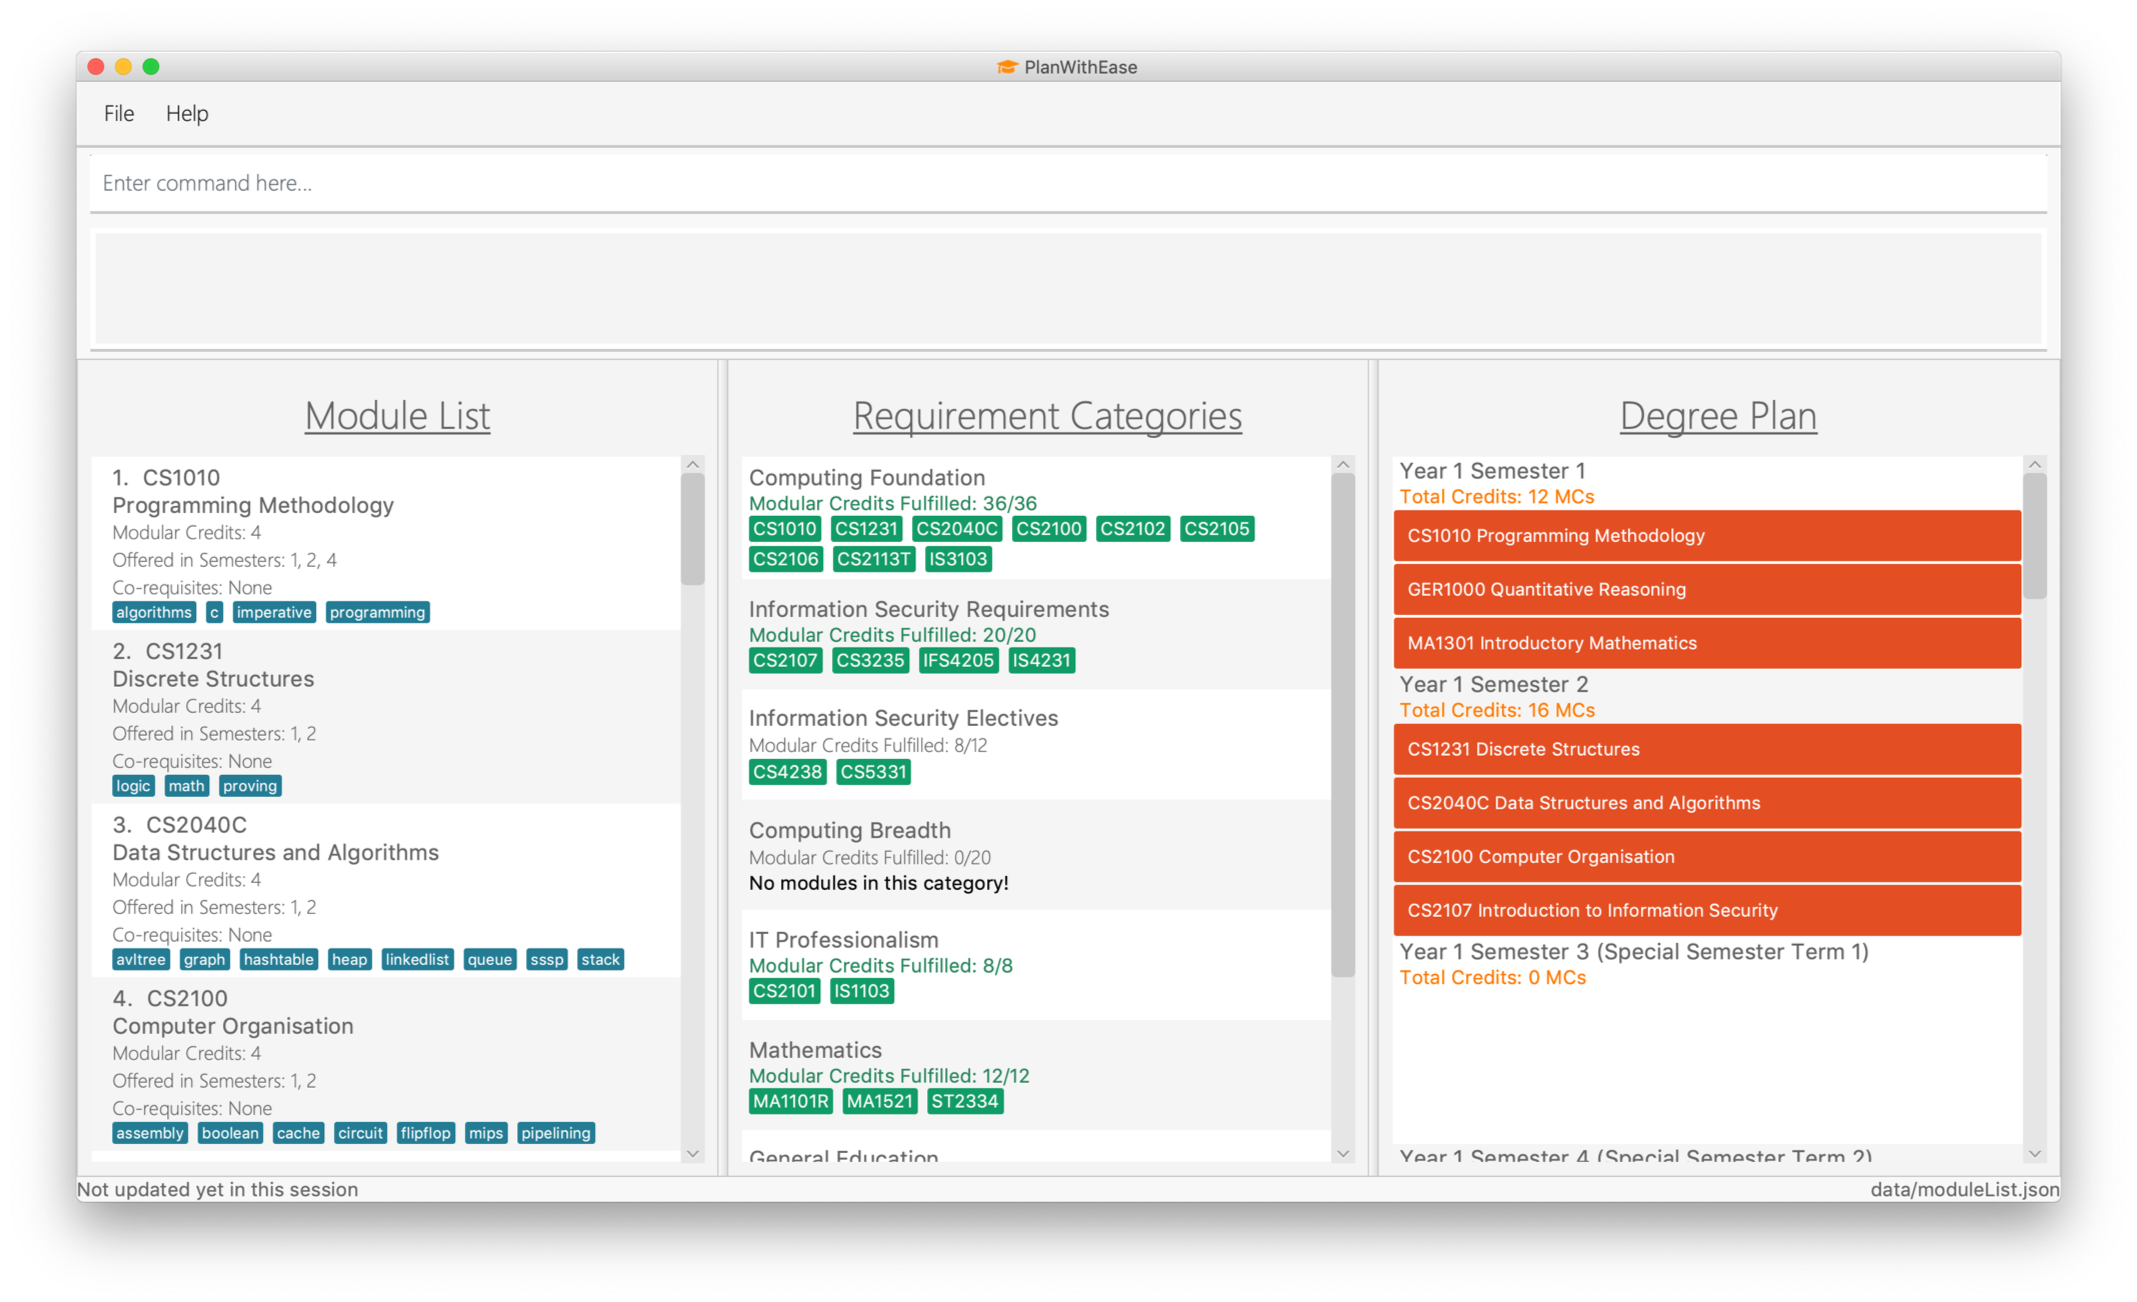
Double-click the file to start the app. The GUI should appear in a few seconds.
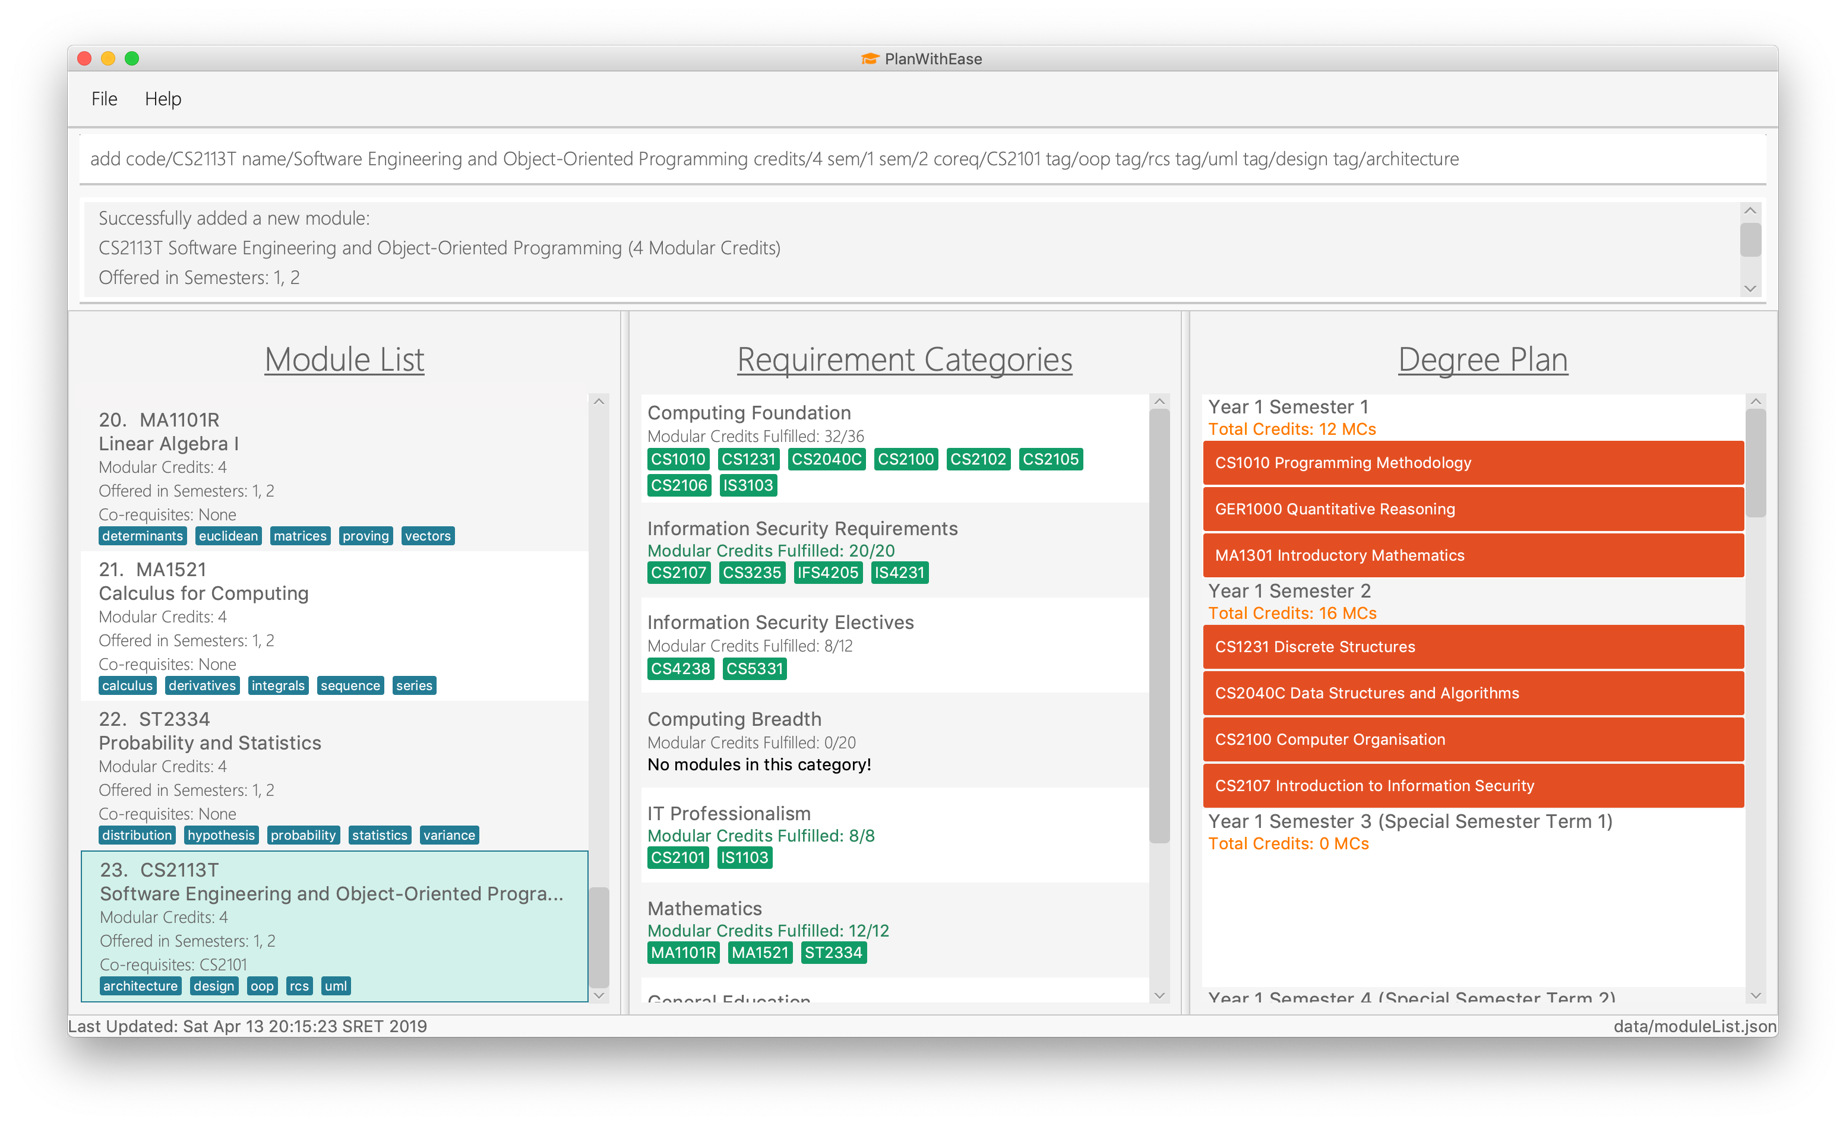 Figure 2. Successful start up of PlanWithEase
 -
You can now try entering commands in the command box and press Enter to execute it!
e.g. typinghelpand pressing Enter will open the help window. -
Below are some example commands you can try:
-
list: list and displays all modules in the module list. -
addname/Programming Methodology code/CS1010J credits/4: adds a module namedProgramming Methodologywith module codeCS1010J, which is assigned4modular credits, to the module list. -
delete3: deletes the 3rd module shown in the module list. -
exit: exits the application
-
-
Refer to Section 4, “Features” for details of each command.
4. Features
In this section, the expected command format will be introduced, and you can expect to learn the various commands you can use.
|
Don’t worry if you don’t understand everything at once. |
Command Format
-
Words in
UPPER_CASEare the parameters to be supplied by the user-
e.g. in
add name/NAME,NAMEis a parameter which can be used as:-
add name/Programming Methodology -
add name/Web Security
-
-
-
Items in square brackets are optional parameters
-
e.g.
name/NAME [tag/TAG]can be used as:-
name/Database Systems tag/sql(with optionaltagparameter) -
name/Database Systems(without optionaltagparameter)
-
-
-
Items with
… after them are parameters that can be used multiple times (including zero times)-
e.g.
[tag/TAG]…can be used as:-
-
tag/programming(i.e. 1 time) -
tag/programming tag/algorithms, etc. (i.e. many times)
-
-
e.g.
[name/NAME NAME…]can be used as:-
-
name/Programming(i.e. 1 time) -
name/Programming Methodology, etc. (i.e. many times)
-
-
-
Prefixed-parameters can be arranged in any order after all non-prefixed parameters (if any)
-
e.g. if the command specifies
INDEX name/NAME code/CODE:-
entering
INDEX code/CODE name/NAMEis also acceptable, but -
entering
name/NAME INDEX code/CODEis not acceptable
-
-
|
Parameter values cannot be empty (unless otherwise stated). |
4.1. General Commands
4.1.1. Viewing help : help 
Don’t worry if you are feeling lost! You can use this User Guide document to gain a better understanding of PlanWithEase's commands.
To open this User Guide document, simply enter help in the command box.
|
Alternatively, you can access this User Guide document by pressing F1 or via the menu bar (as shown below). 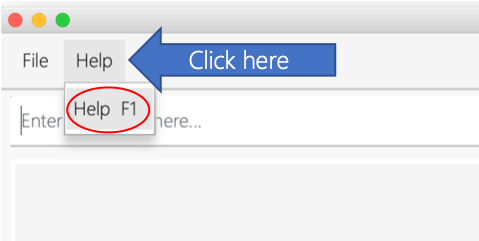
Figure 3. Accessing help from menu bar
|
4.1.2. Listing entered commands : history 
Want to check what commands you have entered previously? Simply enter history in the command box!
The list of commands will be displayed in reverse chronological order (from most recent to earliest).
|
You can press the ↑ and ↓ arrows to display the previous and next input respectively in the command box. |
4.1.3. Undoing previous command: undo 
Made a critical mistake such as accidentally clearing all modules from PlanWithEase and you want to get the data
back?
No problem! You can simply enter undo in the command box to restore PlanWithEase’s data to the state before the
previous undoable command was executed!
|
Undoable commands are commands that modifies the contents of PlanWithEase’s data.
|
Examples:
-
delete 1(deletes first module in the displayed module list)
list(displays all modules in the module list)
undo(reverses thedelete 1command) -
find name/Programming(finds modules with name containing the wordProgrammingand displays them in the module list)
list(displays all modules in the module list)
undo(theundocommand fails as there are no undoable commands executed previously) -
delete 1(deletes first module in the displayed module list)
clear(clears all application data)
undo(reverses theclearcommand)
undo(reverses thedelete 1command)
4.1.4. Redoing previously undone command : redo 
Took too many steps back in time using the undo command and want to move forward in time again?
Use the redo command to reverse the most recent undo command!
|
Be careful when time travelling using the This can happen if you you run an undoable command (excluding |
Examples:
-
delete 1(deletes first module in the displayed module list)
undo(reverses thedelete 1command)
redo(reapplies thedelete 1command) -
delete 1(deletes first module in the displayed module list)
redo(theredocommand fails as there are noundocommands executed previously) -
delete 1(deletes first module in the displayed module list)
clear(clears all modules from the application)
undo(reverses theclearcommand)
undo(reverses thedelete 1command)
redo(reapplies thedelete 1command)
redo(reapplies theclearcommand)
4.1.5. Clearing modules : clear 
Want to clear all the modules in the module list, requirement categories or degree plan? You’ll definitely
want to use the clear command!
The clear command allows you to remove all modules from the specified section (i.e. module list, requirement categories, degree plan).
Command Format: clear [requirement or planner]
|
If no parameters are specified, all modules in the module list, requirement categories and degree plan will be deleted. |
|
If you want to delete all modules in the module list quickly, simply enter the |
Command Usage:
Input |
Behaviour |
Expected Results |
|
Clears all modules from the application |
The module list will be emptied. Additionally, all modules in the requirement categories and degree plan will be removed. |
|
Clears all modules in all requirement categories |
The requirement categories will be emptied. |
|
Clears all modules in all degree plan |
The degree plan will be emptied. |
Example:
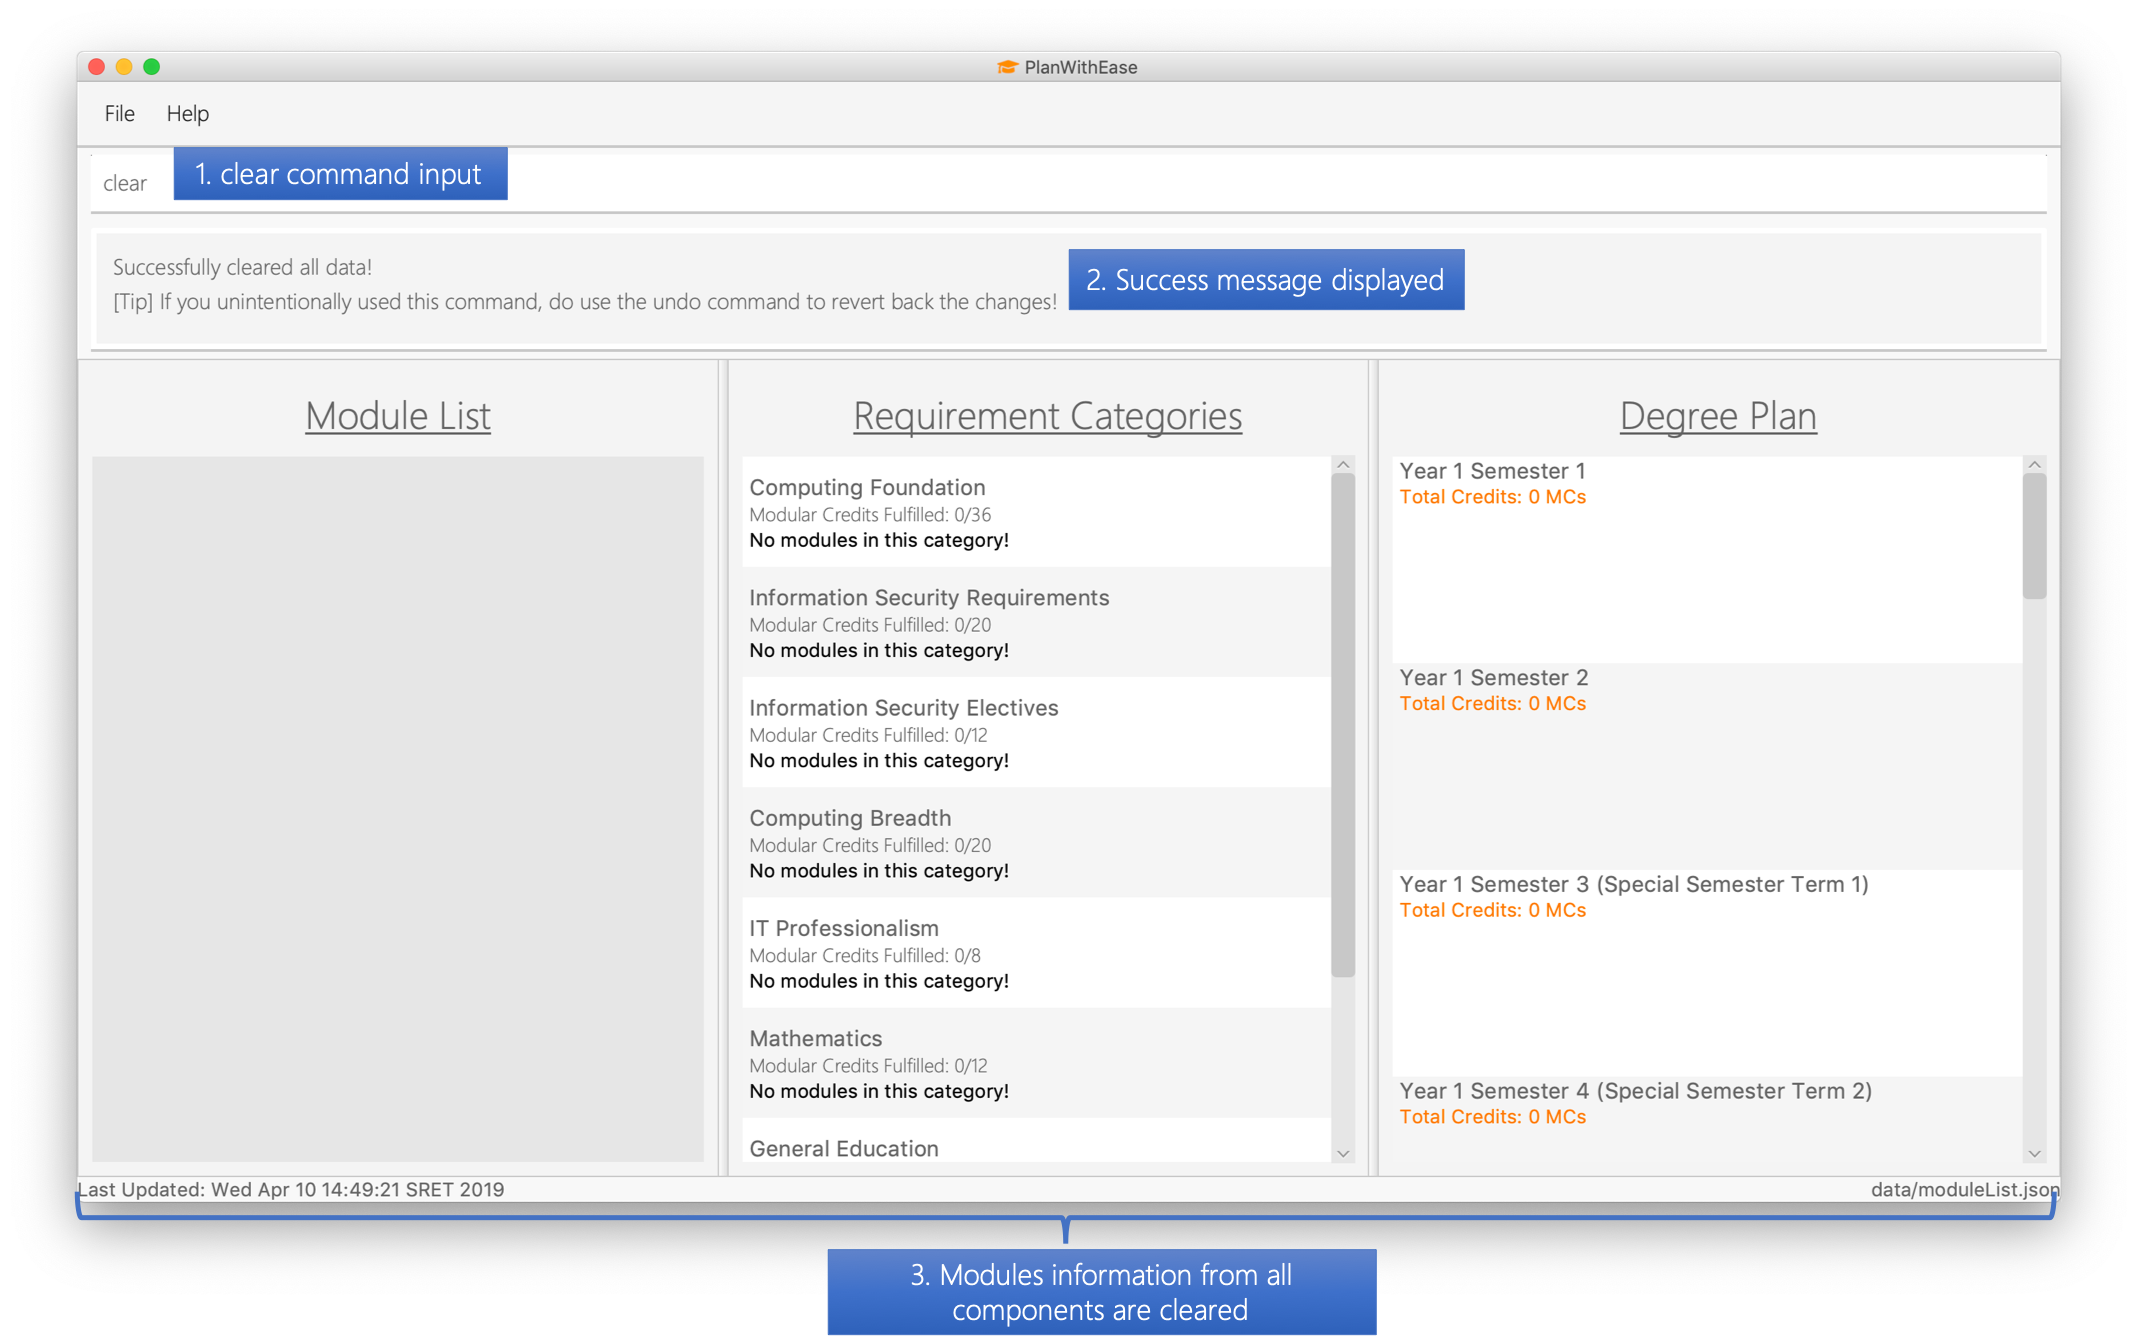
Here’s an example of how PlanWithEase would look like after executing the clear command.
Notice that a success message will be displayed after clearing all modules from PlanWithEase.
Before running the clear command:
clear command.After entering clear and pressing Enter:
clear command.4.1.6. Reset the application: reset 
If you want to populate the program with sample data (sample modules added to the requirement categories and degree plan), you can enter reset in the command box
This can help you save time if you want to start afresh!
|
This will remove all changes you have made to the module list, requirement categories and degree plan, and populate them with sample data. |
|
If you unintentionally used this command, do use the |
4.1.7. Exiting PlanWithEase : exit 
If you want to exit PlanWithEase, you can enter exit in the command box.
Hope you had a wonderful experience using PlanWithEase. Do come back soon!
4.2. Module Management
In this section, you’ll be introduced to commands that helps you to manage modules in PlanWithEase.
Below is a list of command parameters that you can expect to use for commands in this section.
Parameter |
Description |
Acceptable Range of Values |
|
Indicates the module code |
|
|
Indicates the name of the module |
|
|
Indicates the modular credits assigned to the module |
|
|
Indicates the semester which the module is offered in. |
|
|
Indicates the module code of a co-requisite module. |
|
|
Indicates the extra information to associate the module with (e.g. |
|
|
|
4.2.1. Adding modules : add 
Before you can add modules to the degree plan, you’ll need to add modules into the module list first.
It’s easy to add a module into the module list! Here’s how you can use the add command.
Command Format: add code/CODE name/NAME credits/CREDITS [sem/SEMESTER]… [coreq/COREQUISITE]… [tag/TAG]…
|
Please note that you cannot add a new module which has a co-requisite module already existing in the degree plan. |
Example:
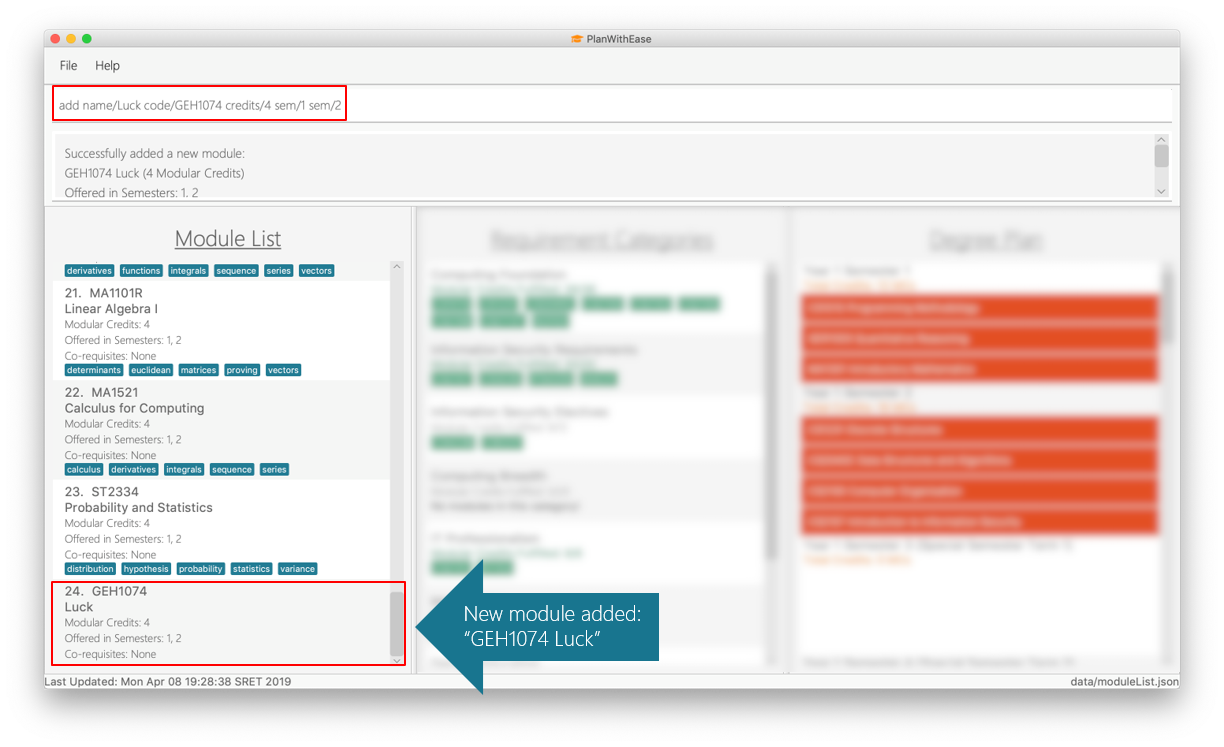
-
add code/GEH1074 name/Luck credits/4 sem/1 sem/2
Adds a module namedLuckwith module codeGEH1074, which is assigned4modular credits and is offered in semesters1and2, to the module list.
|
When adding a module with a corequisite, if the module is added successfully, the co-requisite modules will be updated as well. |
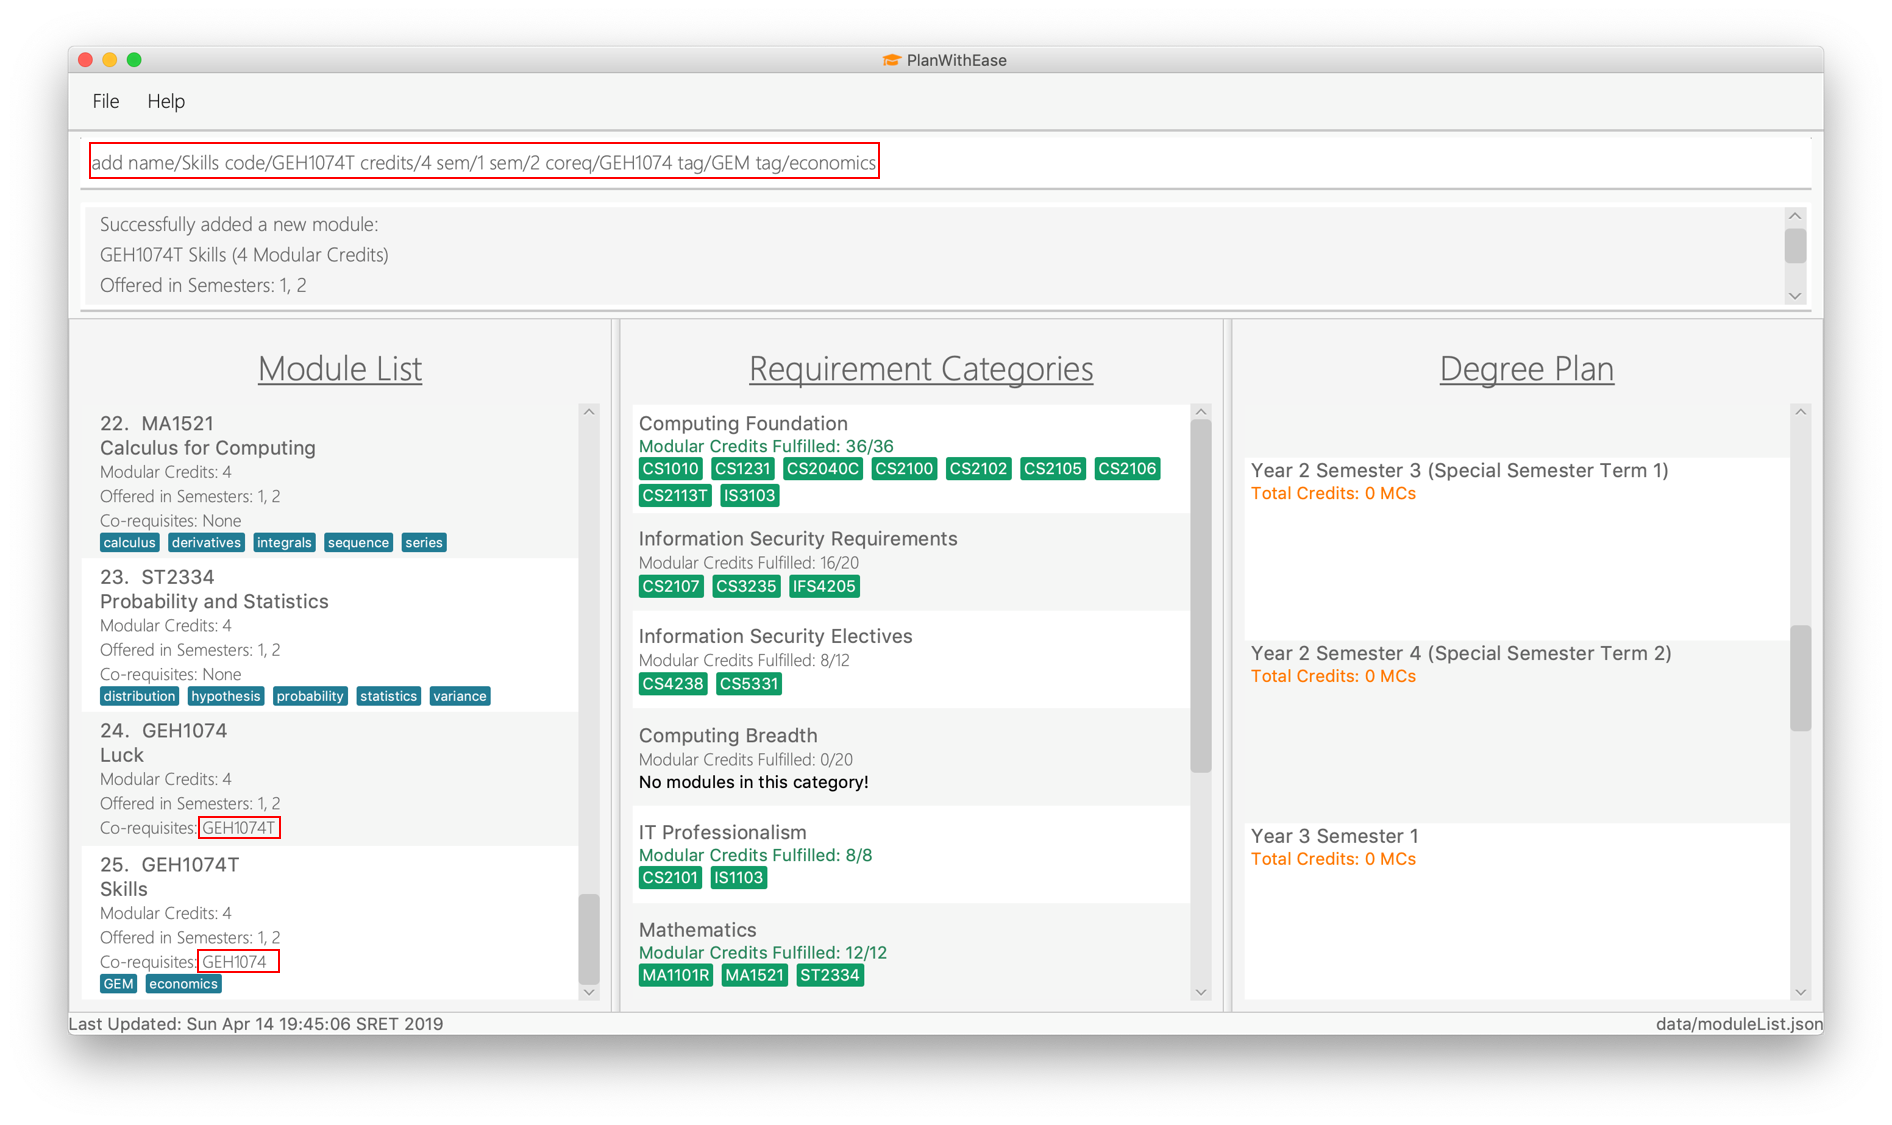
Example:
-
add name/Skills code/GEH1074T credits/4 sem/1 sem/2 coreq/GEH1074 tag/GEM tag/economics
Adds a module namedSkillswith module codeGEH1074T, which is assigned4modular credits and has module codeGEH1074as a corequisite, to the module list. The module added has the tagsGEMandeconomicsas well.
Both modules (GEH1074TandGEH1074) will be updated to be co-requisites as shown below.
4.2.2. Editing modules : edit 
Want to change the module details? No problem!
You can use this handy edit command to update the module details to your liking.
Command Format: edit INDEX [name/NAME] [code/CODE] [credits/CREDITS] [sem/SEMESTER]… [coreq/COREQUISITE]… [tag/TAG]…
|
Examples:
-
edit 1 name/Data Structures and Algorithms code/CS1234
Edits the name and code of the 1st module in the displayed module list to beData Structures and AlgorithmsandCS1234respectively. -
edit 3 code/CS2040C tag/
Edits the code of the 3rd module in the displayed module list to beCS2040Cand clears all existing tags associated with the module. -
edit 5 coreq/CS2105 coreq/CS2106
Edits the co-requisites of the 5th module in the displayed module list to beCS2105andCS2106.
|
Just like the |
Example: If GEH1074 and GEH1074T are not co-requisites, running the command edit 1 coreq/GEH1074T
(assuming index 1 of the module list is GEH1074) will result in GEH1074 and GEH1074T being co-requisites.
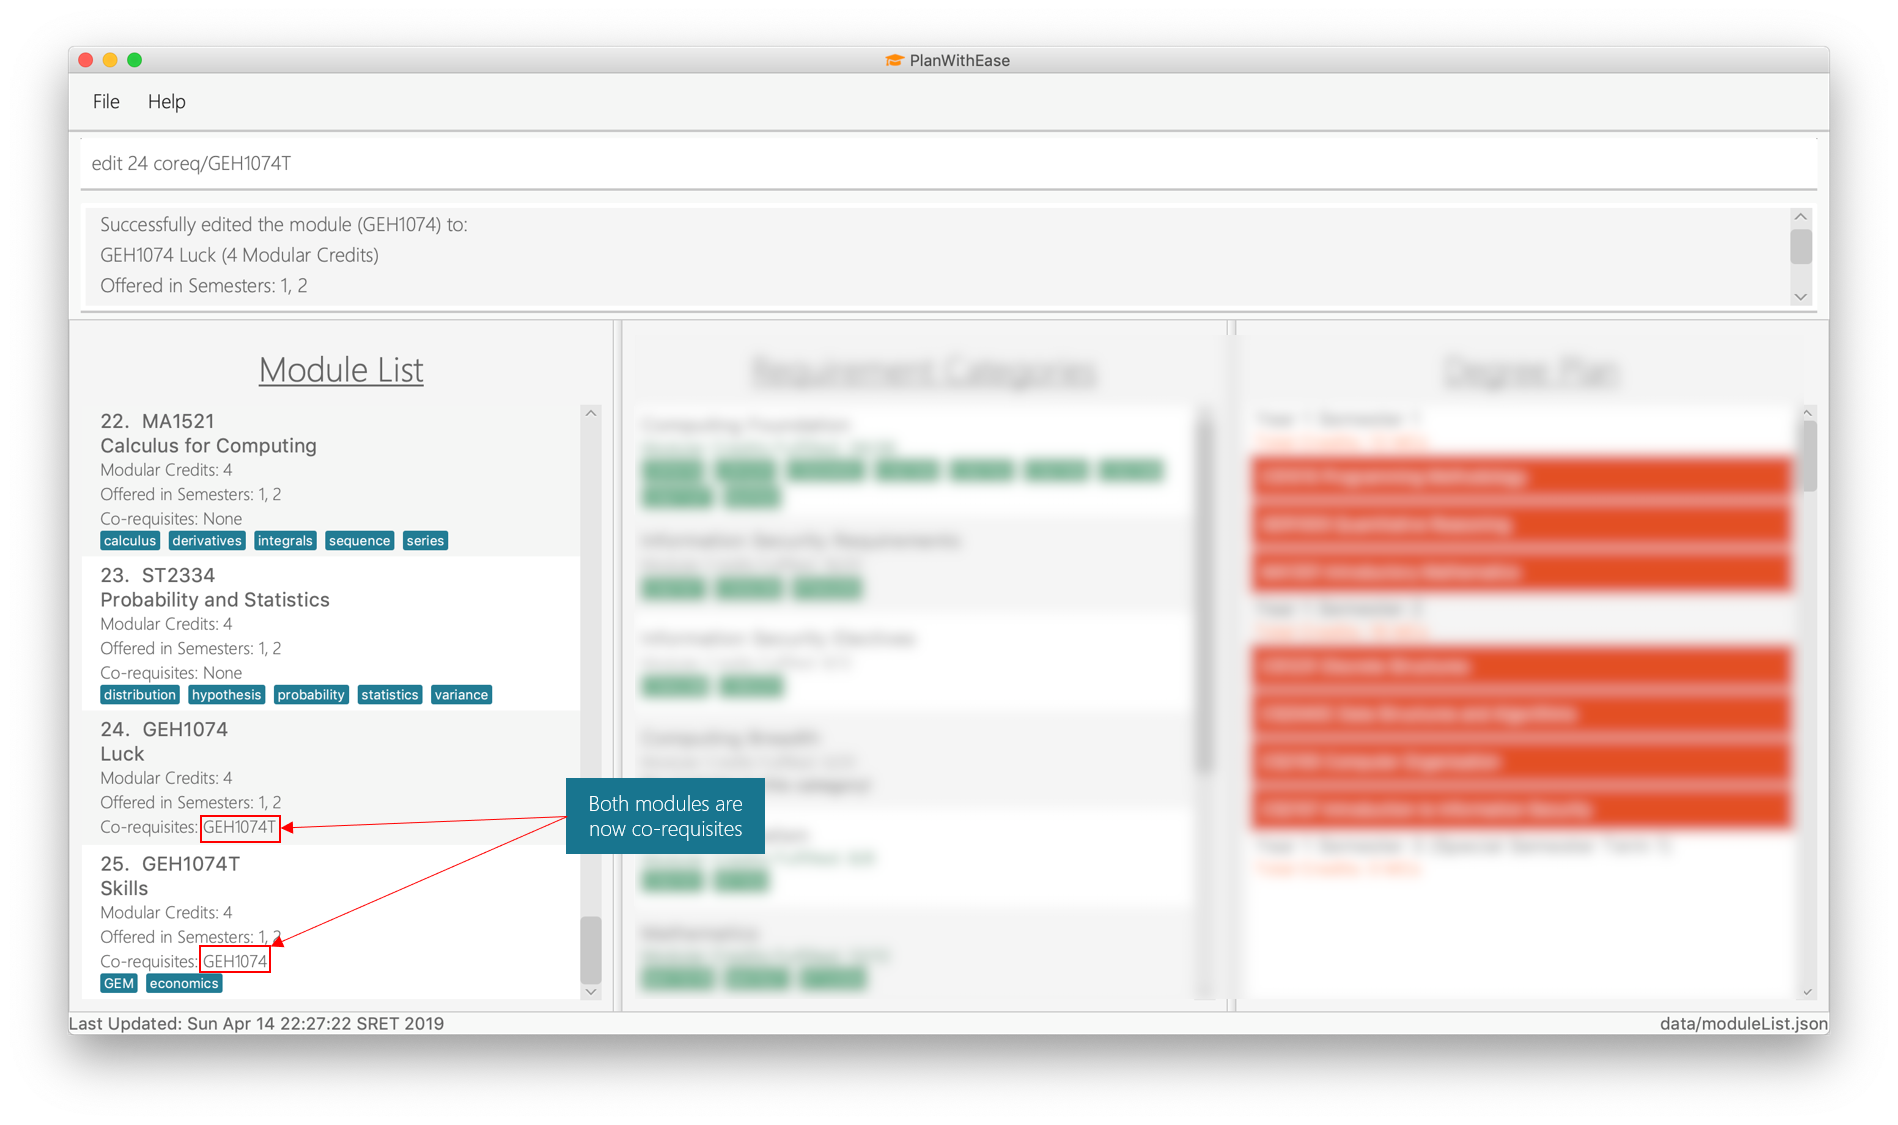
GEH1074 and GEH1074T are being edited to be co-requisites.4.2.3. Deleting modules : delete 
Want to delete a module from the module list? Simply locate the module to be deleted in the module list, and
then use the delete command!
Command Format: delete INDEX
|
To choose which module you want to delete, include the index number (beside the module code) in the displayed module list. |
|
Example:
If GET1074T and GET1074 are co-requisite modules, deleting GET1074 will cause GET1074 's list of co-requisite
modules to be updated as well.
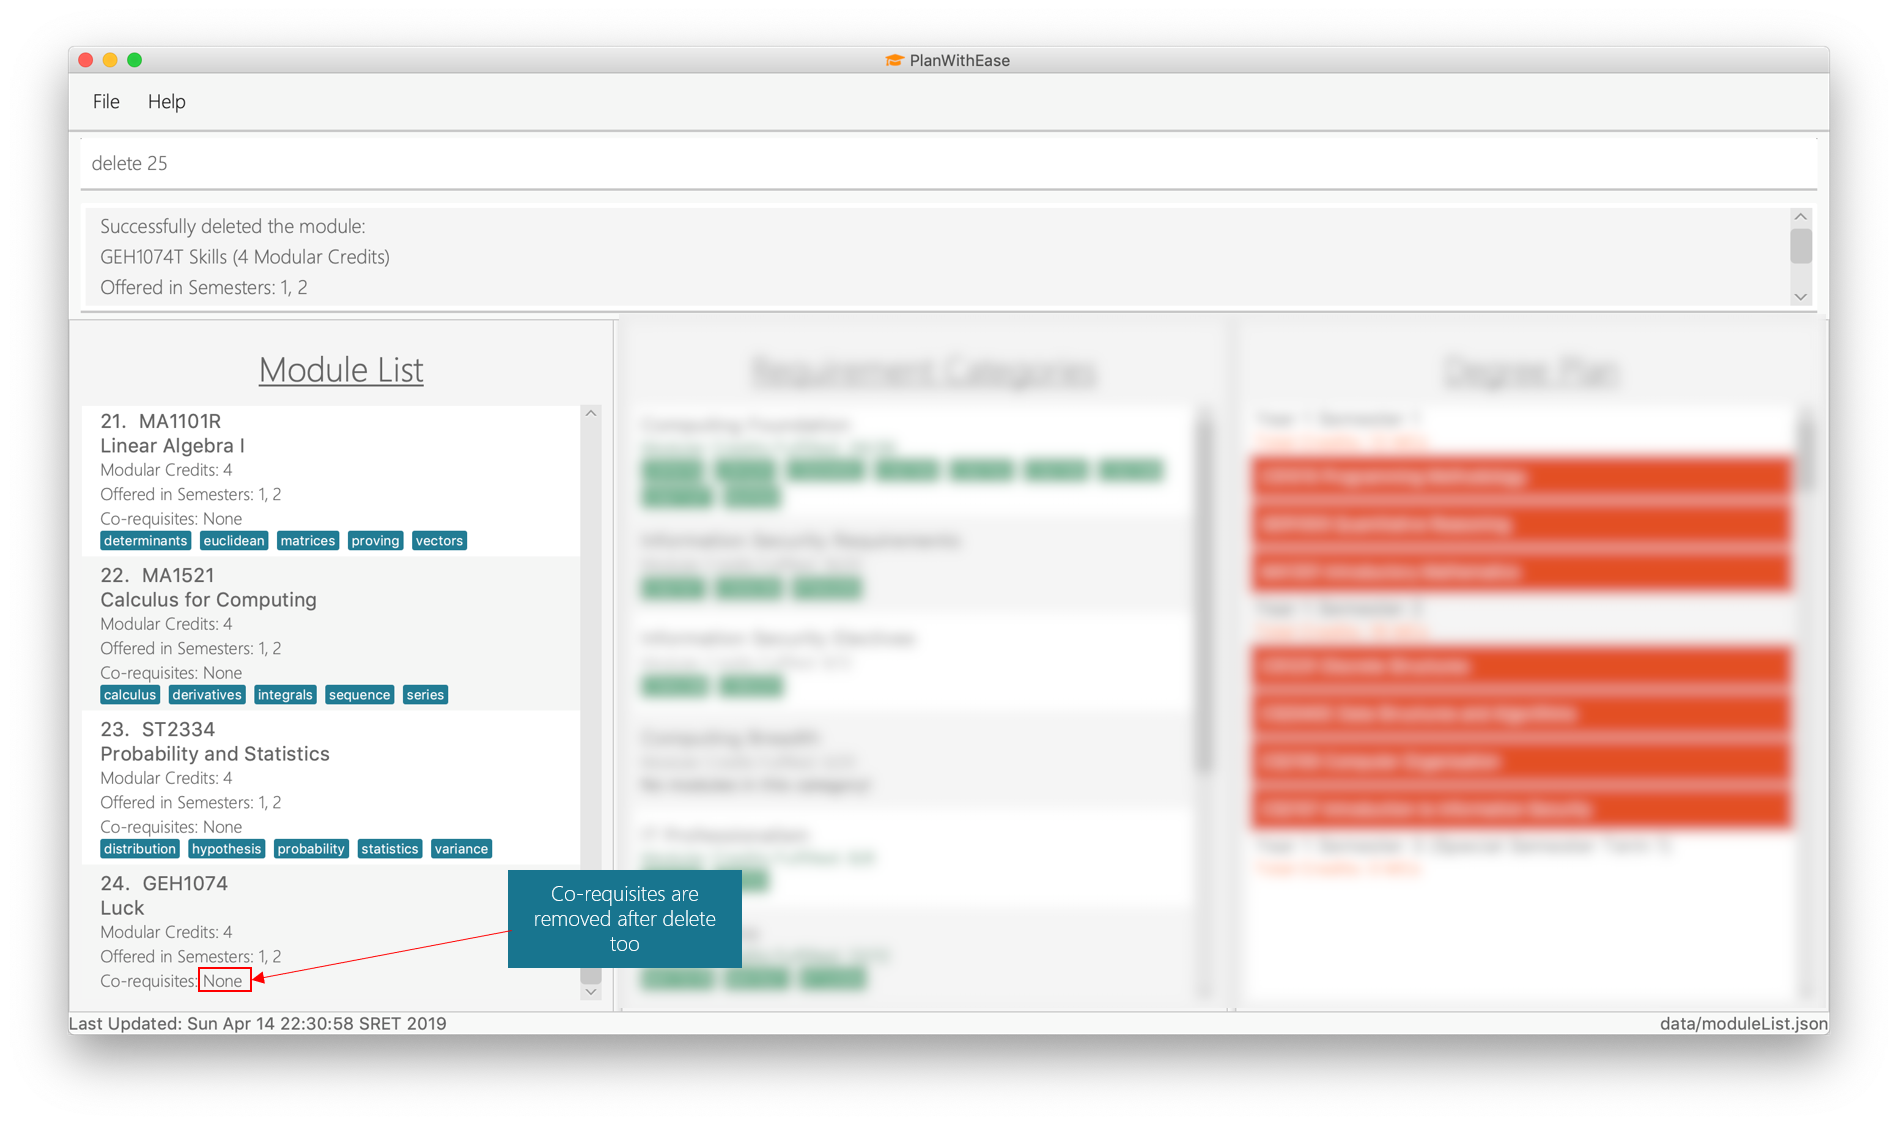
GET1074 is removed from GET1074 's list of co-requisites.4.2.4. Finding modules : find 
Having trouble locating the modules you want?
Make use of find command which allows you to find modules that have their names, code or credits matching the given
search criteria.
Command Format: find [name/NAME] OPERATOR [code/CODE] OPERATOR [credits/CREDITS]
When this command is used, the application will display only those modules which satisfy the search criteria.
The following table describes the valid prefixes that you can supply to the search criteria.
Prefix |
Description |
|
Search for any module |
|
Search for any module |
|
Search for any module |
|
Search for any module |
|
Search for any module that is being offered in |
The following table describes the valid operators which you can supply to the search criteria.
Operator |
Description |
Precedence |
|
Logical "AND" operation (both conditions A AND B must match) |
Highest |
|
Logical "OR" operation (either conditions A OR B must match) |
Lowest |
|
Search term surrounded by parenthesis will always be evaluated first. If there is a tie, the logical operator precedence will be taken into consideration. |
N.A |
The following examples describes how you could form a valid search criteria for the find command.
Single Prefix Usage |
Expected Result |
|
Returns modules containing |
|
Returns modules containing |
|
Returns modules having |
If you need multiple prefixes, the following table shows some examples on how it can be done.
Note that you will need to separate multiple prefixes with an operator.
|
You could choose which search criteria having a higher priority by specifying parenthesis |
Multiple Prefix Usage |
Expected Result |
|
Returns modules containing both |
|
Returns modules containing both |
|
Returns modules containing |
|
Returns modules containing either |
Examples:
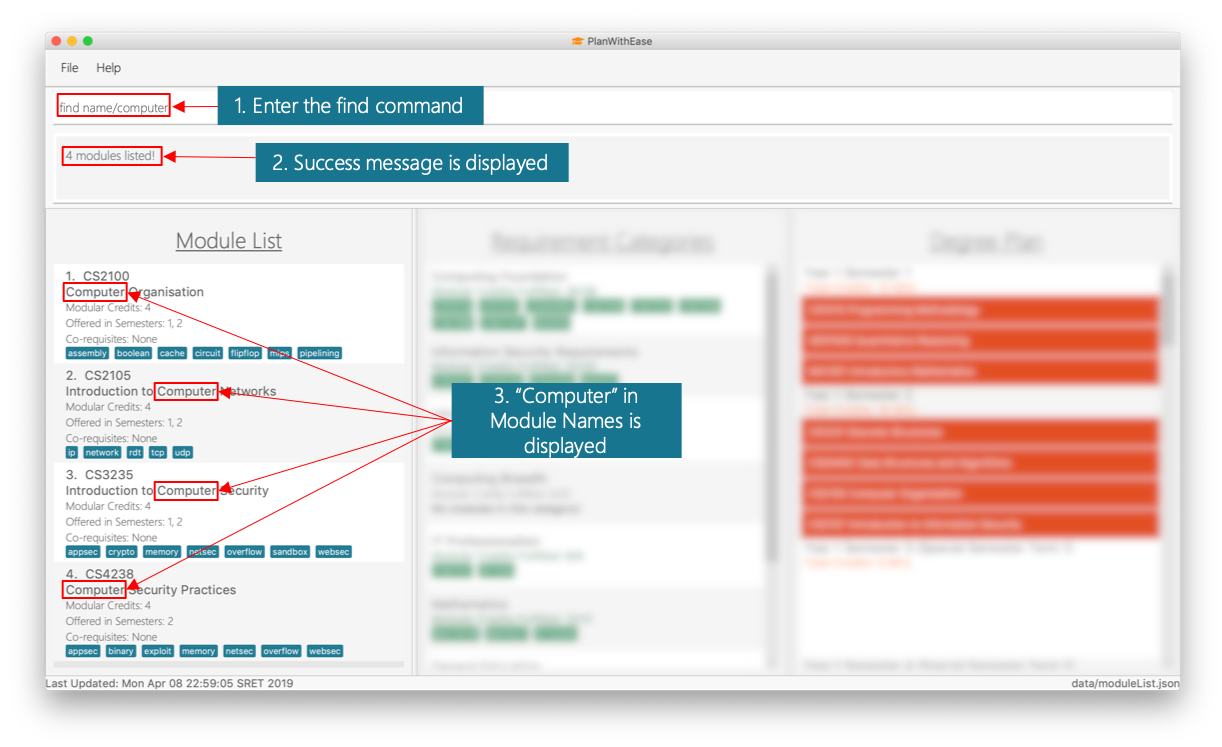
-
find name/computer
Displays all modules with names containing the wordcomputer(e.g.computerandComputer Security) in the module list.
computer-
find name/computer && name/SecurityDisplays all modules with names containing the wordcomputerandsecurityin the module list.
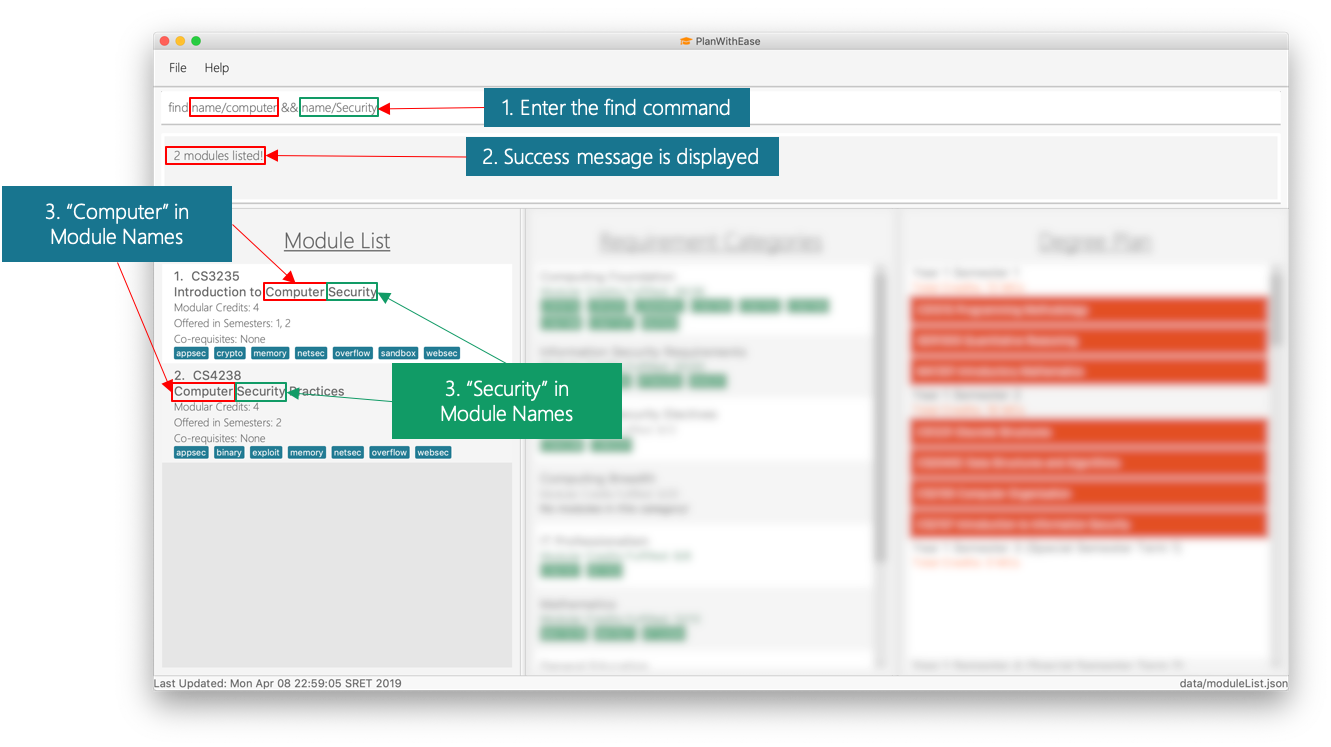
computer and security.-
find (sem/1 || sem/4) && name/Programming
Displays all modules with names containingprogrammingand is offered in either semester1or4in the module list.
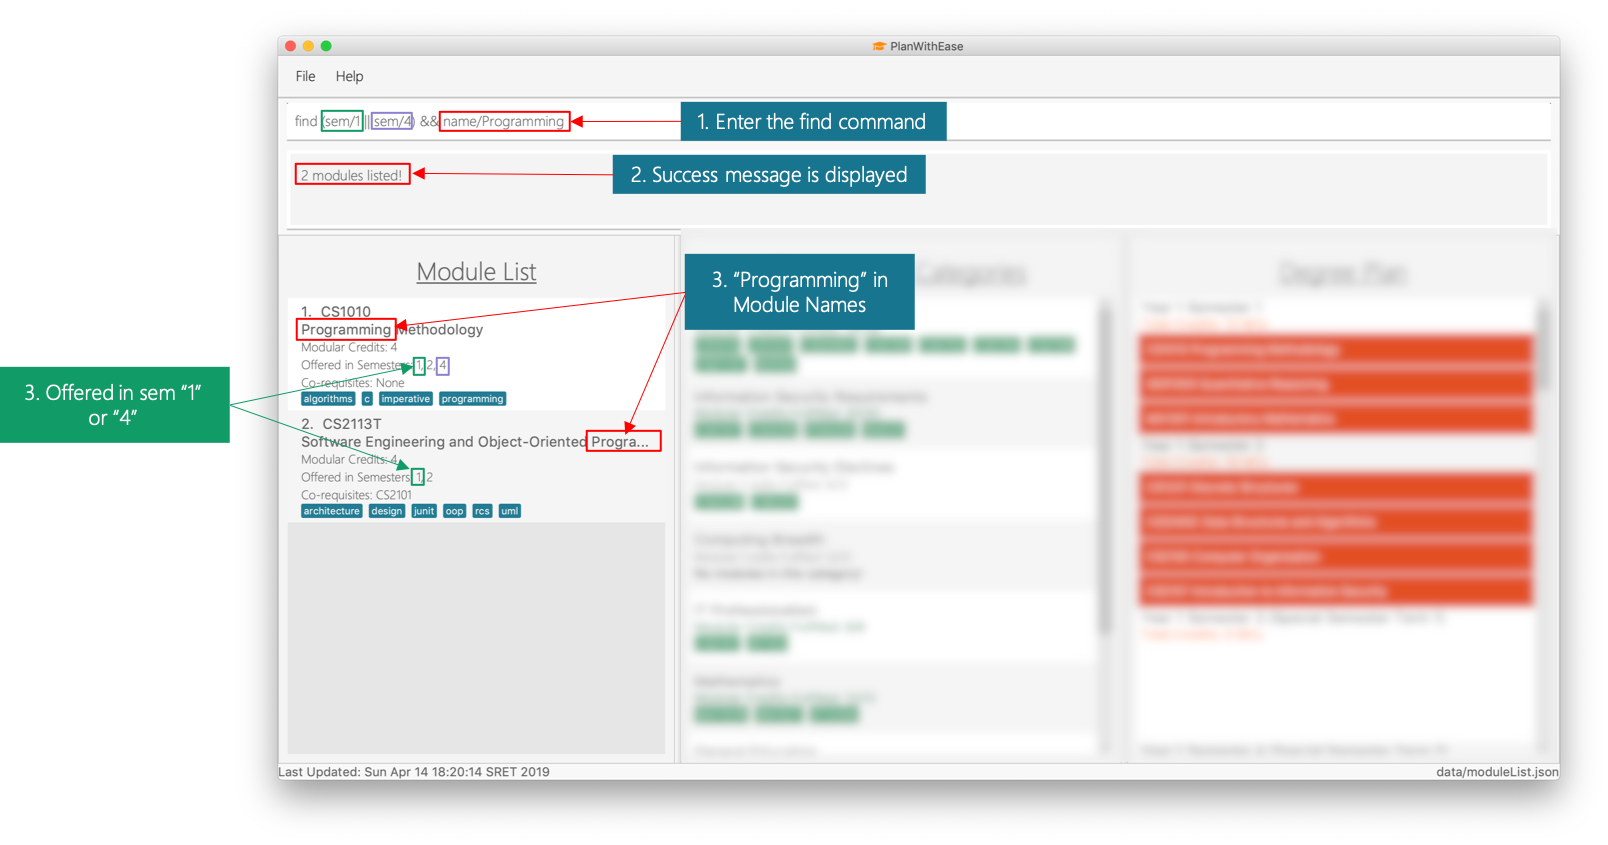
programming and is offered in either semester 1 or 4.|
If you wish to search for module name with exact name Do note that if you prefer to search for module name containing both |
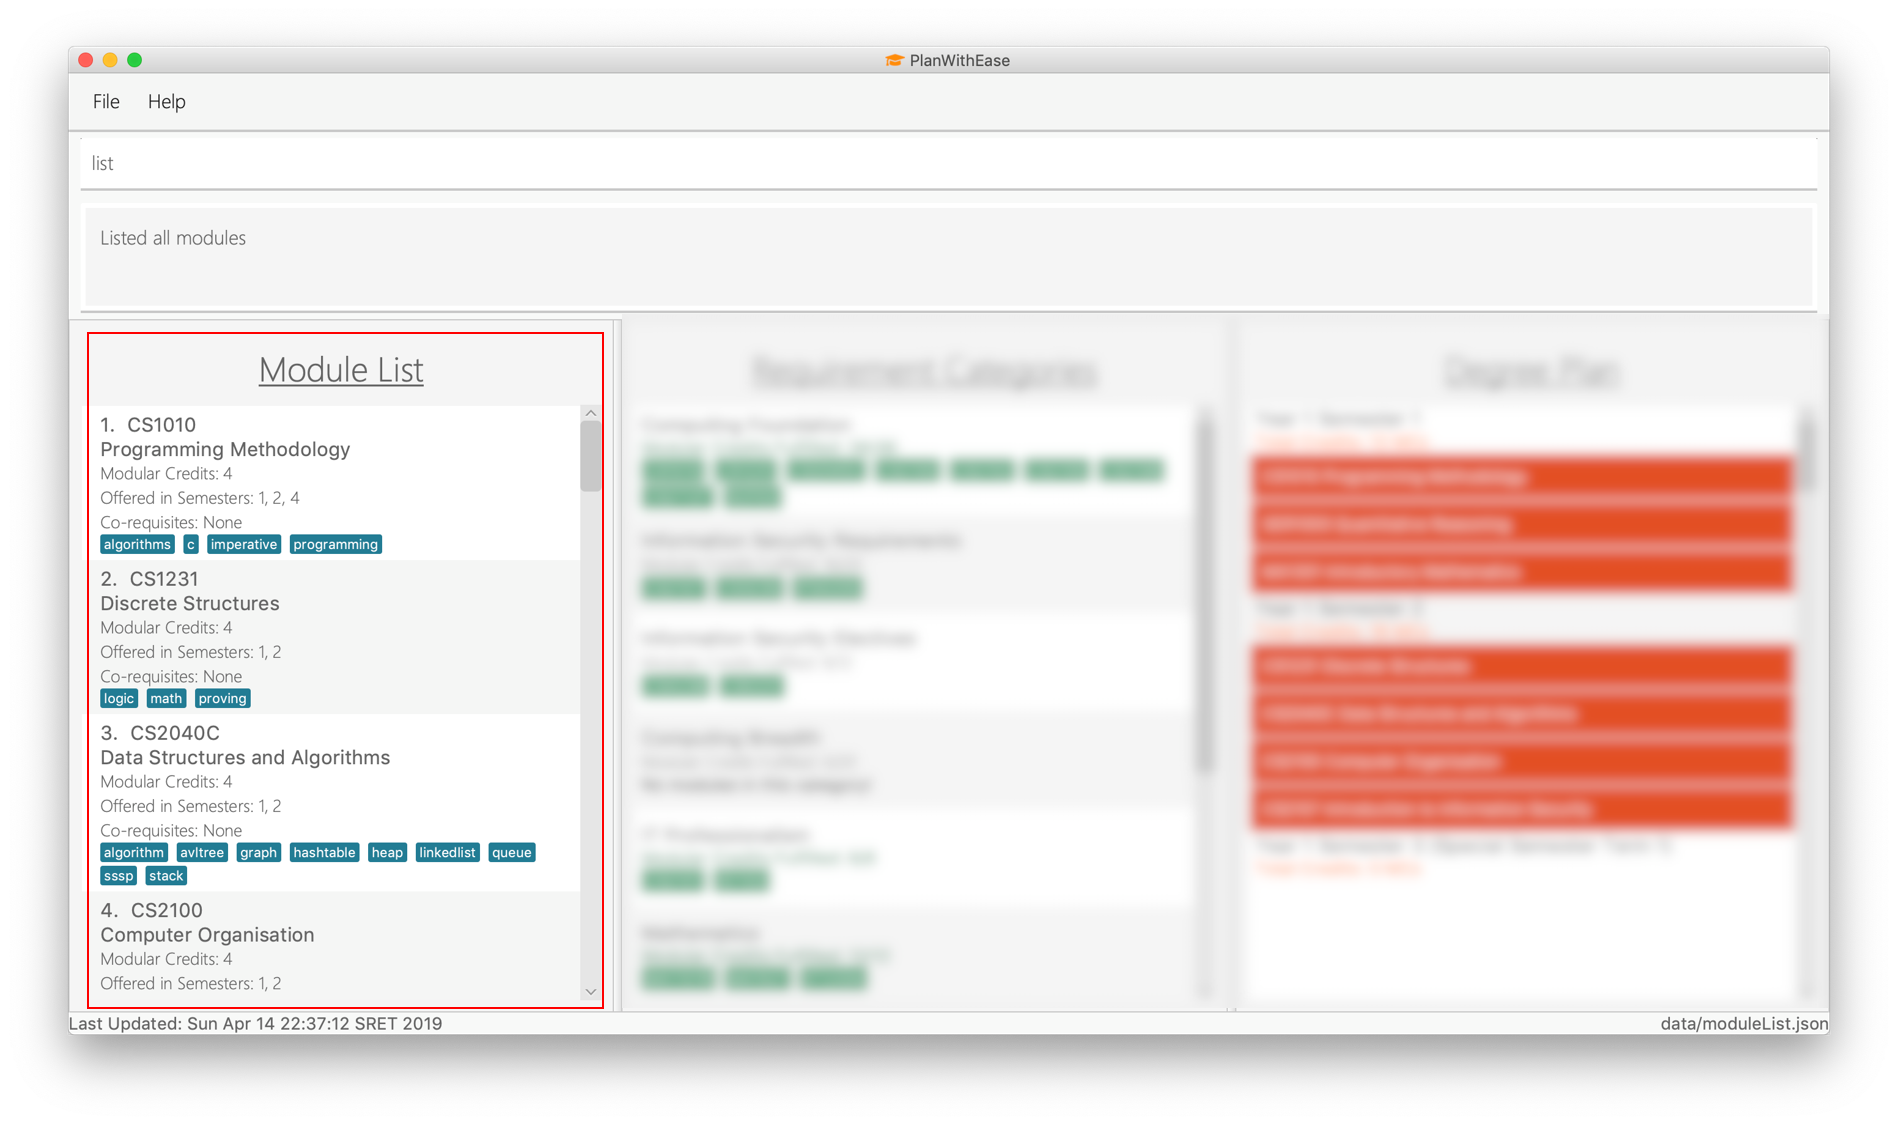
4.2.5. Listing all modules : list 
Shows a list of all modules in the module list.
Command Format: list
|
This command is useful if you want to display all modules in the module list after doing a |
Example: Running the list command:
4.2.6. Selecting modules : select 
Selects the module identified by the index number used in the displayed module list.
Command Format: select INDEX
Examples:
-
list
select 2
Selects the 2nd module in the displayed module list. -
find Programming
select 1
Selects the 1st module in the results of thefindcommand.
4.3. Requirement Tracker
The requirement tracker allows you to manage and and track your degree requirements so that you are always on-track for graduation!
This section contains the various commands that you can use in this application to add, remove, move and list modules to and from the specified requirement categories in this application.
The following table describes the parameters you may use for the commands in this section.
Parameter |
Description |
Acceptable Range of Values |
|
Indicates the name of degree requirement category (e.g. |
|
|
Indicates the module code (e.g. |
|
|
|
|
4.3.1. Adding modules : requirement_add 
Want to see if you have fulfilled a particular degree requirement category?
Simply add the module code to a degree requirement category using the requirement_add command to find out.
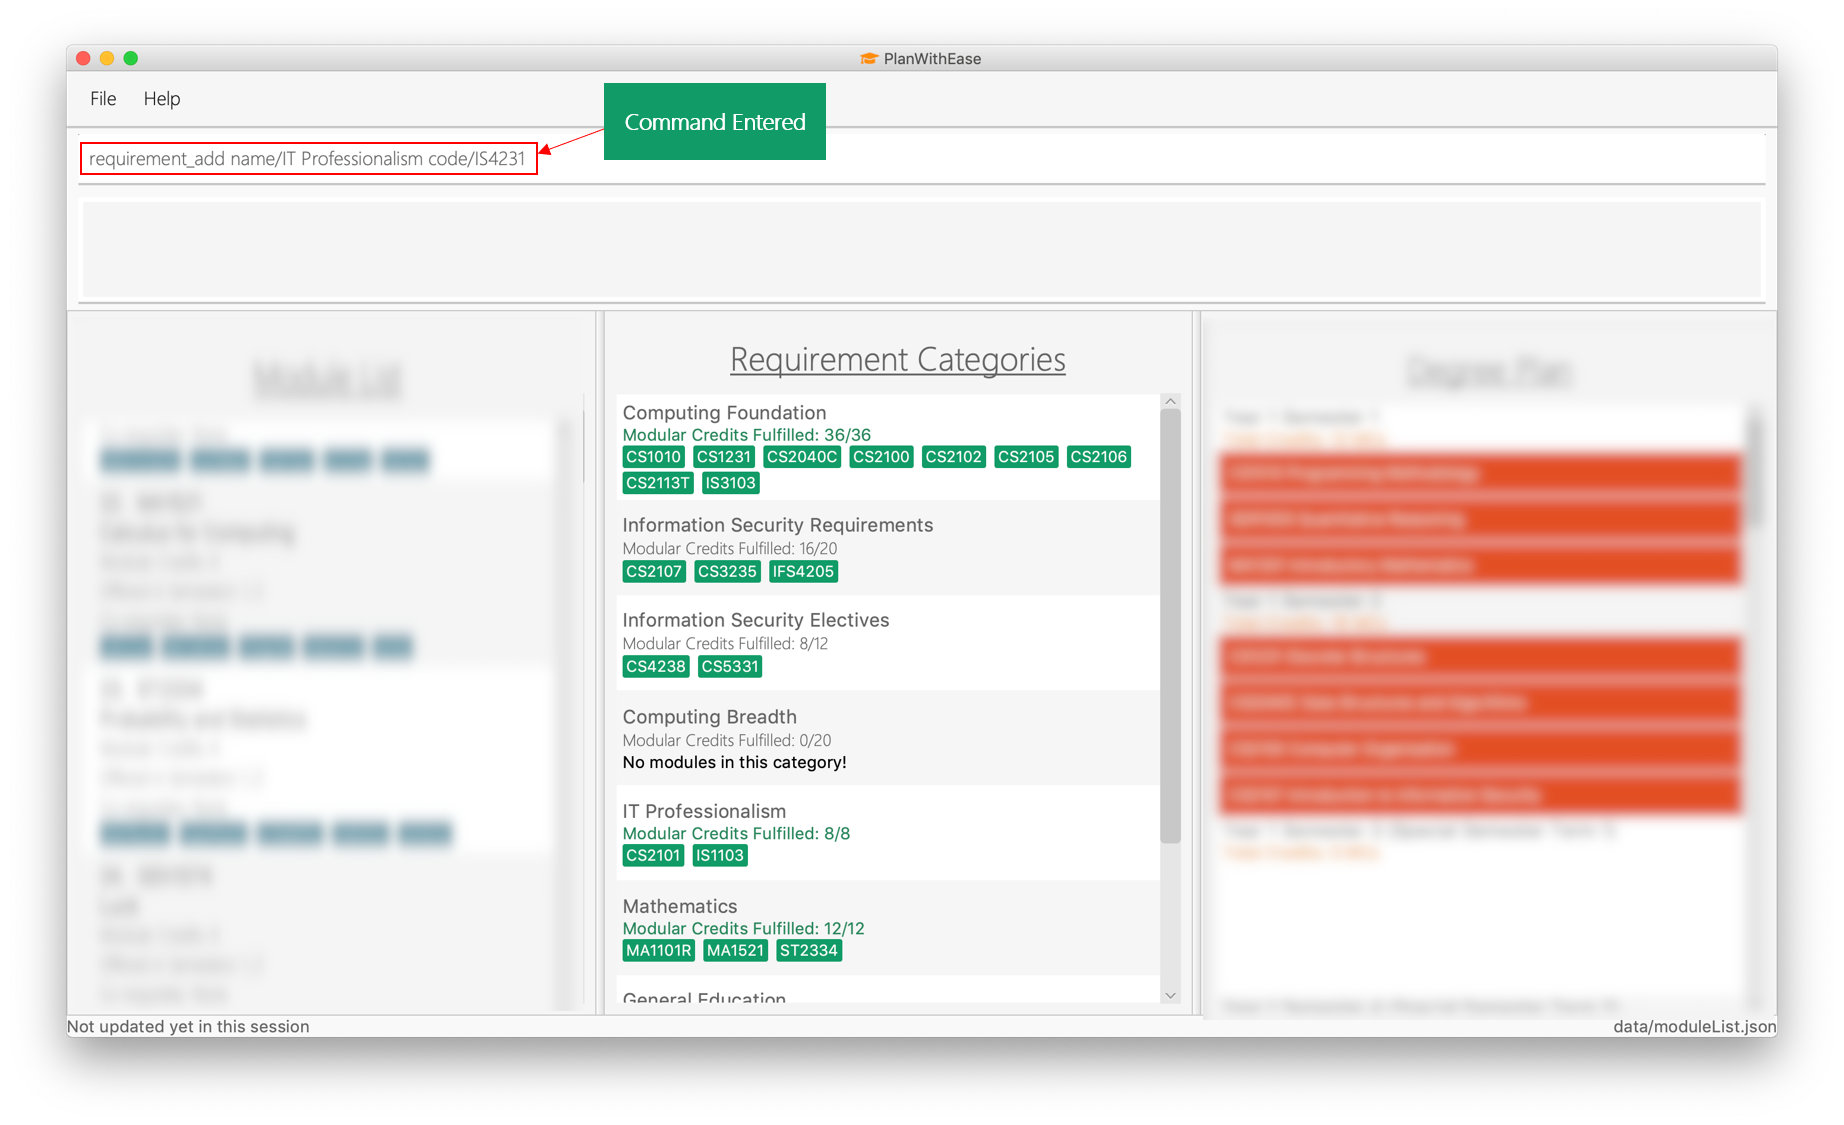
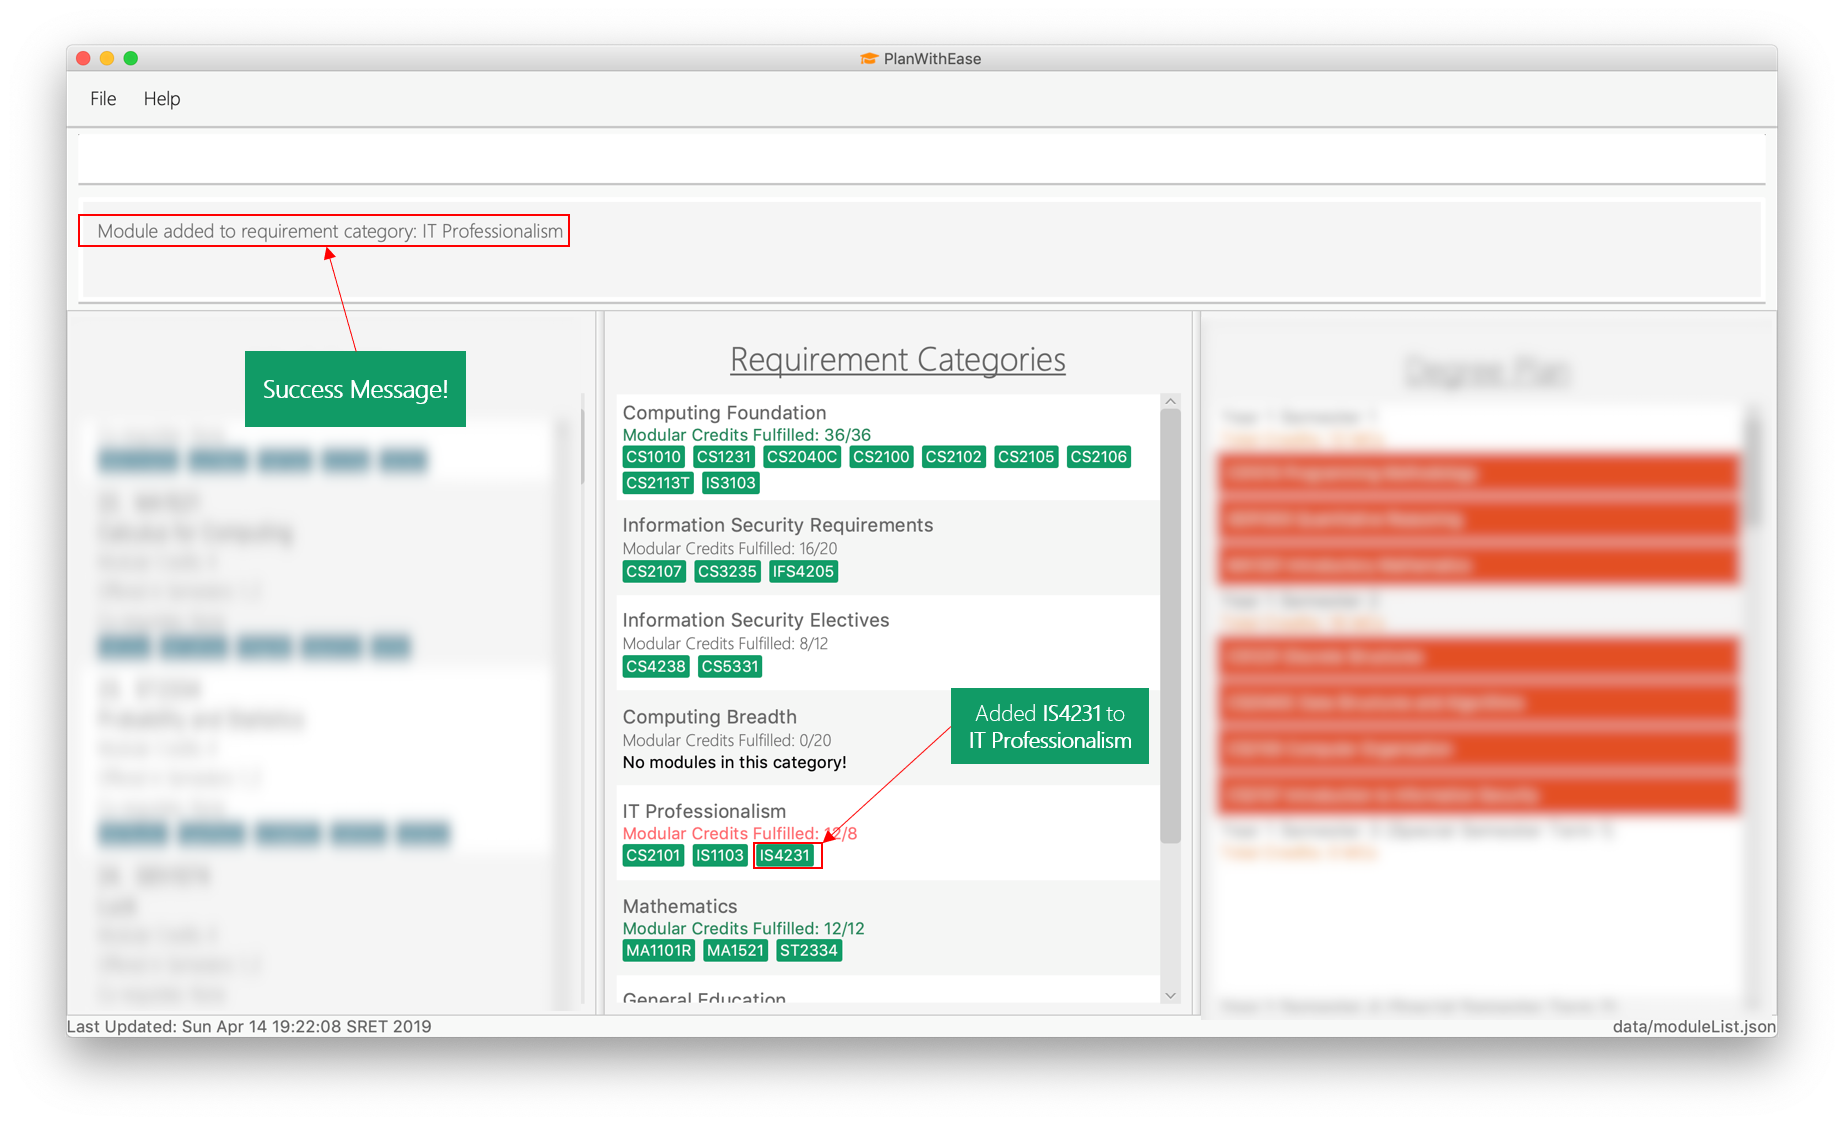
Command Format: requirement_add name/NAME code/CODE [code/CODE]…
Examples:
-
requirement_add name/IT Professionalism code/IS4231
Adds the module codeIS4231to the degree requirement categoryIT Professionalism.
The two images below this command describes what you should see when you execute the above command
-
requirement_add name/Computing Foundation code/CS1231 code/CS2100
Adds module codesCS1231andCS2100to the degree requirement categoryComputing Foundation.
4.3.2. Removing modules : requirement_remove 
Want to remove a module code from the degree requirement category?
requirement_remove will help you to remove the specified module code from the degree requirement category.
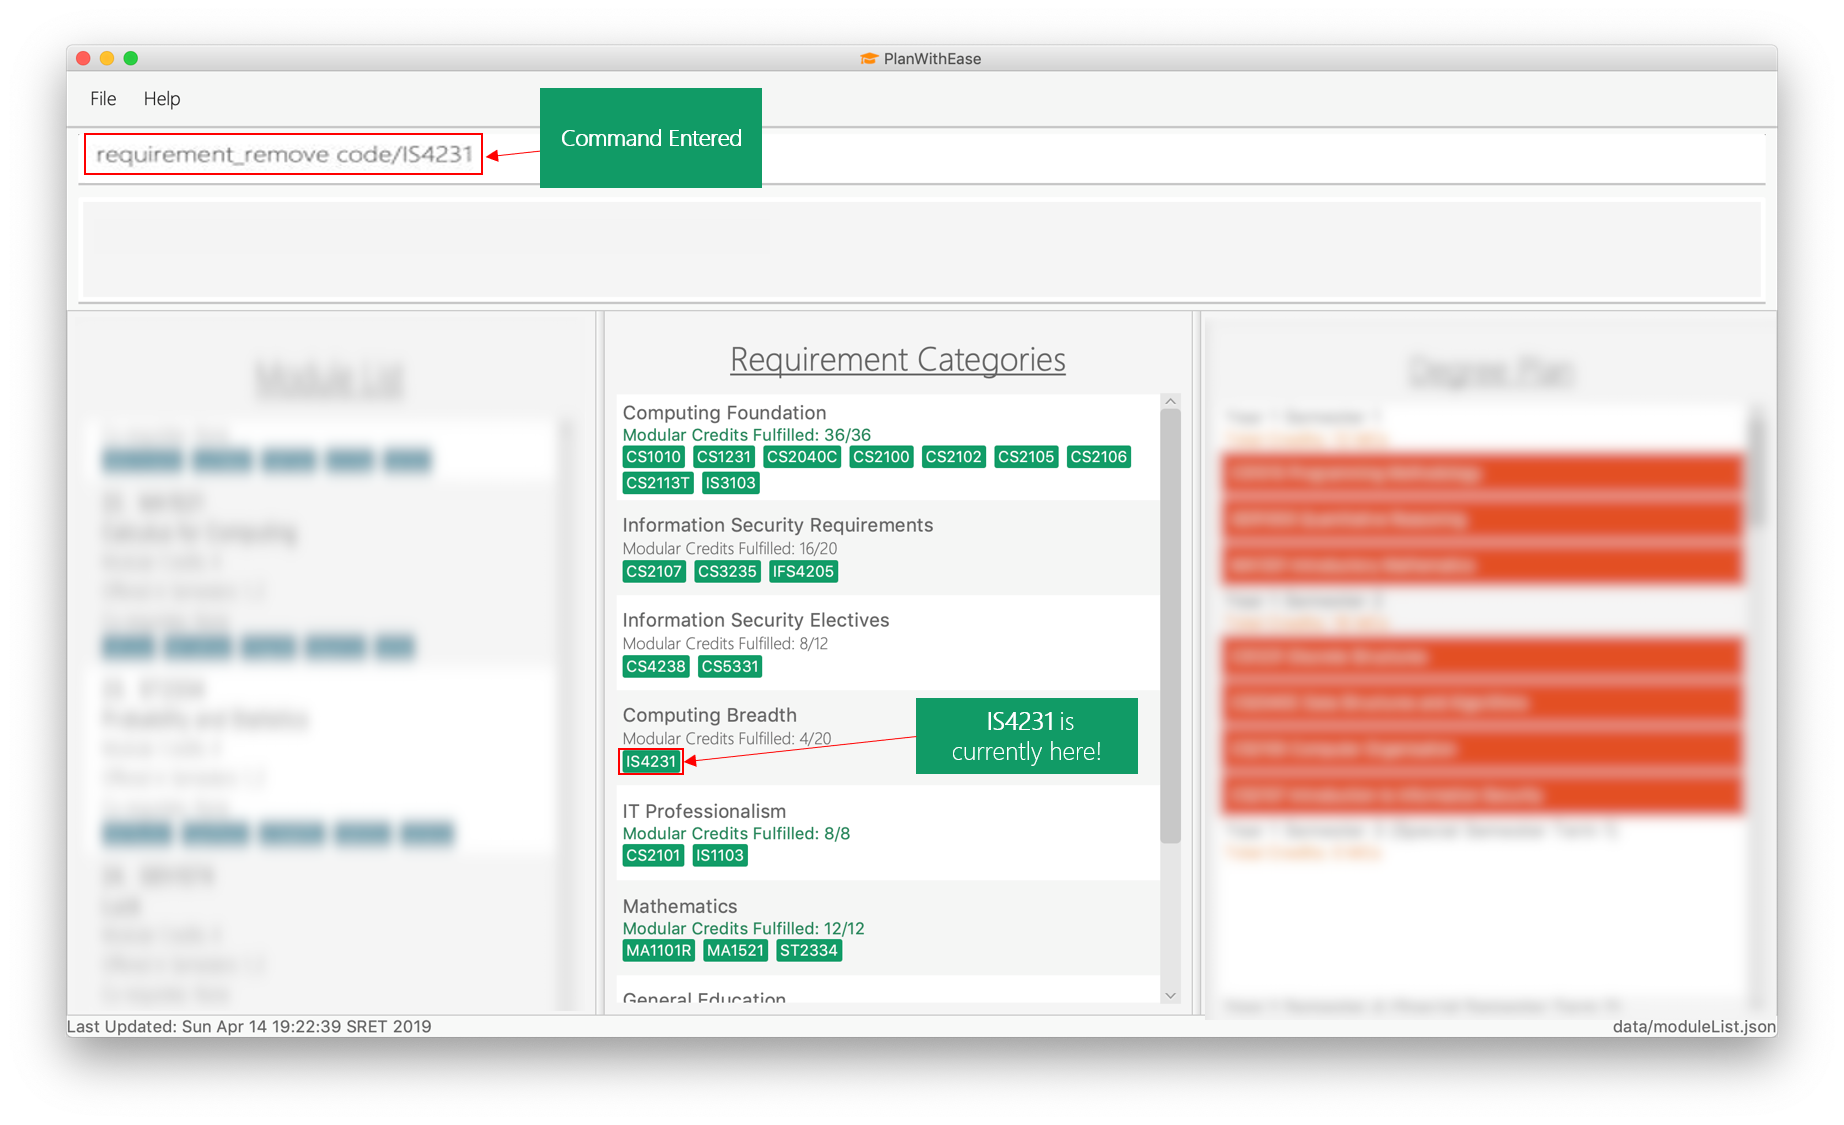
Command Format: requirement_remove code/CODE [code/CODE]…
|
If you want to delete the module entirely, simply use the |
Examples:
-
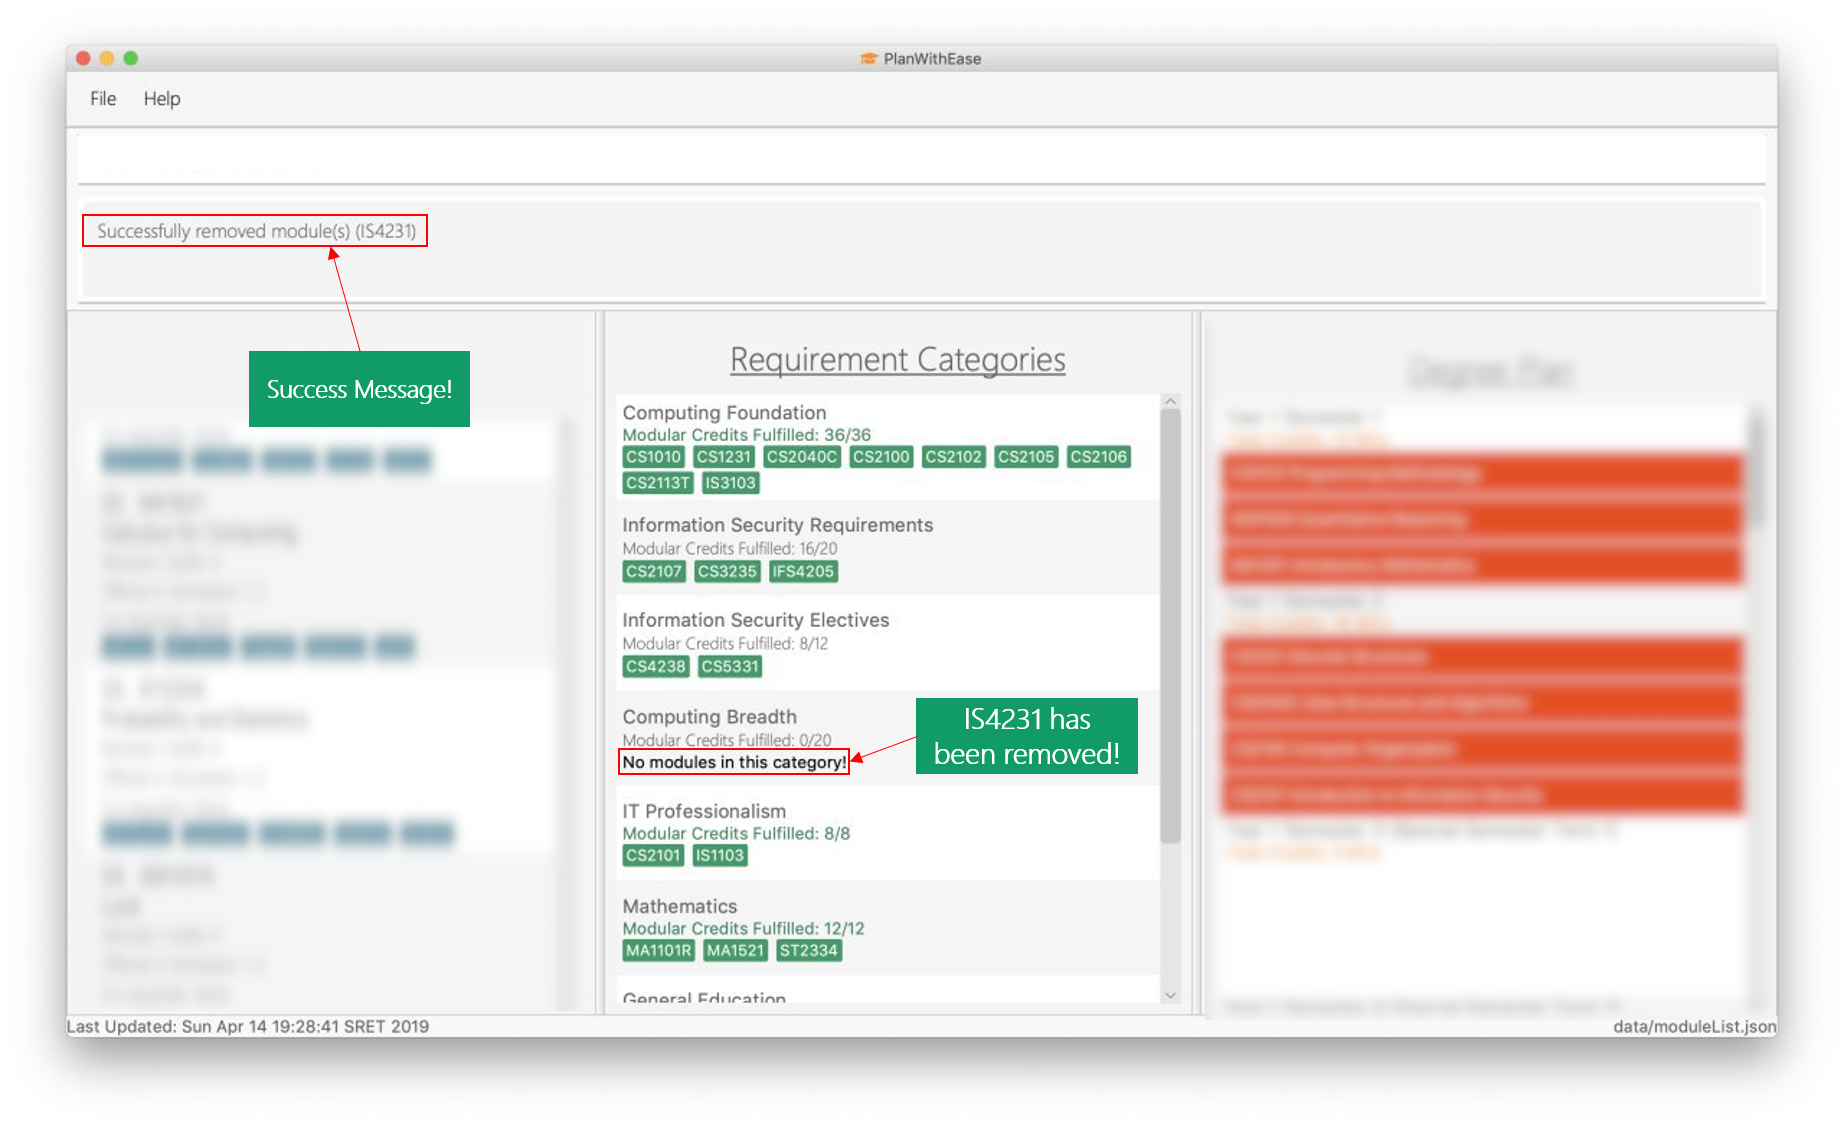
requirement_remove code/IS4231
Removes the module codeIS4231from the degree requirement category.
The two images below this command describes what you should see when you execute the above command
-
requirement_remove code/CS1231 code/CS2100
Removes module codesCS1231andCS2100from the degree requirement category.
4.3.3. Moving modules between requirement categories : requirement_move 
Having seconds thoughts about which degree requirement category the module code should be classified under?
Or simply added the module code to the wong degree requirement category?
No worries, requirement_move will allow you to move the specified module to another degree requirement category.
Command Format: requirement_move name/NAME code/CODE [code/CODE]…
|
The |
|
Unlike the |
Examples:
-
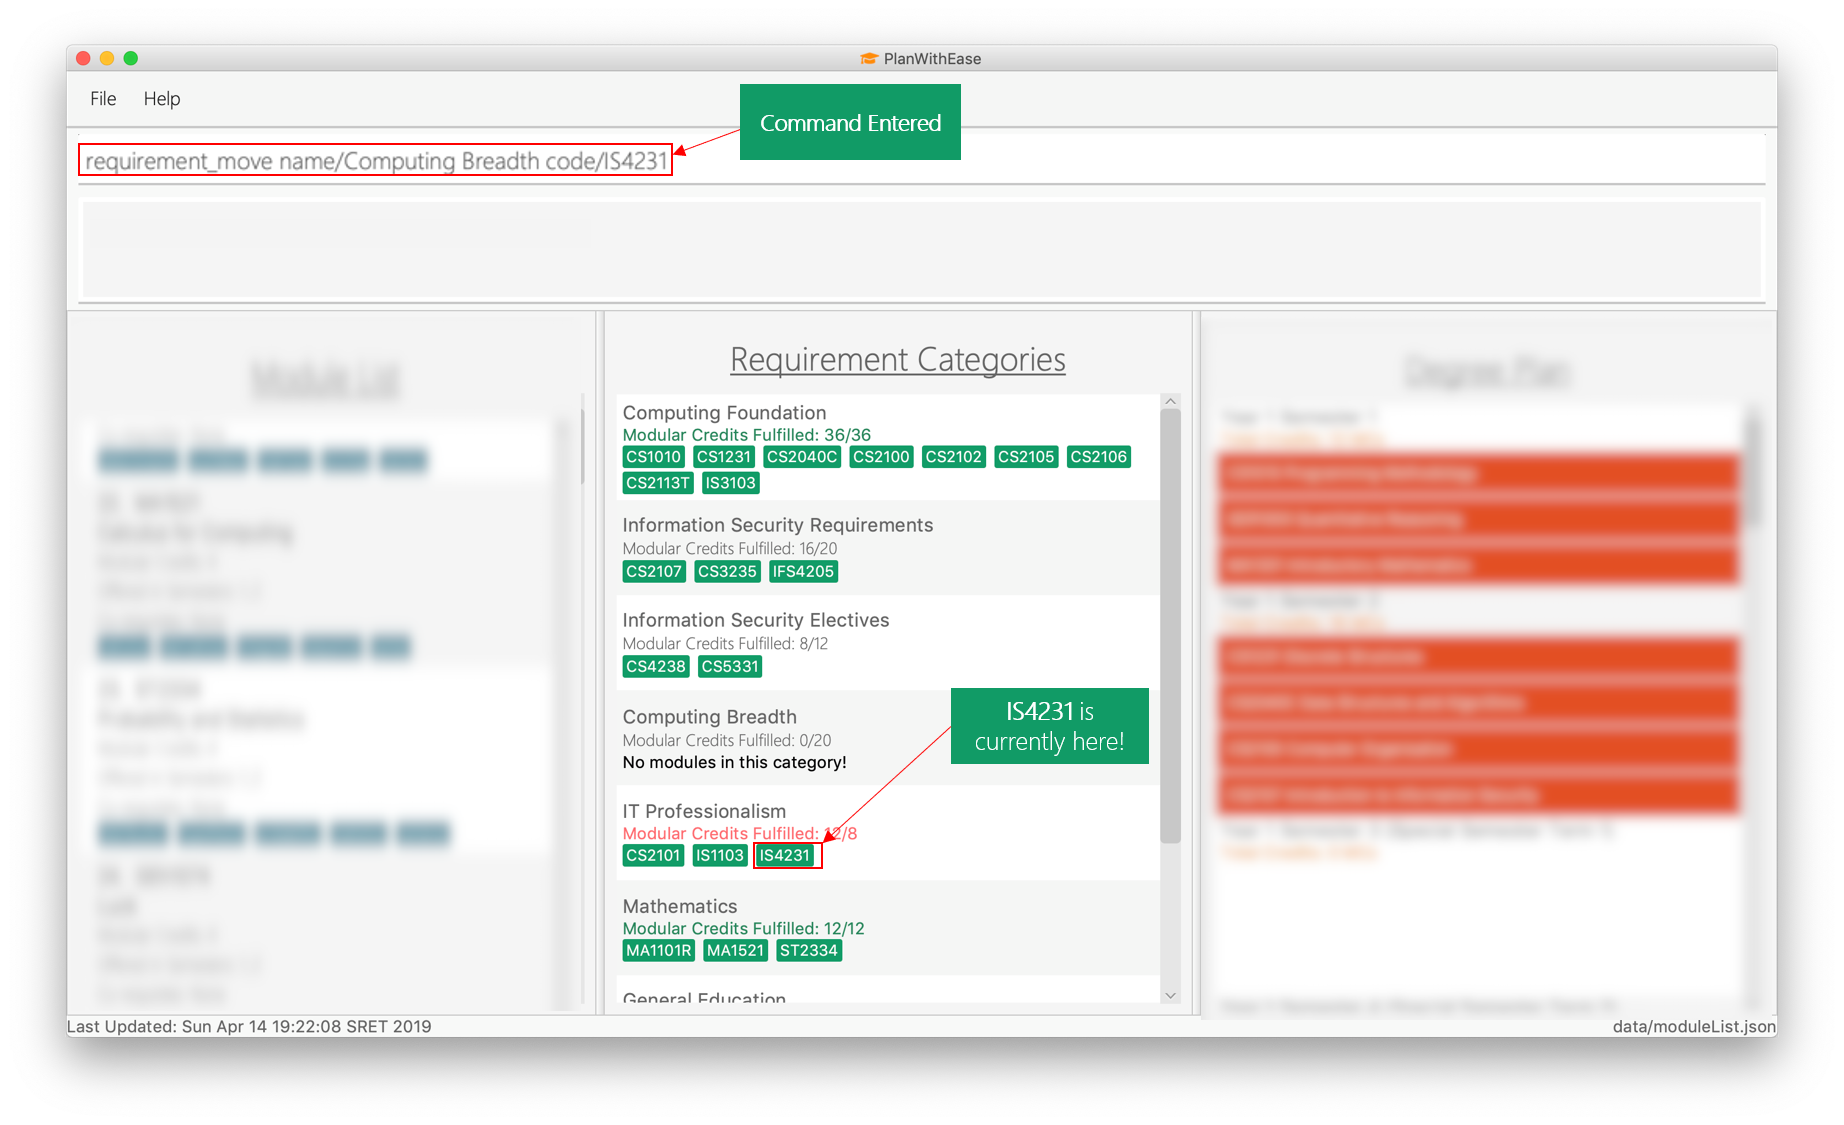
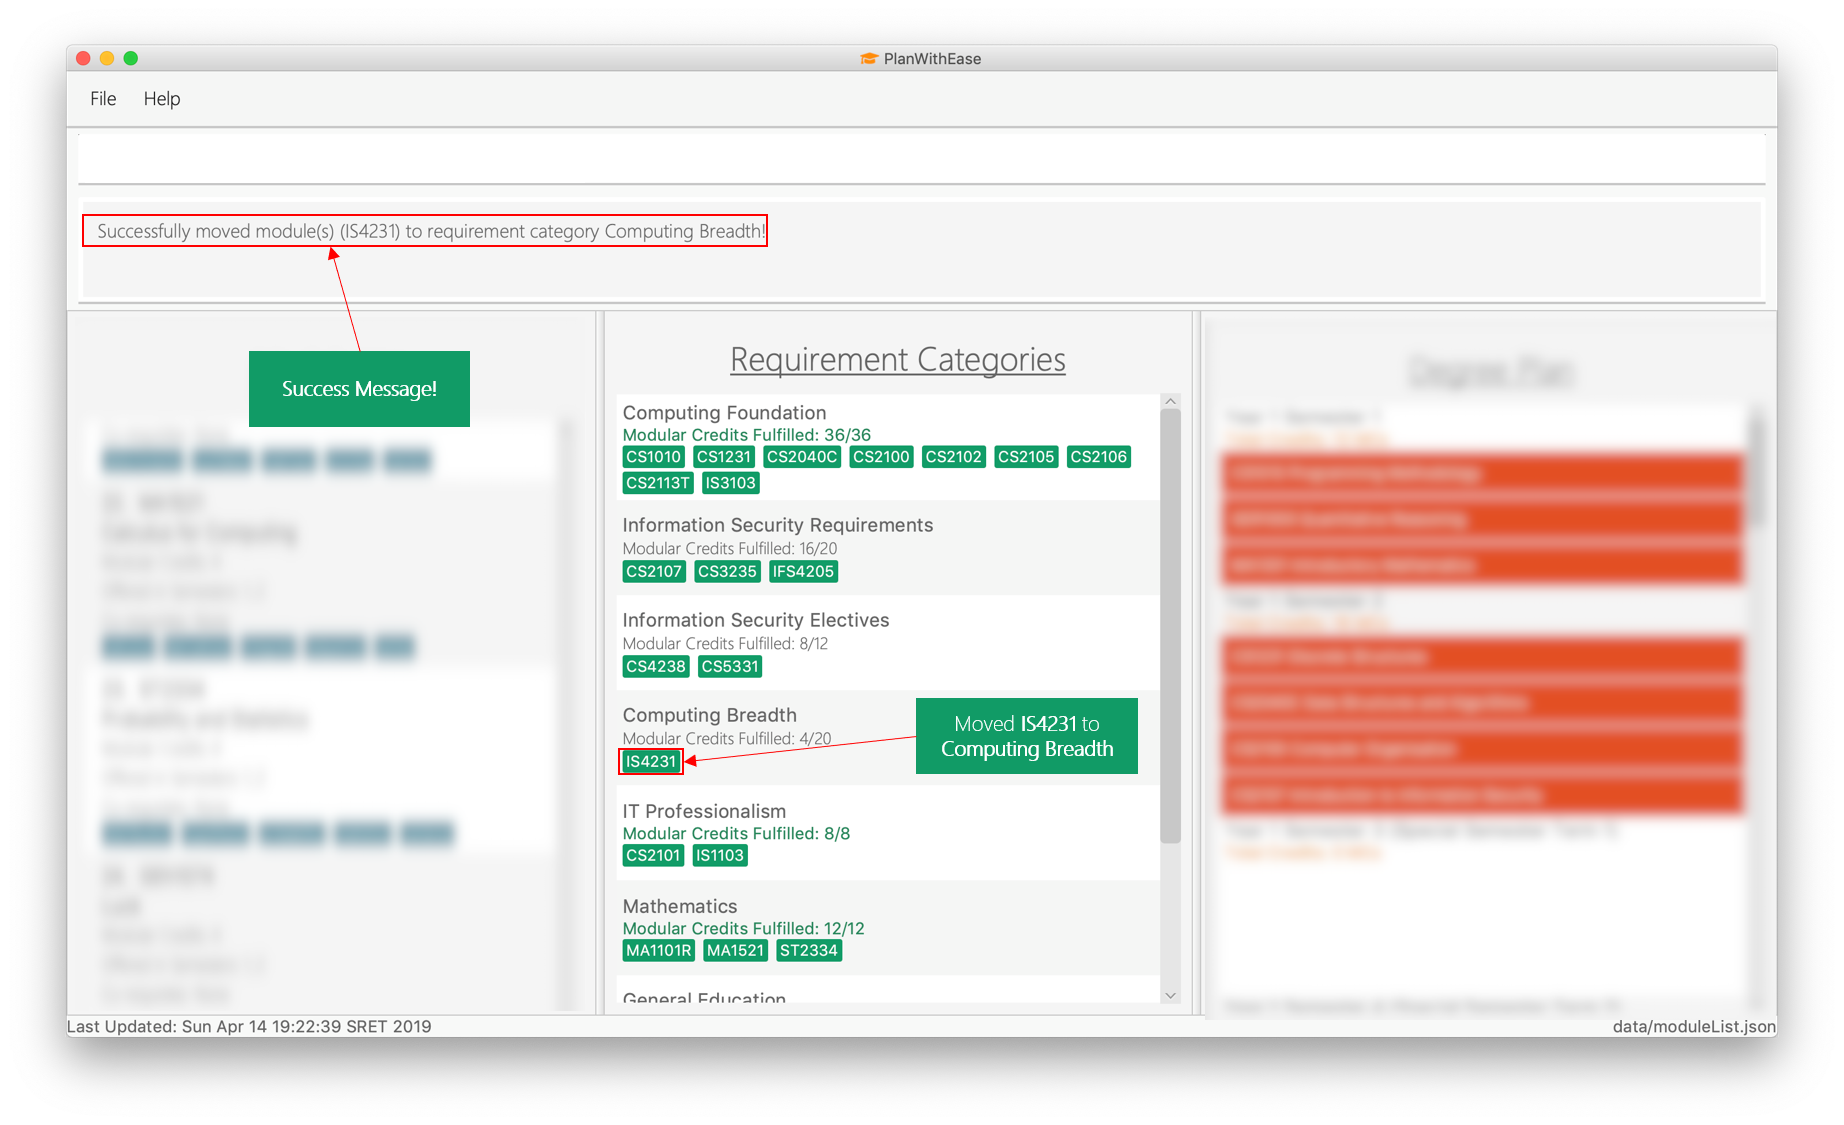
requirement_move name/Computing Breadth code/IS4231
Moves the module codeIS4231to the degree requirement category `Computing Breadth.
The two images below this command describes what you should see when you execute the above command
-
requirement_move name/Computing Foundation code/CS1231 code/CS2100
Moves module codesCS1231andCS2100to the degree requirement categoryComputing Foundation.
4.3.4. Listing all requirement categories : requirement_list 
Shows a list of all degree requirement categories in the application and the module codes added into each degree requirement category.
Command Format: requirement_list
Examples:
-
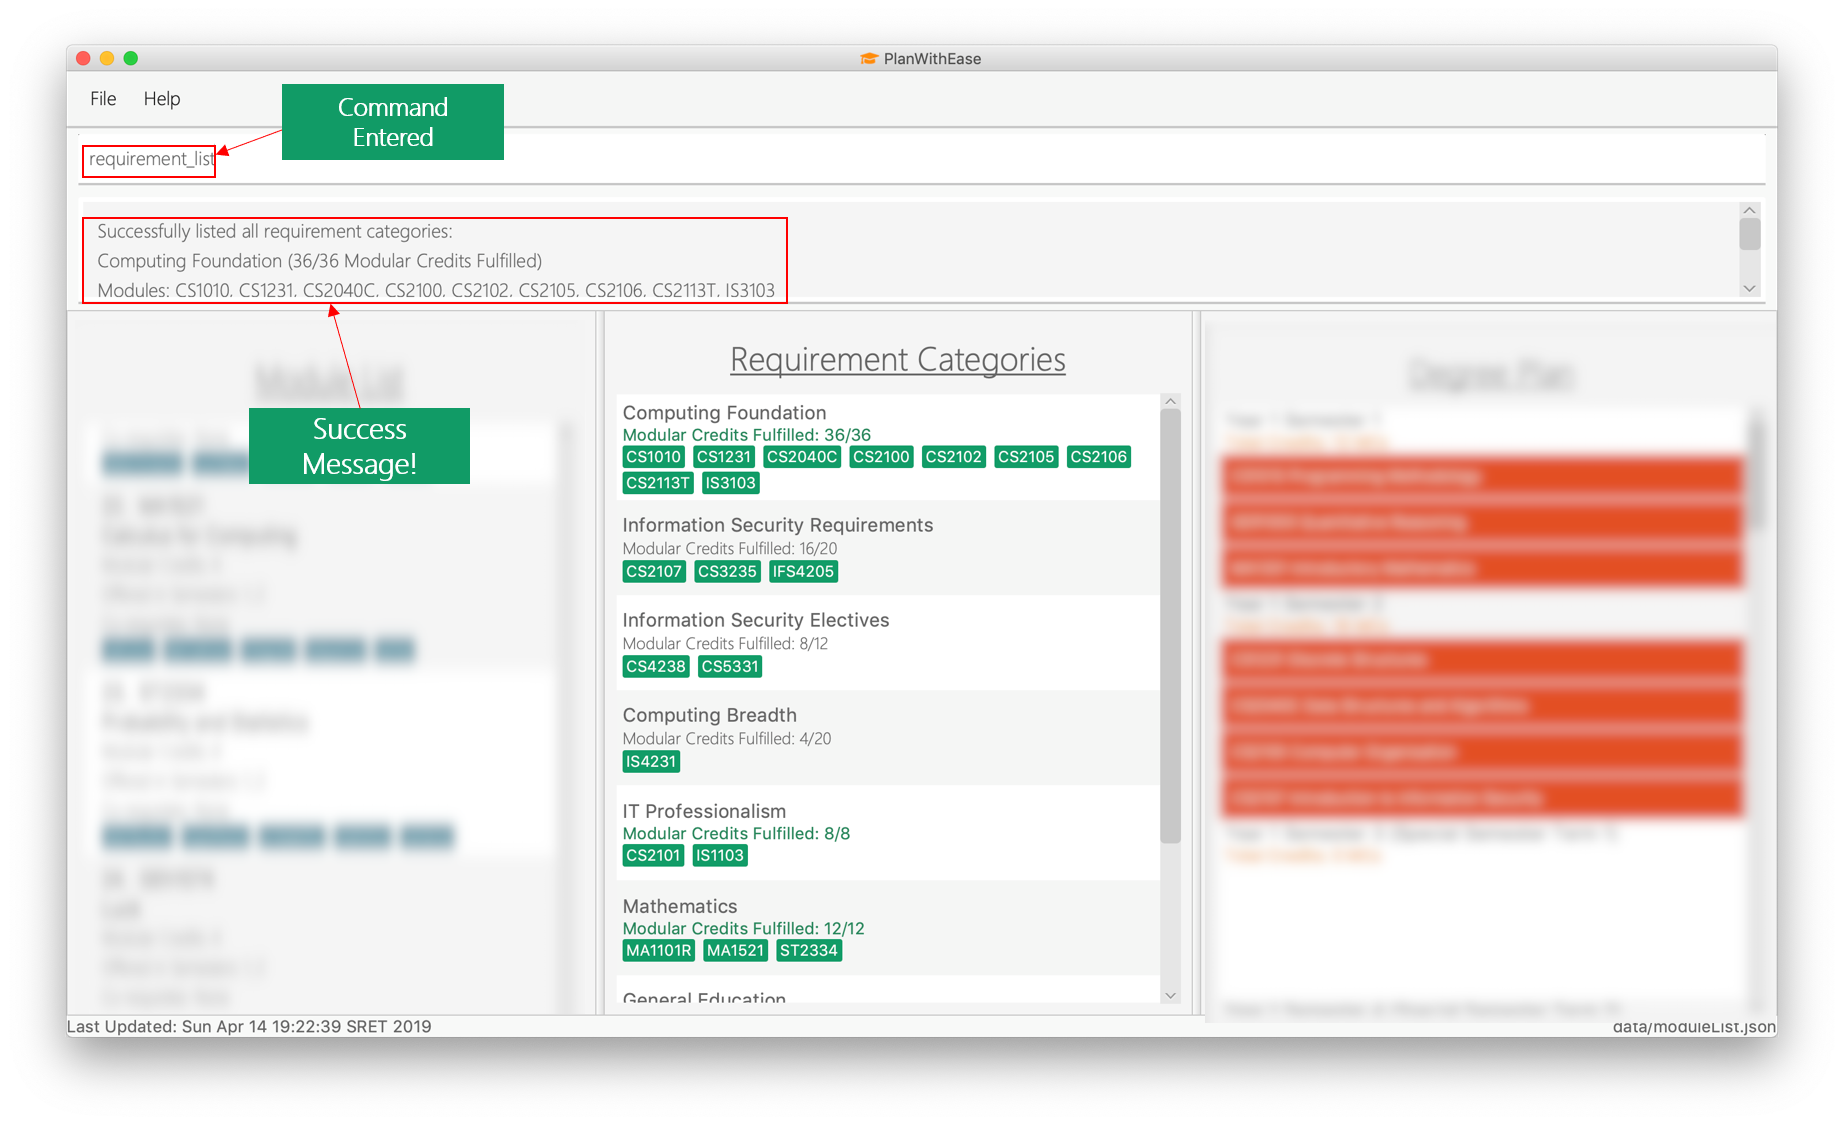
requirement_list
The image below this command describes what you should see when you execute the above command
4.4. Degree Plan Management
The following table describes the parameters you may use for commands in this section.
Parameter |
Description |
Acceptable Range of Values |
|
Indicates the module code |
|
|
Indicates the year of one of the semesters in the degree plan. |
|
|
Indicates the semester of one of the semesters in the degree plan. |
|
|
4.4.1. Adding modules : planner_add 
Want to add modules to the degree plan?
Make use of the planner_add command to add one or multiple modules to the degree plan.
Command Format: planner_add year/YEAR sem/SEMESTER code/CODE [code/CODE]…
|
Examples:
-
planner_add year/1 sem/3 code/CS1010
Adds moduleCS1010to year 1 semester 3 (special term semester 1) of the degree plan. -
planner_add year/1 sem/4 code/CS1231 code/CS2040C
Adds modulesCS1231andCS2040Cto year 1 semester 4 (special term semester 2) of the degree plan. -
planner_add year/1 sem/2 code/CS2113T code/CS2107
Adds modulesCS2113TandCS2107to year 1 semester 2 of the degree plan.
4.4.2. Removing modules : planner_remove 
Want to remove modules from the degree plan?
Make use of planner_remove command to remove one or multiple modules from the degree plan.
Command Format: planner_remove code/CODE [code/CODE]…
|
Examples:
-
planner_remove code/CS1231
Removes moduleCS1231from the degree plan. -
planner_remove code/CS2100 code/CS2040C
Removes modulesCS2100andCS2040Cfrom the degree plan.
4.4.3. Moving a module between semesters: planner_move 
Any change in your decision? Want to take your module in other semester instead?
No worry! Simply use planner_move command to move your module in the degree plan along with its co-requisite(s)
between the semesters by providing your module code and a semester you want to move your module to.
Command Format: planner_move year/YEAR sem/SEMESTER code/CODE
|
When moving a module with co-requisites, if the module is moved successfully, the co-requisite modules will be moved as well. |
Examples:
-
planner_move year/1 sem/2 code/CS1231
Moves module CS1231 along with its co-requisite(s) to year 1 semester 2. -
planner_move year/2 sem/1 code/CS1231
Moves module CS1231 along with its co-requisite(s) to year 2 semester 1.
Before the planner_move command:
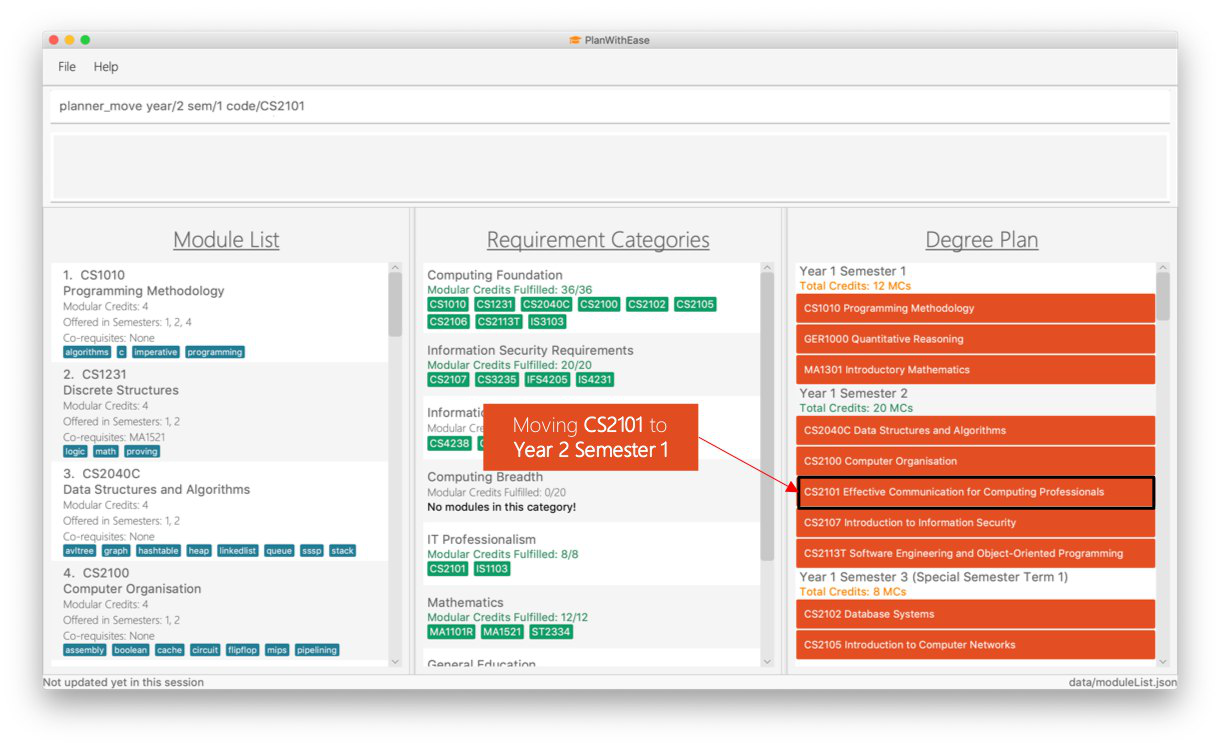
planner_move command.After entering planner_move and pressing Enter:
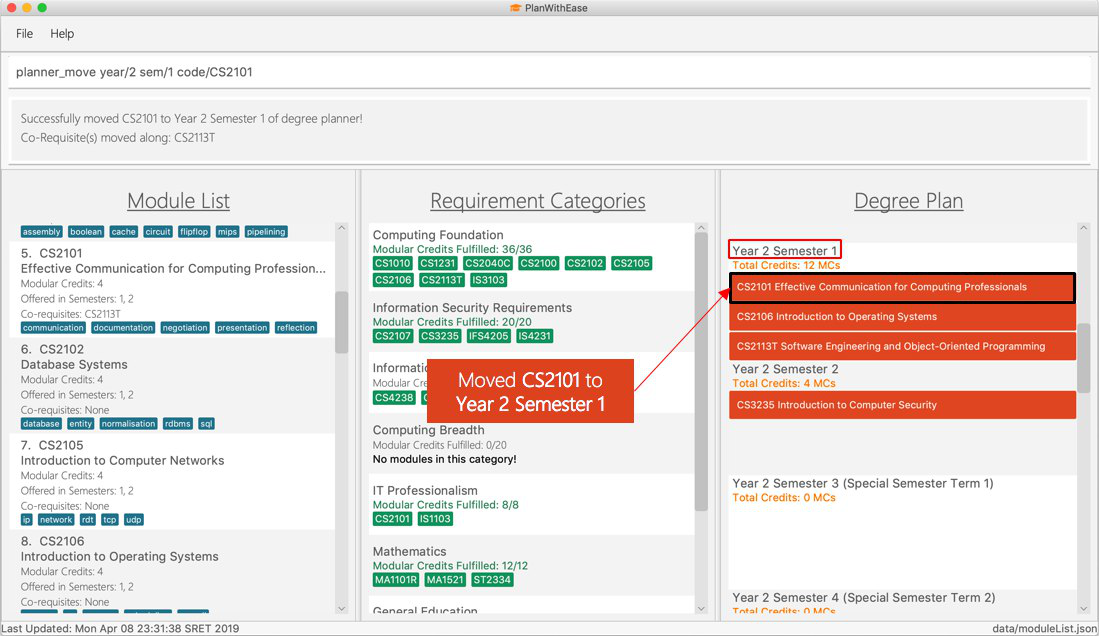
planner_move command.Note that co-requste of the module is moved too:
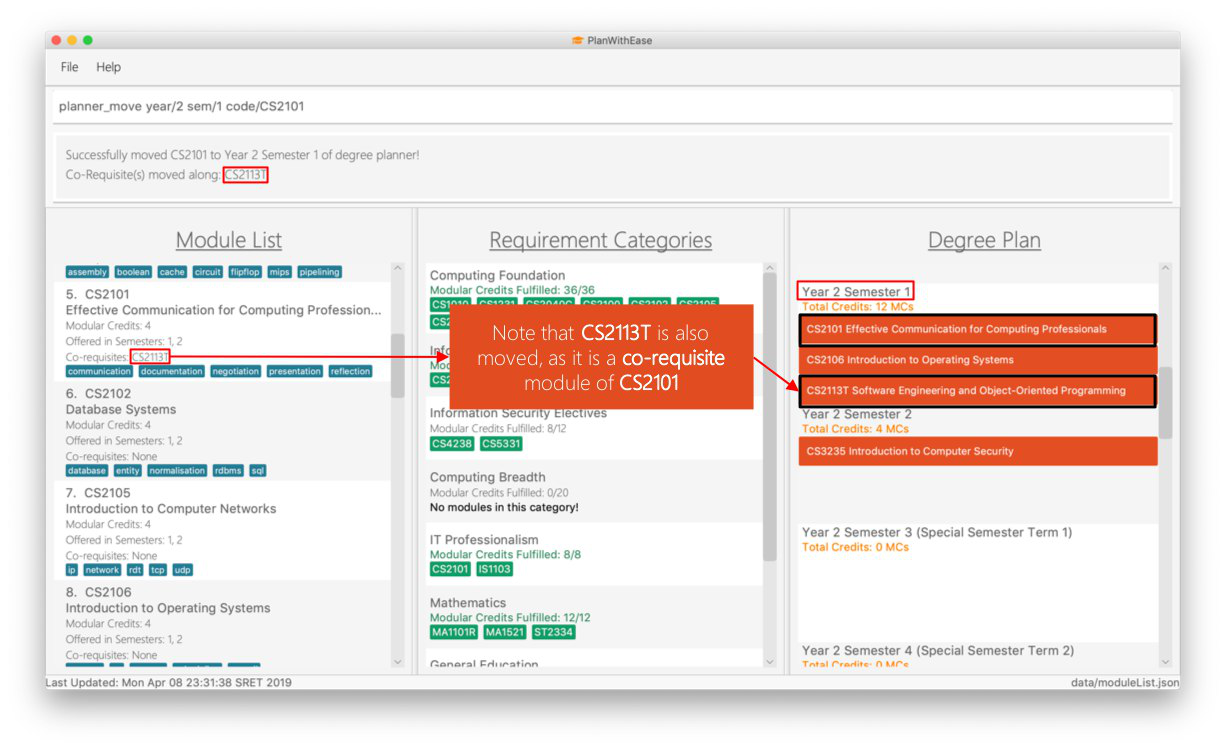
planner_move command.4.4.4. Showing semesters based on year/semester: planner_show 
Having trouble locating semesters you want?
Simply use planner_show command. It will only show you the semesters you want to see.
Command Format: planner_list [y/YEAR] OPERATOR [s/SEMESTER]
When this command is used, the application will display only those semesters which satisfy the search criteria.
The following table describes the valid prefixes that you can use to supply to the search criteria.
Prefix |
Description |
|
Search for any semester |
|
Search for any semester |
The following table describes the valid operators which you can to use supply to the search criteria.
Operator |
Description |
Precedence |
|
Logical "AND" operation (both conditions A AND B must match) |
Highest |
|
Logical "OR" operation (either conditions A OR B must match) |
Lowest |
The following examples describes how you could form a valid search criteria for the planner_show command.
Single Prefix Usage |
Expected Result |
|
Shows only semesters that are in year |
|
Shows only semesters that are in semester |
If you need multiple prefixes, the following table shows you how you could do it.
Note that you will need to separate multiple prefixes with an operator.
|
You could choose which search criteria having a higher priority by specifying parenthesis |
Multiple Prefix Usage |
Expected Result |
|
Shows only semesters that are in years |
|
Shows only semesters that are in semester |
|
Shows only semesters that are in year |
Examples:
-
planner_show year/1
Shows any semesters having the year1(e.g.Year 1 Semester 1,Year 1 Semester 2…) in the degree plan. -
planner_show sem/1
Shows any semesters having the year1(e.g.Year 1 Semester 1,Year 2 Semester 1…) in the degree plan. -
planner_show year/1 || year/2
Shows any semesters having the year1or year2in the degree plan. -
planner_show sem/1 || sem/2
Shows any semesters having the semester1or semester2in the degree plan. -
planner_show year/1 && sem/1
Shows a semester having the year1and semester1(e.g.Year 1 Semester 1)in the degree plan. -
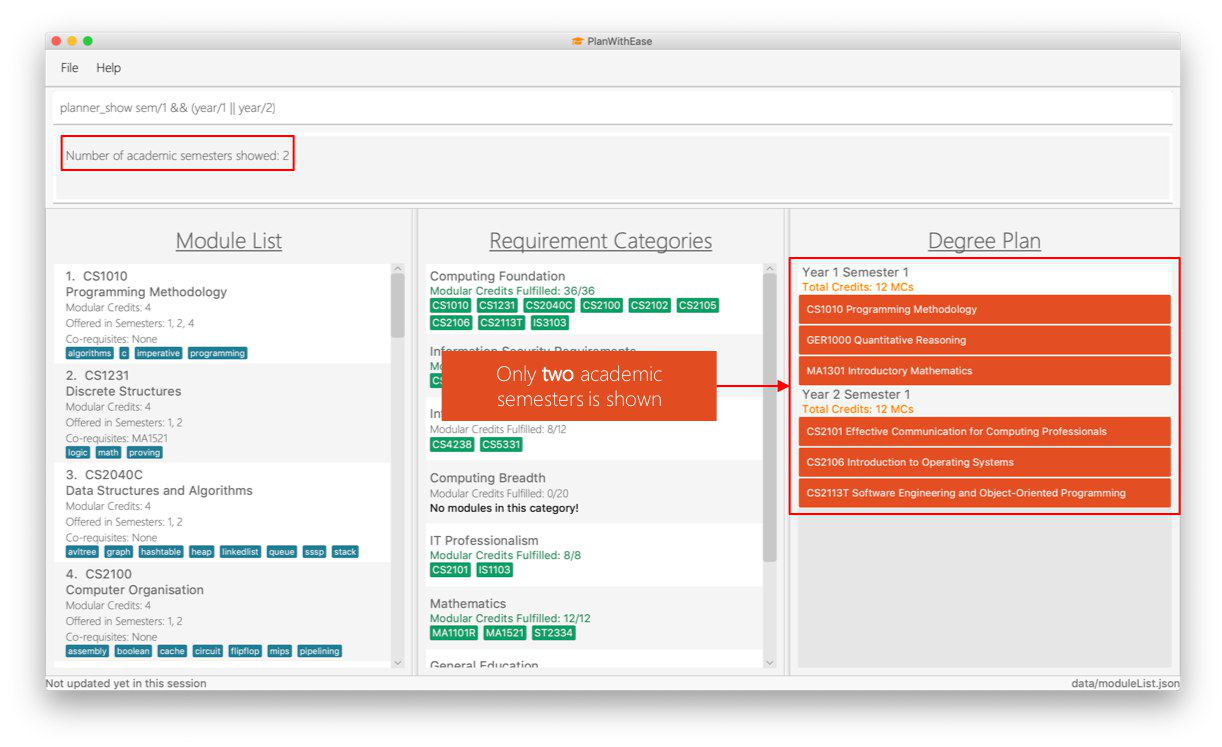
planner_show sem/1 && (year/1 || year/2)
Shows a semester having the year1semester1and year2semester1(e.g.Year 1 Semester 1andYear 2 Semester 2) in the degree plan.
Before the planner_show command:

planner_show command.After entering planner_show and pressing Enter:
planner_show command.4.4.5. Listing all semesters: planner_list 
Maybe you need to list all your semesters back after using planner_show?
Simply enter planner_list into the application!
It wil show you a list of all semesters in degree plan.
Command Format: planner_list
4.4.6. Using degree plan to suggest modules : planner_suggest 
Having trouble identifying modules to add to the degree plan?
Make use of planner_suggest command to find out recommended modules to add to the degree plan.
Command Format: planner_suggest credits/CREDITS [tag/TAG]…
When this command is successfully executed, the result box will display modules recommended.
|
Examples:
-
planner_suggest credits/4
Suggests maximum 10 modules not found in the degree plan, prioritizing modules with credits closer to 4. If tie, prioritizes according to alphabetical order. -
planner_suggest credits/2 tag/algorithms
Suggests maximum 10 modules not found in the degree plan, prioritizing modules with tagalgorithms. If tie, prioritizes according to credits closer to 2. If tie again, prioritizes according to alphabetical order.
5. Future Enhancements [coming in v2.0]
These are features that will come in future releases of PlanWithEase
5.1. Module Prerequisites prereq/
We aim to provide the support of prerequisites for our Module Management.
This changes will allow our users to indicate a module prerequisites and we can handle its dependency for the users
before they add the module into the Degree Plan.
5.2. Auto-create Degree Plan autoplan
We plan to implement this feature to allow an automated planning, we can make use of users feedback and current treads based on module popularity then create the degree plan for the users.
6. FAQ
Q: How do I save my data in the application?
A: You do need to save the data manually. Whenever you run any commands that makes changes, PlanWithEase's data are saved automatically in the data directory.
7. Command Summary
This section provides a quick references for all commands available in PlanWithEase.
7.1. General Commands
The table below shows a list of general commands.
Task |
Purpose |
Command Format |
Example |
Help |
Displays the User Guide |
|
|
History |
Get a list of command entered |
|
|
Undo |
Undo your previous action |
|
|
Redo |
Redo your previous action |
|
|
Clear |
Clear the all the modules from the specified section |
|
|
Reset |
Resets and populates the application with sample data |
|
|
Exit |
Exits the application |
|
|
7.2. Module Management Commands
The table below shows a list of commands which helps you to manage the module list.
Task |
Purpose |
Command Format |
Example |
Add module to module list |
Add a new module to the module list. |
|
|
Edit the details of a module |
Edit the module’s details based on the index given. |
|
|
Delete module from module list |
Remove the module entirely from the module list based on the index given. |
|
|
Find modules in the module list |
Display a list of modules based on your search criteria |
|
|
List all modules |
List all modules available in the module list |
|
|
Selecting a module |
Selects a module in the module list |
|
|
7.3. Requirement Tracker Commands
The table below shows a list of command which helps you to manage and track your degree requirements.
Task |
Purpose |
Command Format |
Example |
Add module(s) to a requirement category |
Add module(s) to the specified requirement category based on the module code provided. |
|
|
Remove module(s) from the requirement category |
Remove module(s) from the requirement category based on the module code provided. |
|
|
Move module(s) between requirement categories |
Move module(s) between the requirement categories from any requirement categories to a specified requirement categories. |
|
|
List all requirement categories in the application |
List all requirement categories in the application and the module(s) added to each requirement categories |
|
|
7.4. Degree Plan Commands
The table below shows a list of commands which helps you to manage the degree plan.
Task |
Purpose |
Command Format |
Example |
Add module(s) to degree plan |
Add module(s) to degree plan based on module code and academic year |
|
|
Remove module(s) from degree plan |
Remove module(s) from degree plan based on the module code |
|
|
Move module between semesters in the degree plan |
Move module between the semesters based on year and semester. |
|
|
List all semesters in the degree plan |
List all semesters in the degree plan |
|
|
List specific semesters in the degree plan |
List specific semesters in the degree plan based on your search term. |
|
|
Suggest available modules |
Suggest available modules from the module lists based on input argument. |
|
|