PROJECT: PlanWithEase
Greetings! I am Yeo Cheng Hong, a Year 2 student studying in the National University of Singapore (NUS).
I have a burning passion for developing applications and software that have a positive impact on peoples’ life.
This portfolio serves as a documentation of my contributions and involvements of a team-based project that I recently
worked on for a module (CS2113T
Software Engineering & Object-Oriented Programming) here at NUS.
This project was completed over the span of 8 weeks by me and 4 other amazing students (Ahn TaeGyu, Bai YunWei, Lee Yu Choy, Ngo Wei Lin).
I believe that this project is able to illustrate how I am able to turn my passion into a positive impact.
Overview
PlanWithEase (PWE) is an application designed to help National University of Singapore (NUS) Information Security freshmen in creating a comprehensive degree plan according to the degree requirements.
The main motivation behind PWE is to assist students by simplify the degree planning process, and at the same time provide them with an overview of the degree plan so that they are able to make informed decisions.
Understanding This Project Portfolio
The following symbols are used throughout this project portfolio:
|
This symbol denotes information that you may want to take note of when using PlanWithEase. |
|
This symbol denotes a tip which you may find useful when using PlanWithEase. |
|
This symbol denotes a warning message which you need to be careful of when using PlanWithEase. |
Summary of contributions
This section provides an overview of the contributions that I have made to this project
-
Major enhancement: Degree Requirement Management
-
This feature allows the user to manage the degree requirement categories in PlanWithEase easily using the
requirement_add,requirement_removeandrequirement_moveandrequirement_listcommands. -
Justification: This feature allows users to be able to keep track of the various different requirement categories. So that they are able to fulfill all the degree requirement categories in order to graduate on time.
-
Highlights: This enhancement provides an overview of all the degree requirement categories by listing the modules added to each degree requirement category as well as the current credit count of each degree requirement category.
-
-
Code contributed : [Commits] [Pull Requests] [RepoSense Code Contribution Dashboard]
-
Notable Enhancements to the project:
Contributions to the User Guide
The following are documentations made to the User Guide which acts as manual on how to use the features that I have implemented in PWE. On top of that, it provides me with an opportunity to showcase my ability to write documentation for end-users. |
Requirement Tracker
The requirement tracker allows you to manage and and track your degree requirements so that you are always on-track for graduation!
This section contains the various commands that you can use in this application to add, remove, move and list modules to and from the specified requirement categories in this application.
The following table describes the parameters you may use for the commands in this section.
Parameter |
Description |
Acceptable Range of Values |
|
Indicates the name of degree requirement category (e.g. |
|
|
Indicates the module code (e.g. |
|
|
|
|
Adding modules : requirement_add 
Want to see if you have fulfilled a particular degree requirement category?
Simply add the module code to a degree requirement category using the requirement_add command to find out.
Command Format: requirement_add name/NAME code/CODE [code/CODE]…
Examples:
-
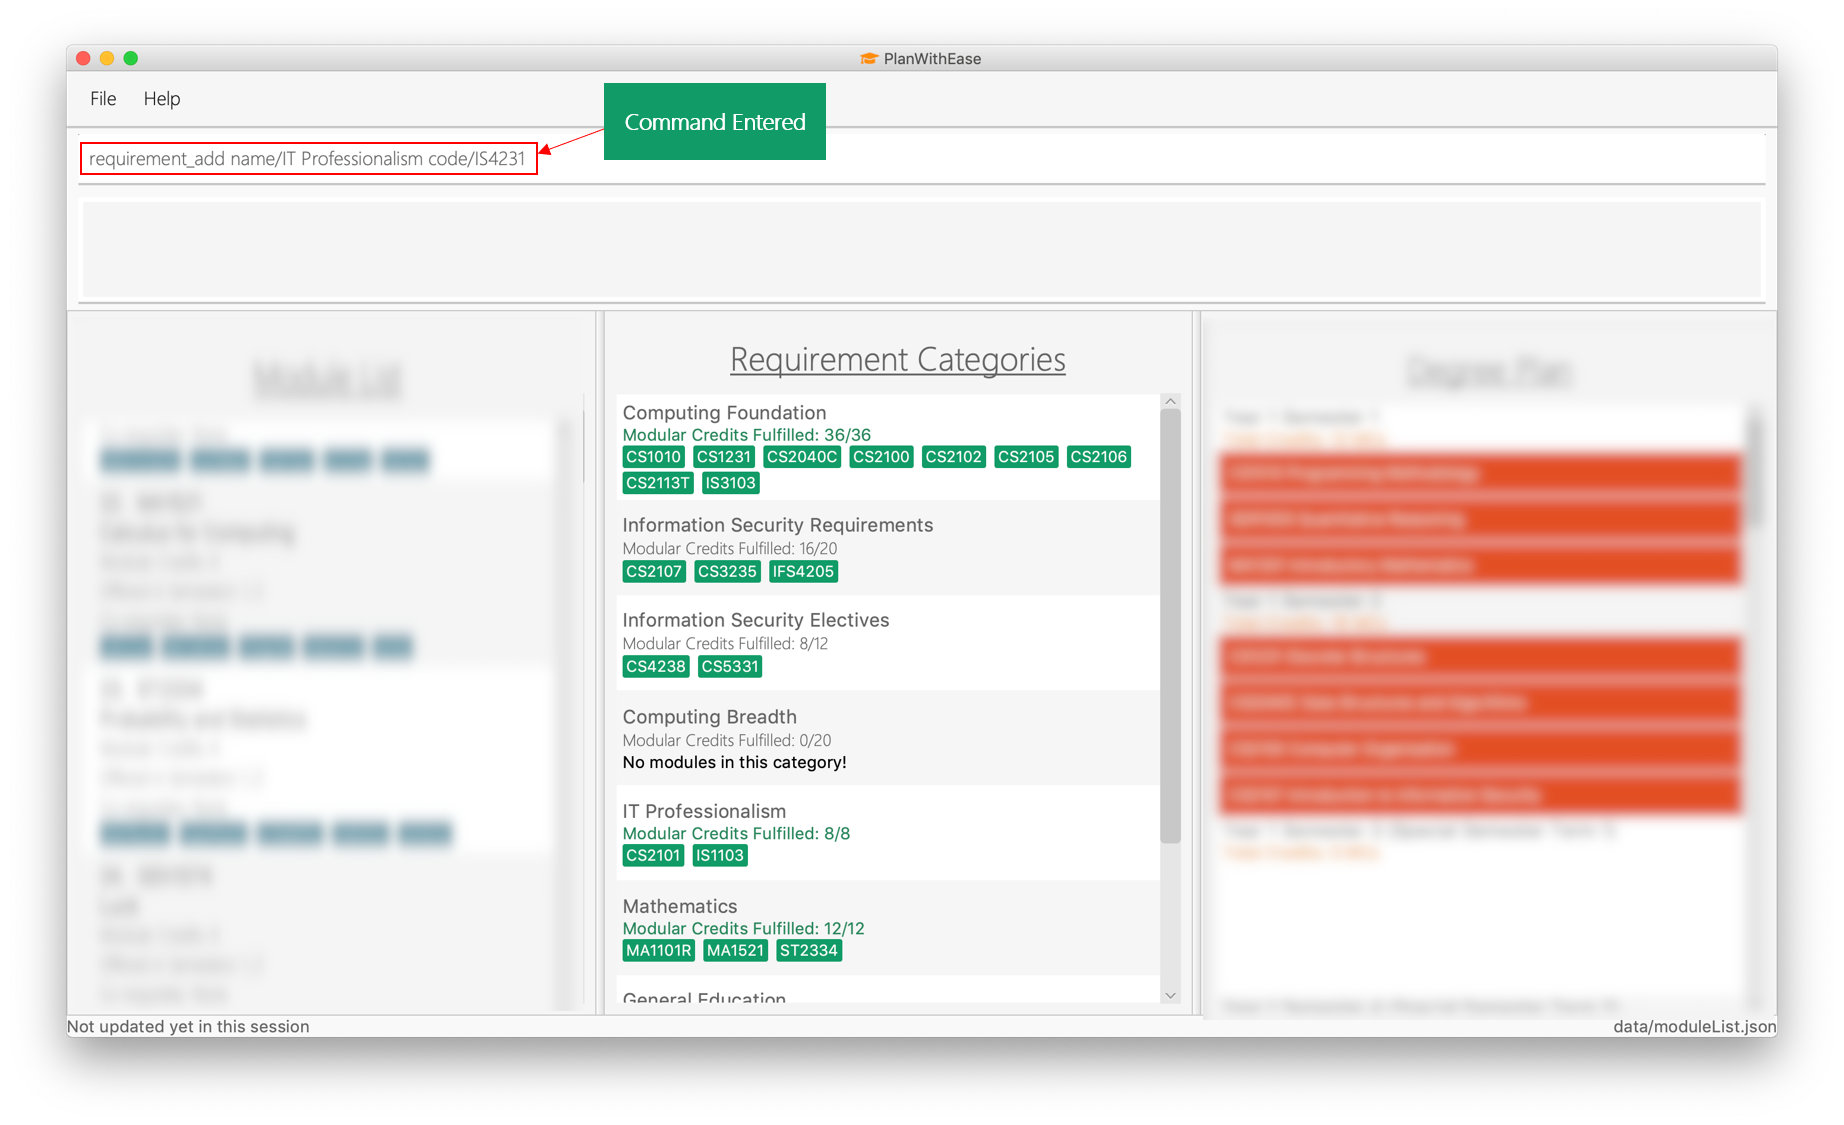
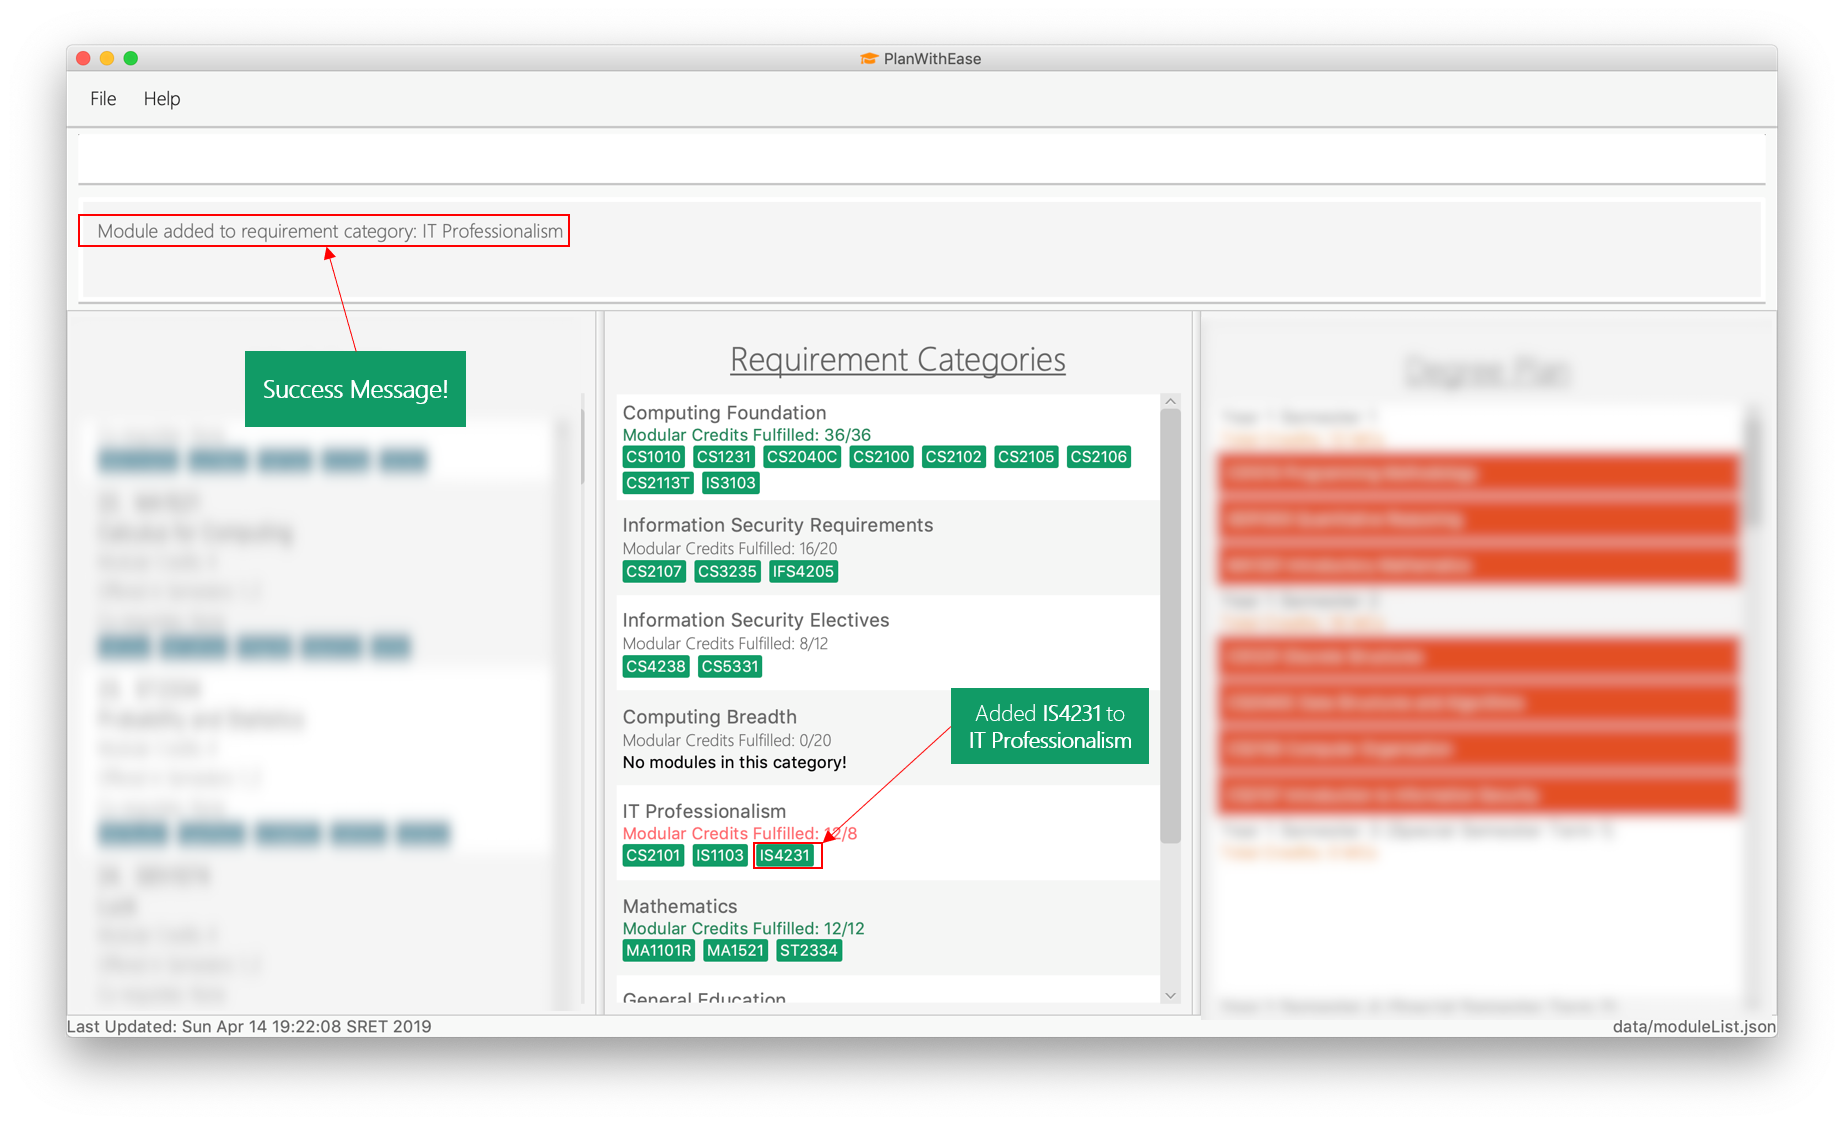
requirement_add name/IT Professionalism code/IS4231
Adds the module codeIS4231to the degree requirement categoryIT Professionalism.
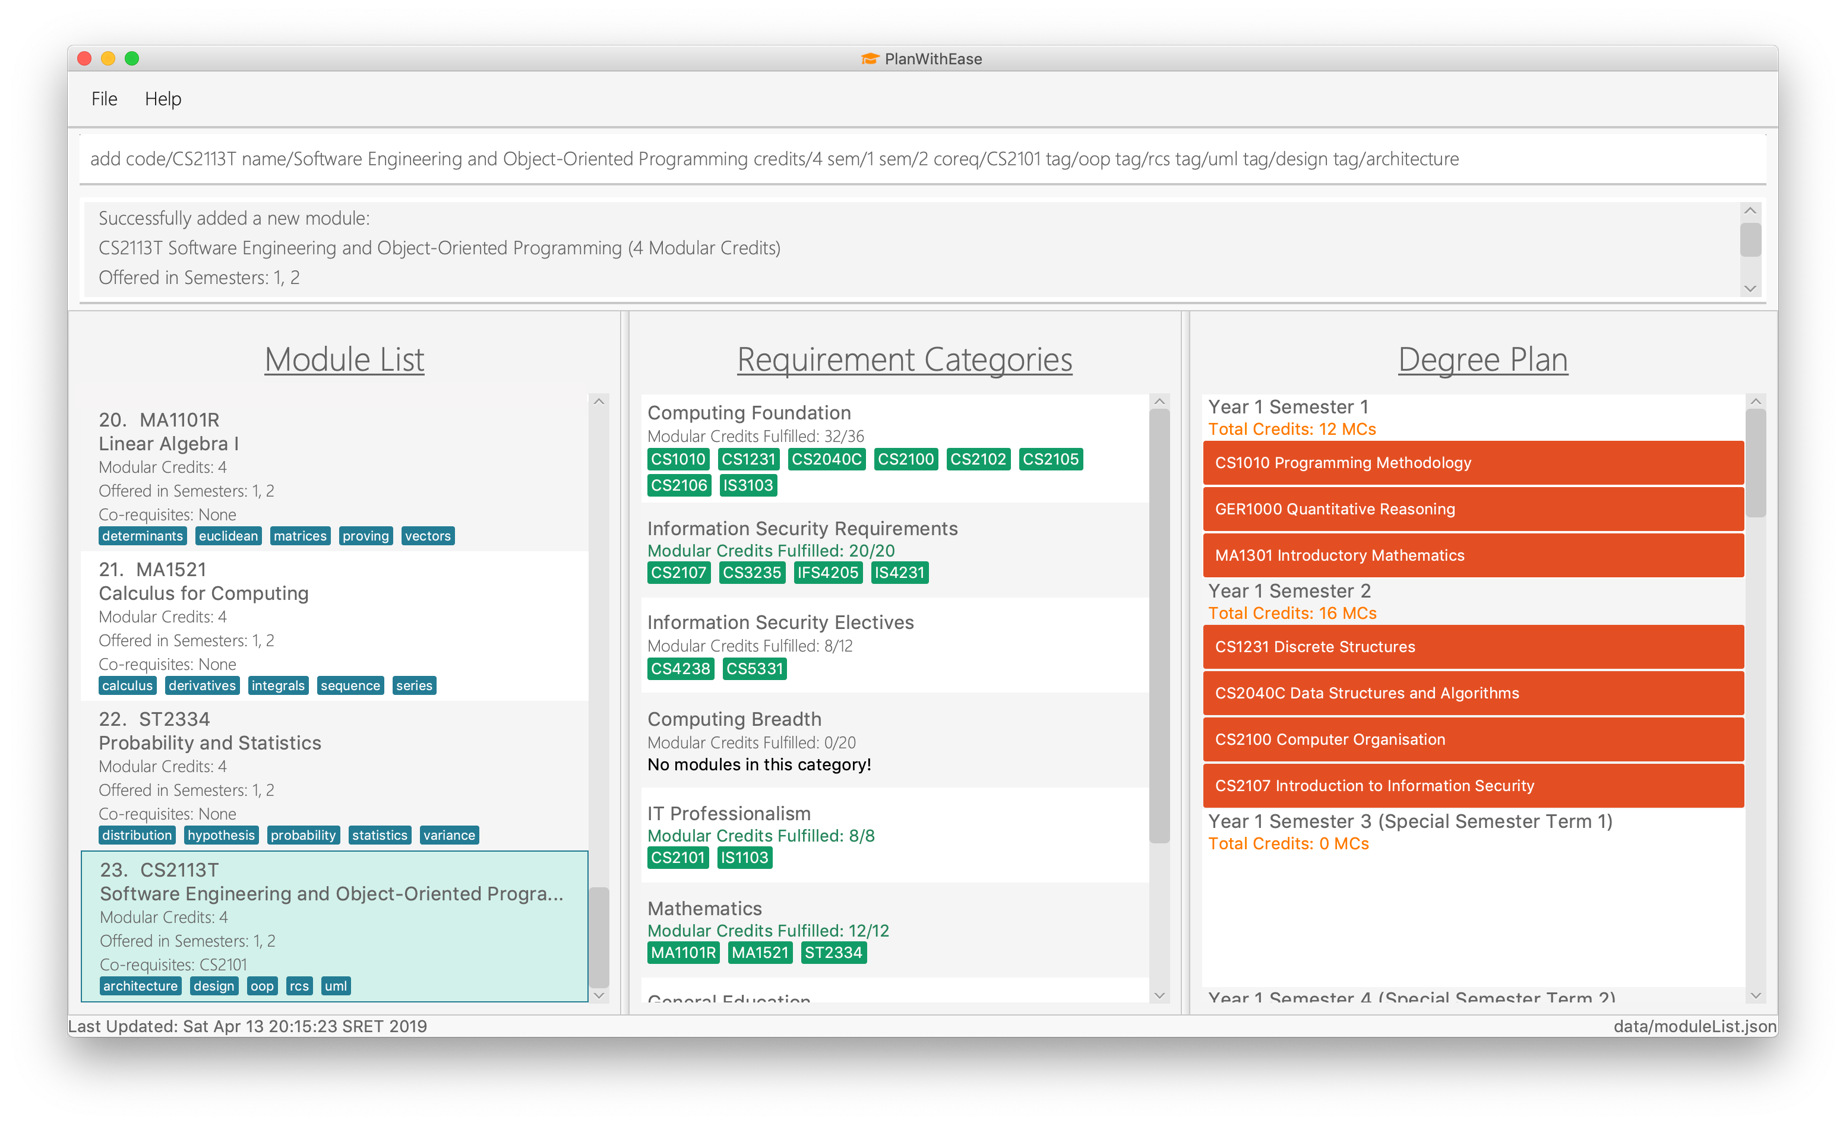
The two images below this command describes what you should see when you execute the above command
-
requirement_add name/Computing Foundation code/CS1231 code/CS2100
Adds module codesCS1231andCS2100to the degree requirement categoryComputing Foundation.
Contributions to the Developer Guide
The following are documentations made to the Developer Guide to serve as a manual to guide the developers on how the features are implemented PWE as well as insights on the design considerations made. On top of that, it provides me an opportunity to showcase my ability to write technical documentation and the technical depth of my contributions to PWE.. |
Requirement Add Feature
The requirement add feature in the application aims to help users to keep track and check if they have fulfilled a particular degree requirement category by adding module code(s) to the specified requirement category.
Current implementation
When the user invokes the requirement_add command, e.g. (requirement_add name/Mathematics code/MA1531).
The following steps are taken by the application.
1. The CommandParser invokes the RequirementAddCommandParser class to parse the user input provided.
The parsed data will then be used to create a RequirementAddCommand object and will be returned to
LogicManager.
|
2. Upon receiving the RequirementAddCommand object, LogicManager would then invoke the RequirementAddCommand
class to pass the object received.
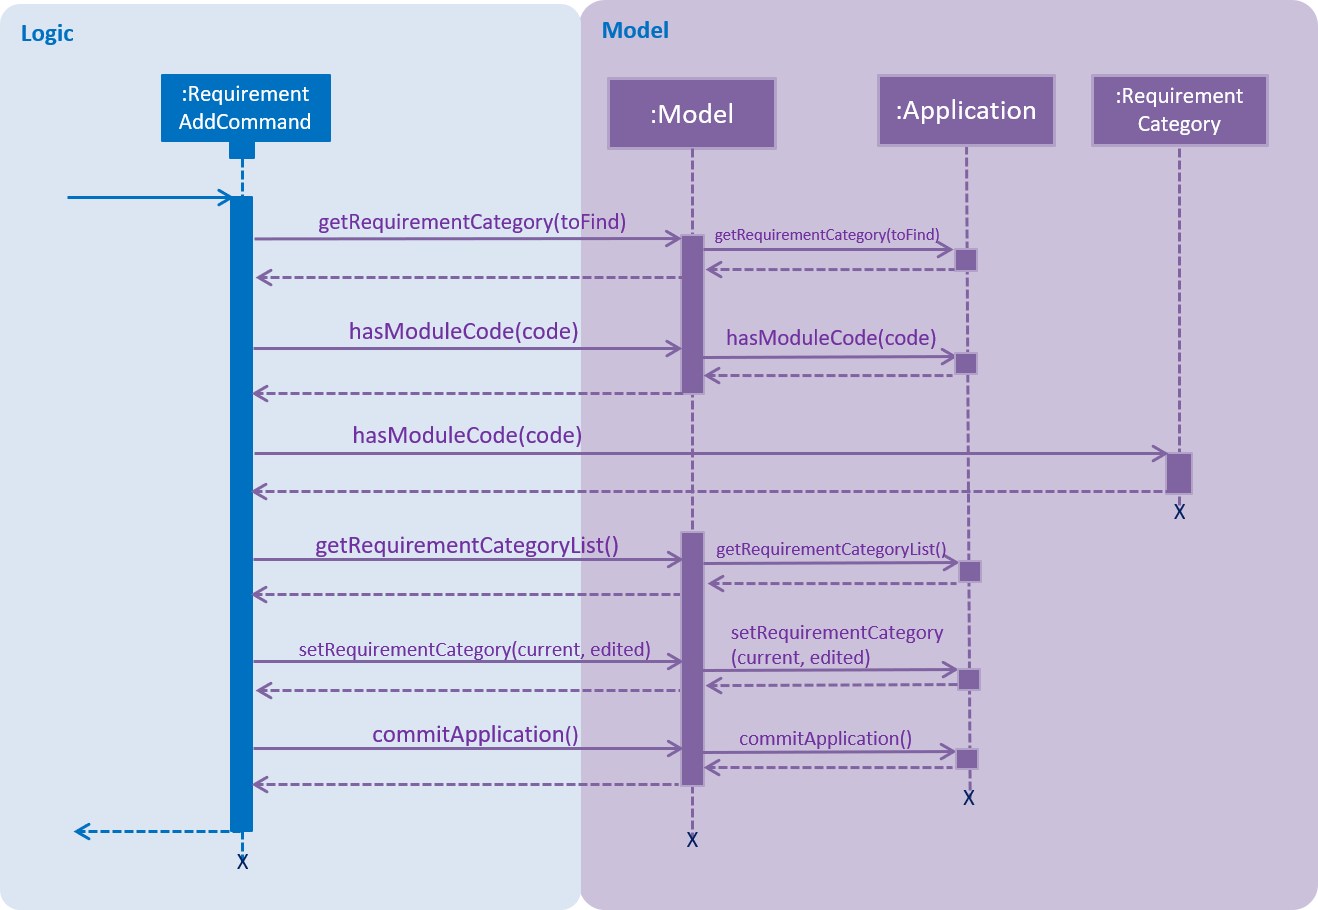
Once invoked, RequirementAddCommand will perform the following checks on the object received:
* Check if the degree requirement category exists in the application through getRequirementCategory
* Check if the module codes provided exists in the application through model.hasModuleCode
* Check if the module codes have already been added to other degree requirement categories
* Check if the module codes have already been added to the specified degree requirement category through
RequirementCategory.hasModuleCode
|
|
3. After passing all of the above checks, RequirementAddCommand updates the context in Model through
setRequirementCategory.
4. In addition to adding module code(s) to the specified degree requirement category, the RequirementAddCommand
class also saves the current database state through commitApplication (for undo/redo functions).
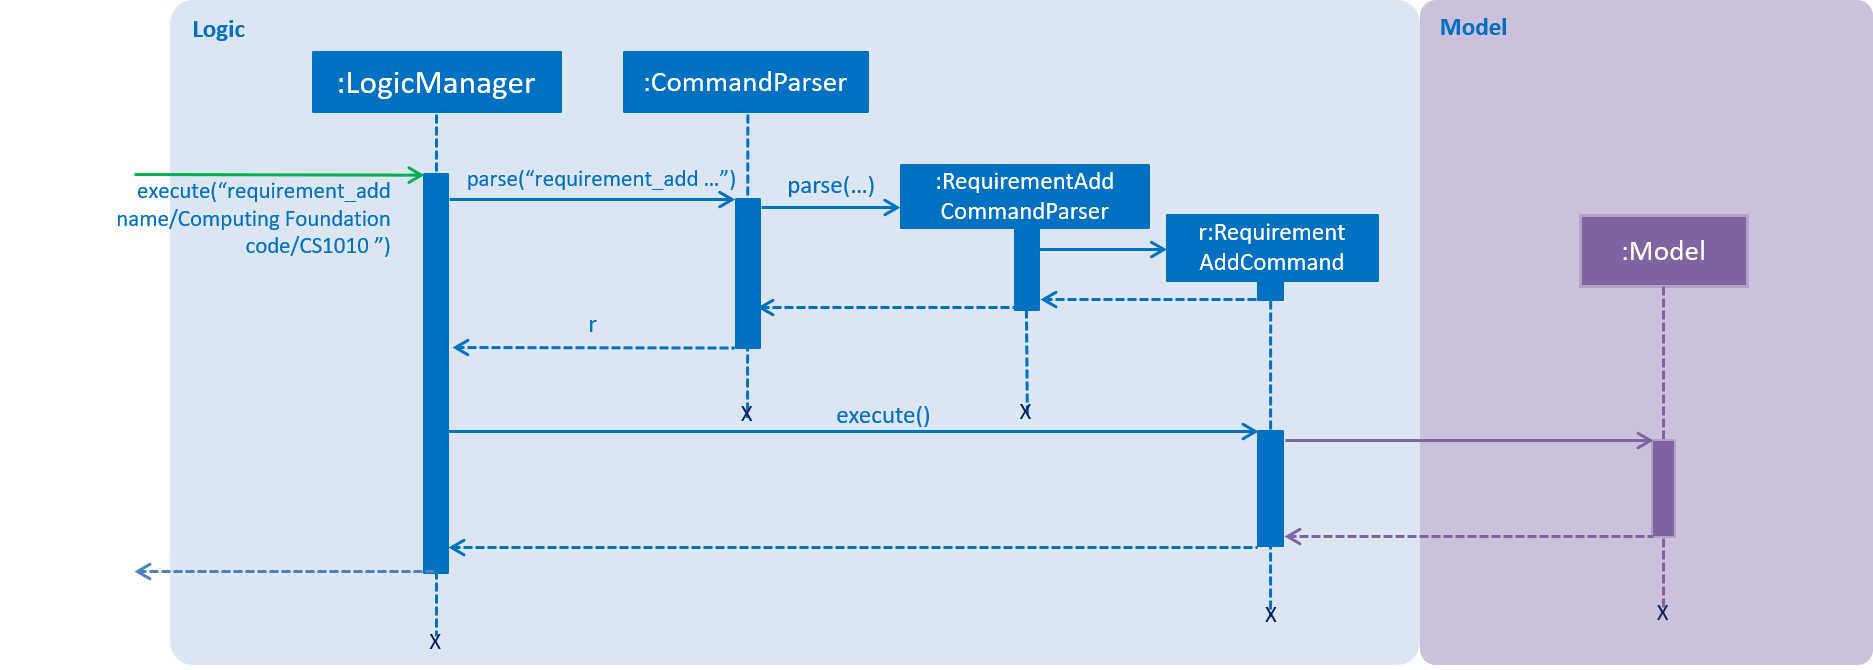
The sequence diagram below shows how this command interacts with the Logic components as described above.
|
Design Considerations
This section describes the various design considerations the taken when implementing the requirement_add
feature.
Aspect: Choice of what is stored in the requirement category storage file
The table below shows a comparison between the two approaches that could have been implemented.
Approach |
Pros |
Cons |
1. Storing only the module codes in the requirement category storage file |
|
|
2. Storing all information related to the modules but only the module code is displayed |
|
|
After evaluating the pros and cons of both approaches, we have decided to implement Approach 1.
The main reason is that all module information would be duplicated again in the requirement category storage file. This would effectively make the module storage file redundant as the information can be found in the requirement category storage file.
In addition, when a module information is updated, we have to ensure that the information in both storage files are updated and consistent to avoid any conflicting information.
Another factor that heavily impacted the decision would be that each module is uniquely identified by a module code. Hence, by storing the module code only, the module’s information can be easily obtained.