PROJECT: PlanWithEase
Hi! I am Ahn Tae Gyu, an Information Security student in National University of Singapore. I am keen on writing programs that help to improve qualities of our lives. You will be able to find brief introduction of the project along with some of my contributions to the project below.
Overview
PlanWithEase (PWE) is a degree planner desktop application designed to help National University of Singapore (NUS) Information Security freshmen in creating a comprehensive degree plan according to the degree requirements. PWE is designed to be simple and intuitive application that allows users to interact with by typing the commands (using a Command Line Interface). Moreover, PWE also comes with a clean Graphical User Interface (GUI) that presents information in an organized manner.Hence, even if you are unfamiliar with the Command Line Interface, you will not need to spend much time understanding how to use PWE. PWE was completed by a team of five members consisting of Ngo Wei Lin, Bai YunWei, Lee Yu Choy, Yeo Cheng Hong and me.
Understanding This Project Portfolio
The following symbols are used throughout this project portfolio:
|
This symbol denotes information that you may want to take note of when using the application. |
|
This symbol denotes a tip which you may find useful when using the application. |
|
This symbol denotes a warning message which you need to be careful of when using the application. |
Additionally, you may also encounter the following text styles:
-
Commands or parameters will be in this
format. -
Important messages will be bold.
-
Undoable command will be in italics.
-
Keyboard buttons will be referred to as such: F1.
Summary of contributions
Given below is a summary of contributions I made in this project. |
Major Enhancement: Degree Plan Management
Planner Move, Planner Show & Planner list
During this enhancement, Degree Planner model was build to allow other developer Bai YunWei and me to integrate planner related features into the application as well as stores degree plan related information.
-
Summary of the features:
-
Planner Move feature allows a module in the degree plan to be easily moved to another semester.
-
Planner Show feature allows displaying of specific semesters.
-
Planner list feature allows displaying of all semesters in the degree plan.
-
-
Justification:
-
Users can keep track of degree plan details (such as modules to take in particular semesters).
-
Users can easily make changes to the degree plan by moving a module in the degree plan with
planner_movecommand. -
Users can easily display specific semesters that the user wants with
planner_showcommand.
-
-
Highlights:
-
During the enhancement, there were numerous reviews done to ensure that no other model components is broken and any degree plan related features can be integrated without any problem.
-
-
Planner Move was enhanced to carried out checks for the module’s co-requisite and semesters it and its co-requisites are offered in.
-
Planner Show was enhanced to utilize boolean expression parser that was designed by Lee Yu Choy.
-
Credits:
-
Plenty of module corrections and suggestions were made during the built of Degree Planner model by Ngo Wei Lin.
-
Boolean expression parser was designed by Lee Yu Choy.
-
Minor Enhancement: Adding UI segment for degree plan
-
Justification: UI part for degree plan was added to displays the semesters and modules to be taken during the semesters.
-
Highlights:
-
Browser Panel that existed originally have to be adjusted in order for the UI part of the degree plan to be added.
-
UI for Degree plan was updated to sort the degree plan before displaying.
-
-
Credits:
-
Beautification of the overall UI including the part for the degree plan was done by Lee Yu Choy
-
Other contributions:
-
Project management:
-
Enhancements to existing features:
-
Documentation:
-
PRs reviewed: Approved Pull Requests
-
Issues:
Contributions to the User Guide
Given below are sections I contributed to the User Guide. They showcase my ability to write documentation targeting end-users. |
Moving a module between semesters: planner_move 
Any change in your decision? Want to take your module in other semester instead?
No worry! Simply use planner_move command to move your module in the degree plan along with its co-requisite(s)
between the semesters by providing your module code and a semester you want to move your module to.
Command Format: planner_move year/YEAR sem/SEMESTER code/CODE
|
When moving a module with co-requisites, if the module is moved successfully, the co-requisite modules will be moved as well. |
Examples:
-
planner_move year/1 sem/2 code/CS1231
Moves module CS1231 along with its co-requisite(s) to year 1 semester 2. -
planner_move year/2 sem/1 code/CS1231
Moves module CS1231 along with its co-requisite(s) to year 2 semester 1.
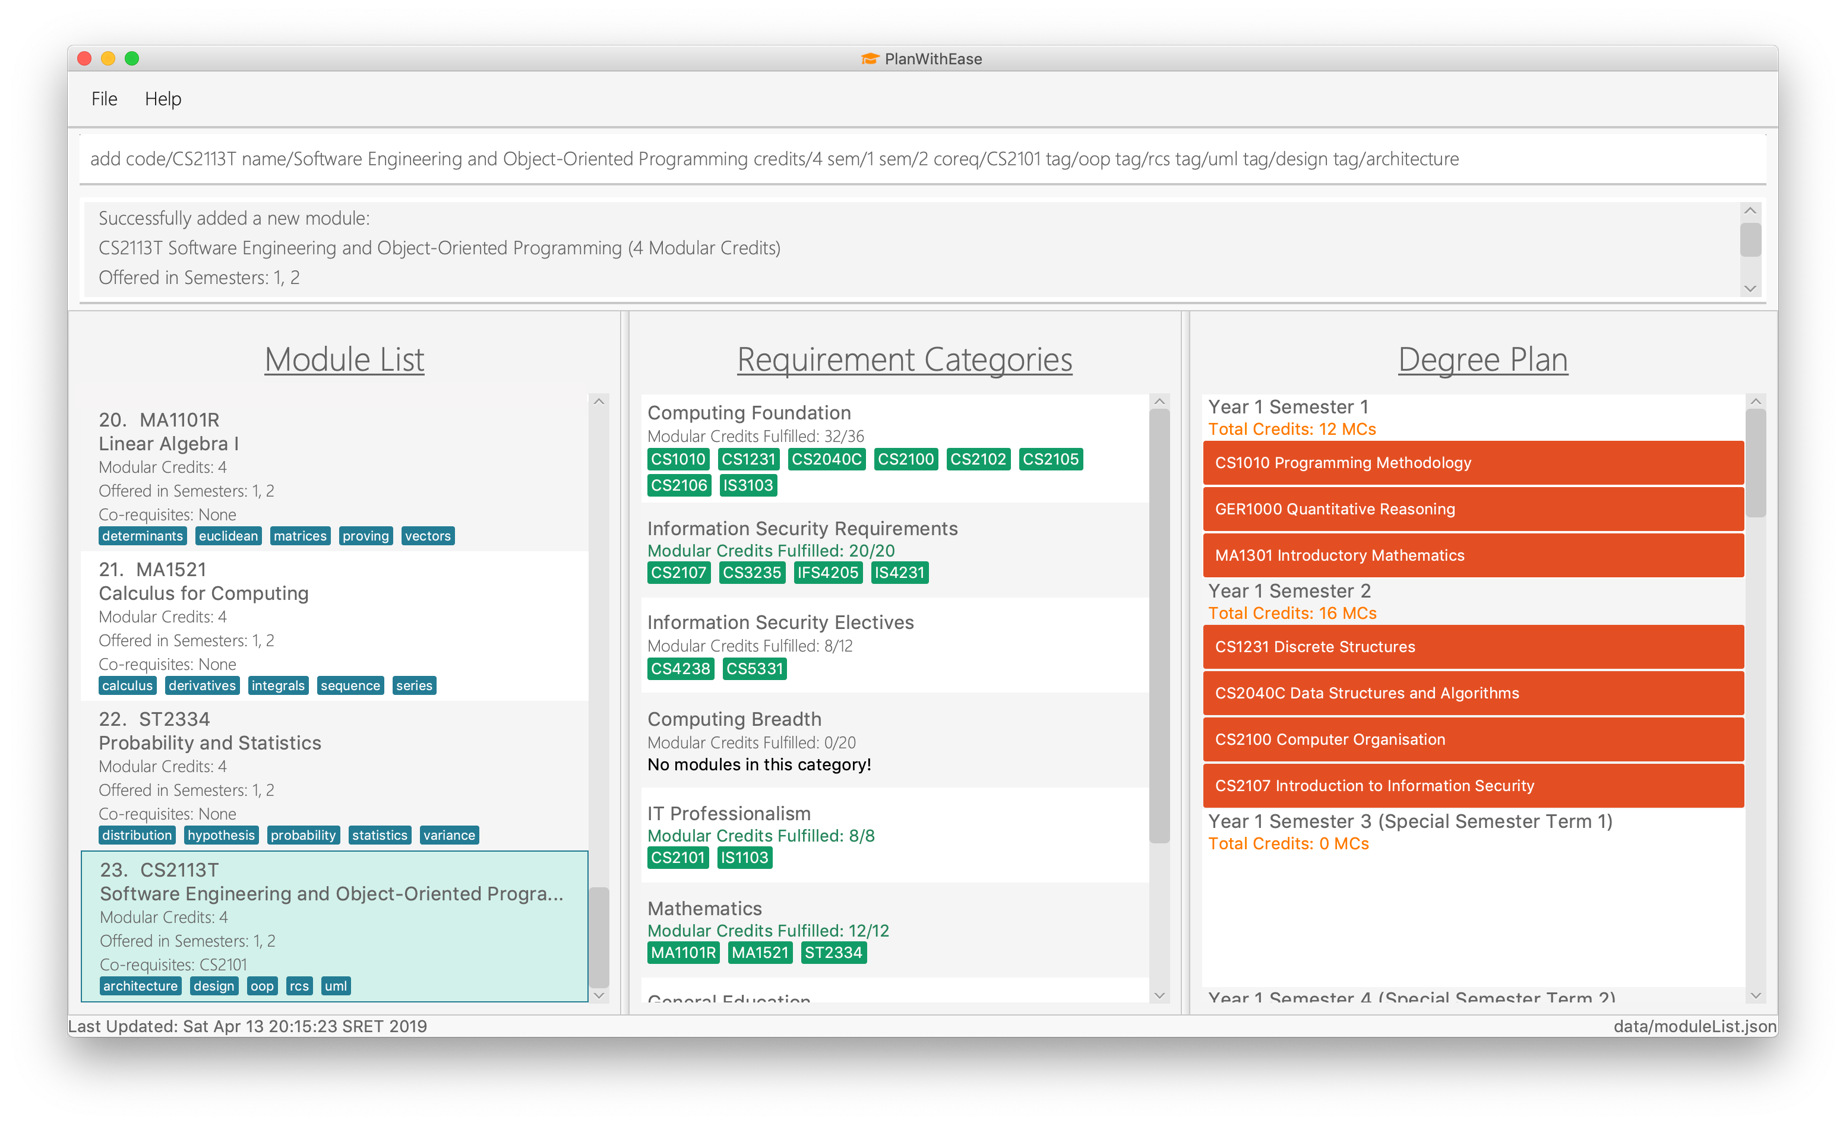
Before the planner_move command:
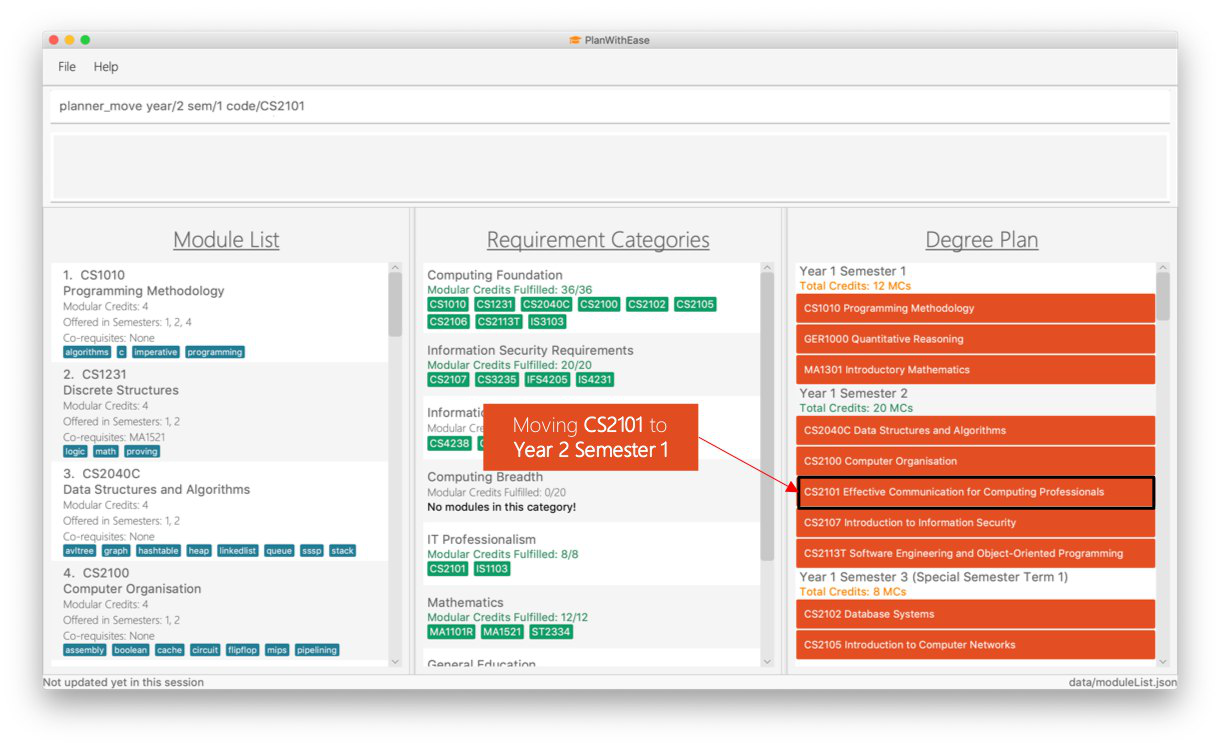
planner_move command.After entering planner_move and pressing Enter:
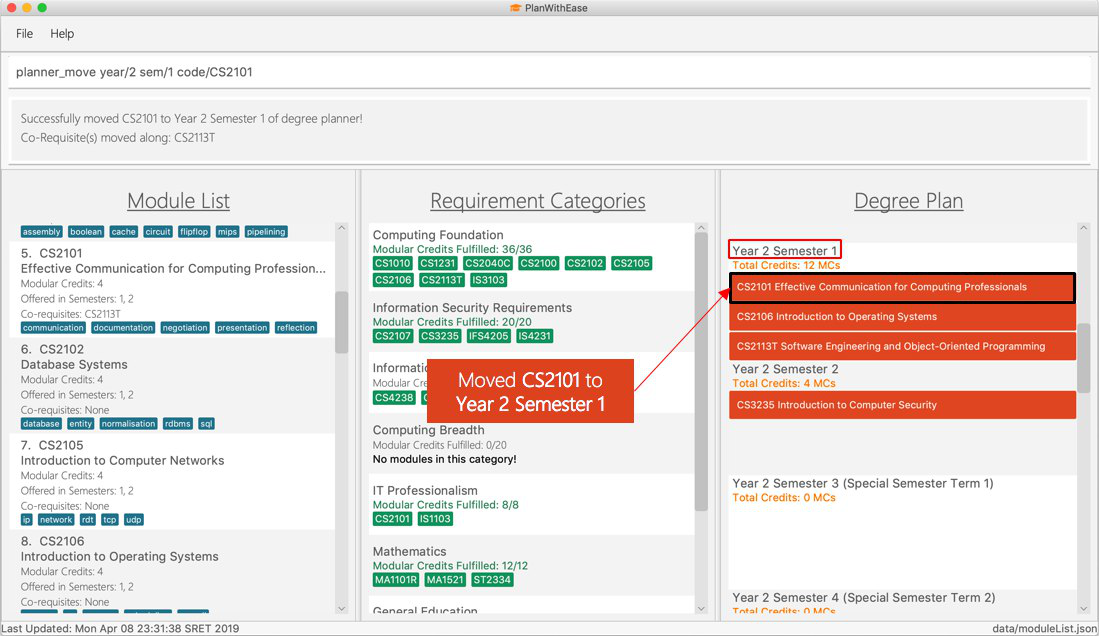
planner_move command.Note that co-requste of the module is moved too:
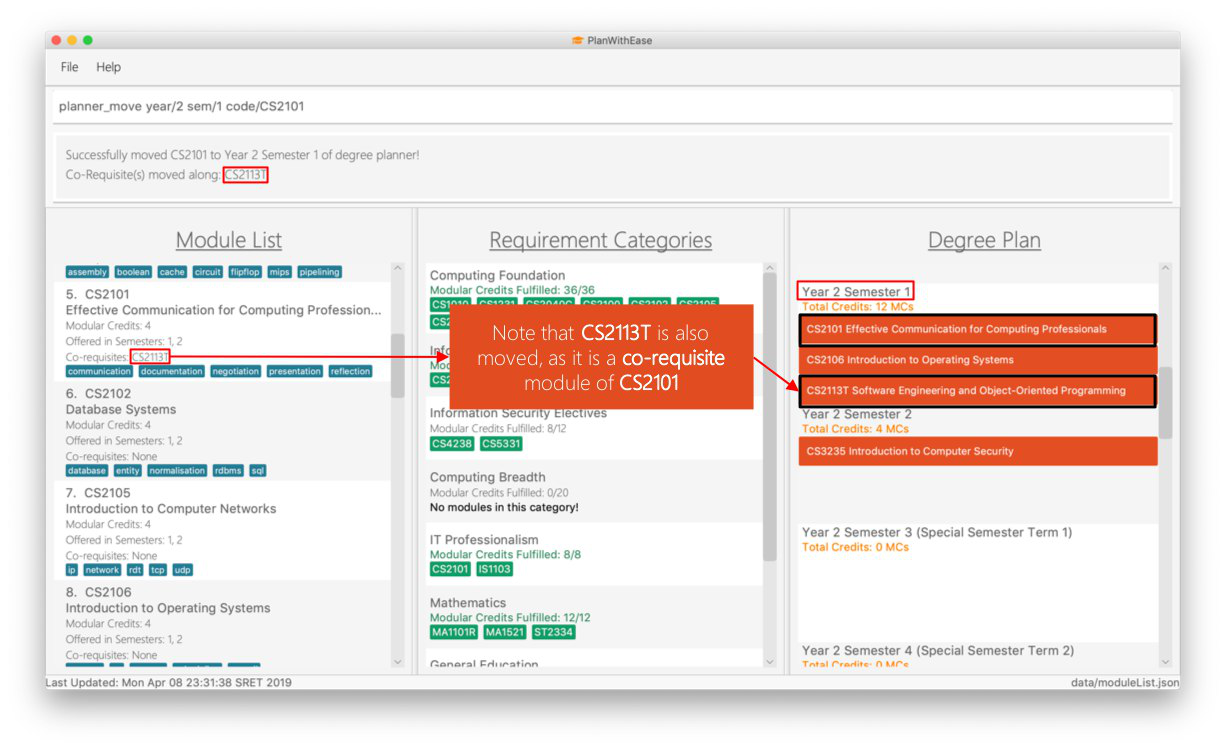
planner_move command.Showing semesters based on year/semester: planner_show 
Having trouble locating semesters you want?
Simply use planner_show command. It will only show you the semesters you want to see.
Command Format: planner_list [y/YEAR] OPERATOR [s/SEMESTER]
When this command is used, the application will display only those semesters which satisfy the search criteria.
The following table describes the valid prefixes that you can use to supply to the search criteria.
Prefix |
Description |
|
Search for any semester |
|
Search for any semester |
The following table describes the valid operators which you can to use supply to the search criteria.
Operator |
Description |
Precedence |
|
Logical "AND" operation (both conditions A AND B must match) |
Highest |
|
Logical "OR" operation (either conditions A OR B must match) |
Lowest |
The following examples describes how you could form a valid search criteria for the planner_show command.
Single Prefix Usage |
Expected Result |
|
Shows only semesters that are in year |
|
Shows only semesters that are in semester |
If you need multiple prefixes, the following table shows you how you could do it.
Note that you will need to separate multiple prefixes with an operator.
|
You could choose which search criteria having a higher priority by specifying parenthesis |
Multiple Prefix Usage |
Expected Result |
|
Shows only semesters that are in years |
|
Shows only semesters that are in semester |
|
Shows only semesters that are in year |
Examples:
-
planner_show year/1
Shows any semesters having the year1(e.g.Year 1 Semester 1,Year 1 Semester 2…) in the degree plan. -
planner_show sem/1
Shows any semesters having the year1(e.g.Year 1 Semester 1,Year 2 Semester 1…) in the degree plan. -
planner_show year/1 || year/2
Shows any semesters having the year1or year2in the degree plan. -
planner_show sem/1 || sem/2
Shows any semesters having the semester1or semester2in the degree plan. -
planner_show year/1 && sem/1
Shows a semester having the year1and semester1(e.g.Year 1 Semester 1)in the degree plan. -
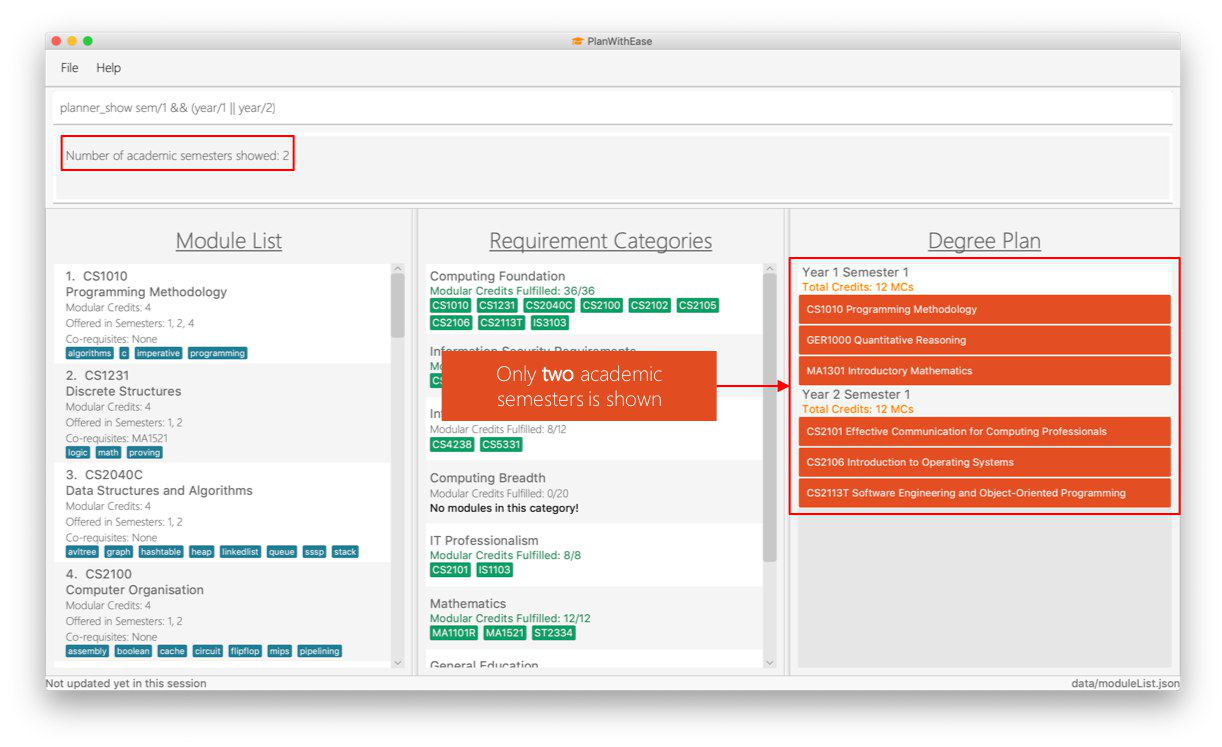
planner_show sem/1 && (year/1 || year/2)
Shows a semester having the year1semester1and year2semester1(e.g.Year 1 Semester 1andYear 2 Semester 2) in the degree plan.
Before the planner_show command:

planner_show command.After entering planner_show and pressing Enter:
planner_show command.Listing all semesters: planner_list 
Maybe you need to list all your semesters back after using planner_show?
Simply enter planner_list into the application!
It wil show you a list of all semesters in degree plan.
Command Format: planner_list
Using degree plan to suggest modules : planner_suggest 
Having trouble identifying modules to add to the degree plan?
Make use of planner_suggest command to find out recommended modules to add to the degree plan.
Command Format: planner_suggest credits/CREDITS [tag/TAG]…
When this command is successfully executed, the result box will display modules recommended.
|
Examples:
-
planner_suggest credits/4
Suggests maximum 10 modules not found in the degree plan, prioritizing modules with credits closer to 4. If tie, prioritizes according to alphabetical order. -
planner_suggest credits/2 tag/algorithms
Suggests maximum 10 modules not found in the degree plan, prioritizing modules with tagalgorithms. If tie, prioritizes according to credits closer to 2. If tie again, prioritizes according to alphabetical order.
Future Enhancements [coming in v2.0]
These are features that will come in future releases of PlanWithEase
Module Prerequisites prereq/
We aim to provide the support of prerequisites for our Module Management.
This changes will allow our users to indicate a module prerequisites and we can handle its dependency for the users
before they add the module into the Degree Plan.
Auto-create Degree Plan autoplan
We plan to implement this feature to allow an automated planning, we can make use of users feedback and current treads based on module popularity then create the degree plan for the users.
FAQ
Q: How do I save my data in the application?
A: You do need to save the data manually. Whenever you run any commands that makes changes, PlanWithEase's data are saved automatically in the data directory.
Command Summary
This section provides a quick references for all commands available in PlanWithEase.
General Commands
The table below shows a list of general commands.
Task |
Purpose |
Command Format |
Example |
Help |
Displays the User Guide |
|
|
History |
Get a list of command entered |
|
|
Undo |
Undo your previous action |
|
|
Redo |
Redo your previous action |
|
|
Clear |
Clear the all the modules from the specified section |
|
|
Reset |
Resets and populates the application with sample data |
|
|
Exit |
Exits the application |
|
|
Module Management Commands
The table below shows a list of commands which helps you to manage the module list.
Task |
Purpose |
Command Format |
Example |
Add module to module list |
Add a new module to the module list. |
|
|
Edit the details of a module |
Edit the module’s details based on the index given. |
|
|
Delete module from module list |
Remove the module entirely from the module list based on the index given. |
|
|
Find modules in the module list |
Display a list of modules based on your search criteria |
|
|
List all modules |
List all modules available in the module list |
|
|
Selecting a module |
Selects a module in the module list |
|
|
Requirement Tracker Commands
The table below shows a list of command which helps you to manage and track your degree requirements.
Task |
Purpose |
Command Format |
Example |
Add module(s) to a requirement category |
Add module(s) to the specified requirement category based on the module code provided. |
|
|
Remove module(s) from the requirement category |
Remove module(s) from the requirement category based on the module code provided. |
|
|
Move module(s) between requirement categories |
Move module(s) between the requirement categories from any requirement categories to a specified requirement categories. |
|
|
List all requirement categories in the application |
List all requirement categories in the application and the module(s) added to each requirement categories |
|
|
Degree Plan Commands
The table below shows a list of commands which helps you to manage the degree plan.
Task |
Purpose |
Command Format |
Example |
Add module(s) to degree plan |
Add module(s) to degree plan based on module code and academic year |
|
|
Remove module(s) from degree plan |
Remove module(s) from degree plan based on the module code |
|
|
Move module between semesters in the degree plan |
Move module between the semesters based on year and semester. |
|
|
List all semesters in the degree plan |
List all semesters in the degree plan |
|
|
List specific semesters in the degree plan |
List specific semesters in the degree plan based on your search term. |
|
|
Suggest available modules |
Suggest available modules from the module lists based on input argument. |
|
|
Showing semesters based on year/semester: planner_show
Having trouble locating semesters you want?
Simply use planner_show command. It will only show you the semesters you want to see.
Command Format: planner_list [y/YEAR] OPERATOR [s/SEMESTER]
When this command is used, the application will display only those semesters which satisfy the search criteria.
The following table describes the valid prefixes that you can use to supply to the search criteria.
Prefix |
Description |
|
Search for any semester |
|
Search for any semester |
The following table describes the valid operators which you can to use supply to the search criteria.
Operator |
Description |
Precedence |
|
Logical "AND" operation (both conditions A AND B must match) |
Highest |
|
Logical "OR" operation (either conditions A OR B must match) |
Lowest |
The following examples describes how you could form a valid search criteria for the planner_show command.
Single Prefix Usage |
Expected Result |
|
Shows only semesters that are in year |
|
Shows only semesters that are in semester |
If you need multiple prefixes, the following table shows you how you could do it.
Note that you will need to separate multiple prefixes with an operator.
|
You could choose which search criteria having a higher priority by specifying parenthesis |
Multiple Prefix Usage |
Expected Result |
|
Shows only semesters that are in years |
|
Shows only semesters that are in semester |
|
Shows only semesters that are in year |
Examples:
-
planner_show year/1
Shows any semesters having the year1(e.g.Year 1 Semester 1,Year 1 Semester 2…) in the degree plan. -
planner_show sem/1
Shows any semesters having the year1(e.g.Year 1 Semester 1,Year 2 Semester 1…) in the degree plan. -
planner_show year/1 || year/2
Shows any semesters having the year1or year2in the degree plan. -
planner_show sem/1 || sem/2
Shows any semesters having the semester1or semester2in the degree plan. -
planner_show year/1 && sem/1
Shows a semester having the year1and semester1(e.g.Year 1 Semester 1)in the degree plan. -
planner_show sem/1 && (year/1 || year/2)
Shows a semester having the year1semester1and year2semester1(e.g.Year 1 Semester 1andYear 2 Semester 2) in the degree plan.
Before the planner_show command:
planner_show command.After entering planner_show and pressing Enter:
planner_show command.Contributions to the Developer Guide
Given below are sections I contributed to the Developer Guide. They showcase my ability to write technical documentation and the technical depth of my contributions to the project. |
Planner Move Feature
The planner_move command aims to provide functionality for users to move a module between academic semesters in the
degree plan along with its co-requisites.
This section shares the implementation and design considerations made during the enhancement of the planner_move
feature.
Overview
As the users often encounter situations where they decide to take the modules in other semesters after they have
completed their degree planning, the planner_move feature is essential to have.
Current planner_move feature supports the moving of a module along with its co-requisites given the module and
its co-requisites are offered in the semester the users wants to move to.
Current Implementation
When a user execute the planner_move command (e.g. planner_move year/1 sem/2 code/CS1010), the following steps
are taken by the application.
Given below is a sequence diagram for moving a module that illustrates the interactions among PlannerMoveCommand,
PlannerMoveCommandParser and Model:
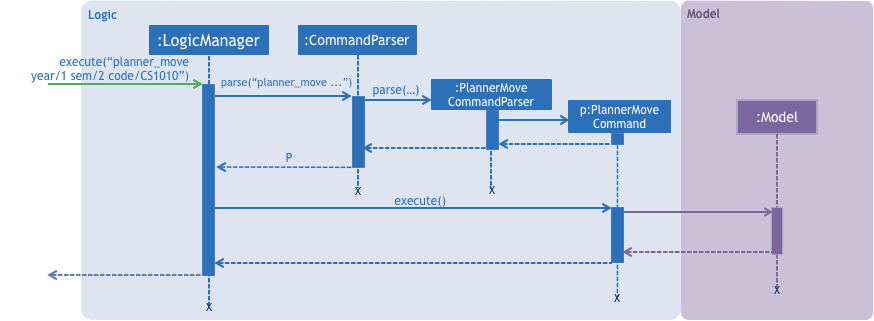
Step 1. The PlannerMoveCommandParser#parse method is invoked. The PlannerMoveCommandParser receives the command with
the arguments as a string.
Step 2. The PlannerMoveCommandParser parses the text related to each PREFIX and constructs the PlannerMoveCommand
. If more than one of each kind of PREFIX (e.g. year/1 sem/2 code/CS1231 code/CS1010) is provided, only text related
to last of each PREFIX (e.g. year/1 sem/2 code/CS1010) will be parsed.
|
Step 3. The PlannerMoveCommand with YEAR, SEMESTER and CODE specified by the user is returned.
Step 4. The PlannerMoveCommand#execute method is invoked.
Given below is a sequence diagram that illustrates the interactions among PlannerMoveCommand, Model and
Application:
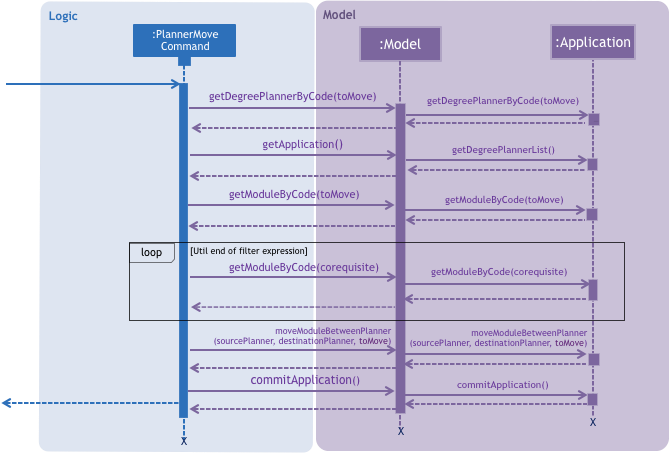
During this step, the following methods are carried out in the order:
-
The
getDegreePlannerByCodemethod will be called to check if there exists any academic semester in degree plan that has the parsed module code. -
The
getApplicationmethod will be called followed by thegetDegreePlannerListmethod will be called by the model to retrieve the list of academic semesters available in the degree plan. Then,filterwill be carried out with the help ofDegreePlanner#isSameDegreePlannerto locate the academic semester the user wants to move the module to.
|
|
-
The
getModuleByCodemethod will be called to returnModuleobject having the codetoMove. Then, theModuleobject will be used to retrieve the semesters the module is available in with thegetSemestersmethod to check if the module is offered in the academic semester the user is trying to move to. -
The
getModuleByCodemethod will be called in a loop during thefilterto find out all the module’s co-requisites not offered in the academic semester the user is trying to move to.
|
Any violations in the checks will result in throwing of an error message. |
Step 5. The Model is updated.
|
Step 6. A CommandResult object is returned.
Design Considerations
Aspect: How should searching of the degree plan based on the year and the semester provided to be done
-
Alternative 1 (current choice): Construct
DegreePlannerobject with the year and the semester provided and useDegreePlanner#isSameDegreePlannerto compare and search for the corresponding degree plan.
Pros |
There is no need to create any method that may create unnecessary coupling. |
Cons |
There is a need to create a |
-
Alternative 2: Create
getDegreePlannermethod which retrievesDegreePlannerobject based on the year and the semester provided.
Pros |
Easy to implement. |
Cons |
The method will create unnecessary couplings between |
Planner Show Feature
Planner show feature aims to help users to be able to easily locate and display any academic semesters in the degree plan which is in our application. We support the displaying of degree planners based on year, semester and boolean expressions. This enables our users to display only specific academic semesters in the degree plan that they want.
Overview
When a user invokes the planner_show command. (e.g. planner_show y/YEAR && s/SEMESTER), the following steps
are taken by the program.
-
Extract the text related to
planner_showcommand (e.g.y/YEAR && s/SEMESTER) -
Parse the text related to each
PREFIXindividually. -
Return a composite predicate for all attributes.
Step 1 is performed by the ApplicationParser class.
Step 2 and 3 are performed by BooleanExpressionParser#parse.
Current Implementation
-
Show degree planner(s) by year i.e.
planner_show y/YEARreturns degree planner(s) having its year matches the year given -
Show degree planner(s) by semester i.e.
planner_show s/SEMESTERreturns degree planner(s) having its semester matches the semester given -
include
yearandsemesterattributes in oneplanner_showcommand and list degree planner(s) i.e.planner_show y/YEAR s/SEMESTERreturns module having its year or semester matches the given year and semester
Design Considerations
Aspect: How to parse multiple attributes
-
Alternative 1 (current choice): Parse the text related to each
PREFIXindividually usingBooleanExpressionParser
Pros |
User is able to have more flexible search. |
Cons |
More time and work needed for developer to implement. |
-
Alternative 2: Parse the text related to each
PREFIXat one go without usingBooleanExpressionParser
Pros |
Easy to implement. |
Cons |
Additional overhead needed and inconsistent in the application’s commands since |