PROJECT: PlanWithEase
Hello there, I am Wei Lin. I am currently pursuing a degree in Information Security at National University of Singapore (NUS).
I love to build and break applications!
This portfolio serves to document my involvements in a team-based project CS2113T (Software Engineering & Object-Oriented Programming) module by NUS. The project spans over a period of eight weeks, and was completed by a team of five members (consisting of Ahn TaeGyu, Bai YunWei, Lee Yu Choy, Yeo Cheng Hong and myself) over the span of 8 weeks.
Overview
In this project, our aim was to simplify the process of planning a degree, and ensure that the degree plan fulfills the degree requirements.
Planning a degree is certainly not an easy task, and can be very time-consuming. Furthermore, there are many considerations to make, making it difficult to create the perfect degree plan.
With this goal in mind, we developed PlanWithEase (PWE), a degree planner application designed to help NUS Information Security freshmen in creating a comprehensive degree plan according to the degree requirements effortlessly.
Understanding This Project Portfolio
The following symbols are used throughout this project portfolio:
|
This symbol denotes information that you may want to take note of when using the application. |
|
This symbol denotes a tip which you may find useful when using the application. |
|
This symbol denotes a warning message which you need to be careful of when using the application. |
Additionally, you may also encounter the following text styles:
-
Commands or parameters will be in this
format. -
Important messages will be bold.
-
Undoable command will be in italics.
-
Keyboard buttons will be referred to as such: F1.
Summary of Contributions
This section provides a summary on the contributions I made to this project. |
Major Enhancement: Module Management
Add, Edit & Delete Modules
This feature allows the user to manage modules in PlanWithEase easily using the add, edit and delete commands.
-
Justification: Users can keep track of module details (such as module co-requisites, the semesters the modules are offered in, etc.) within PlanWithEase to facilitate their planning.
-
Highlights: This enhancement performs numerous validation checks to ensure that the degree plan created by the user remains sound after users edit module details, which is crucial in enabling the whole application to function correctly. The module management commands also provide tips on how to resolve any errors encountered by the users.
Other Contributions:
-
Project management:
-
Notable Enhancements/Modifications to Existing Features:
-
Collaborated with a team mate (Lee Yu Choy) to implement a custom string tokenizer
BooleanExpressionTokenizer, which was pivotal in enabling users to be able to use complex search conditions to narrow down their search when using thefindandplanner_showcommands (PR #119) -
Introduced data integrity validations for Storage component (PRs #122, #204, #222)
-
Performed surgical refactoring of the original Address Book (Level 4) codebase to fit our requirements (example: PRs #18, #27, #30)
-
Populated sample data used to guide new users in using the application (examples: PRs #45, #146)
-
Implemented precondition checks to all functional code to follow defensive programming practices (example: PR #170)
-
-
Documentation:
-
Community:
-
Tools:
-
Integrated Travis & AppVeyor Continuous Integration (CI) tools, Coveralls code coverage tool, Codacy code analytics tool, Netlify deployment preview tool to the team’s repository (examples: PRs #4, #23)
-
Updated Gradle build configuration to automate and simplify the build process (examples: PRs #107, #201)
-
Added a new Github plugin (project-bot) to automate triaging of issues in the team’s Project Board
-
Contributions to the User Guide
The following sections illustrate my ability in writing documentation targeting end-users to guide them in using the various features of the application. |
Module Management
In this section, you’ll be introduced to commands that helps you to manage modules in PlanWithEase.
Below is a list of command parameters that you can expect to use for commands in this section.
Parameter |
Description |
Acceptable Range of Values |
|
Indicates the module code |
|
|
Indicates the name of the module |
|
|
Indicates the modular credits assigned to the module |
|
|
Indicates the semester which the module is offered in. |
|
|
Indicates the module code of a co-requisite module. |
|
|
Indicates the extra information to associate the module with (e.g. |
|
|
|
Adding modules : add 
Before you can add modules to the degree plan, you’ll need to add modules into the module list first.
It’s easy to add a module into the module list! Here’s how you can use the add command.
Command Format: add code/CODE name/NAME credits/CREDITS [sem/SEMESTER]… [coreq/COREQUISITE]… [tag/TAG]…
|
Please note that you cannot add a new module which has a co-requisite module already existing in the degree plan. |
Example:
-
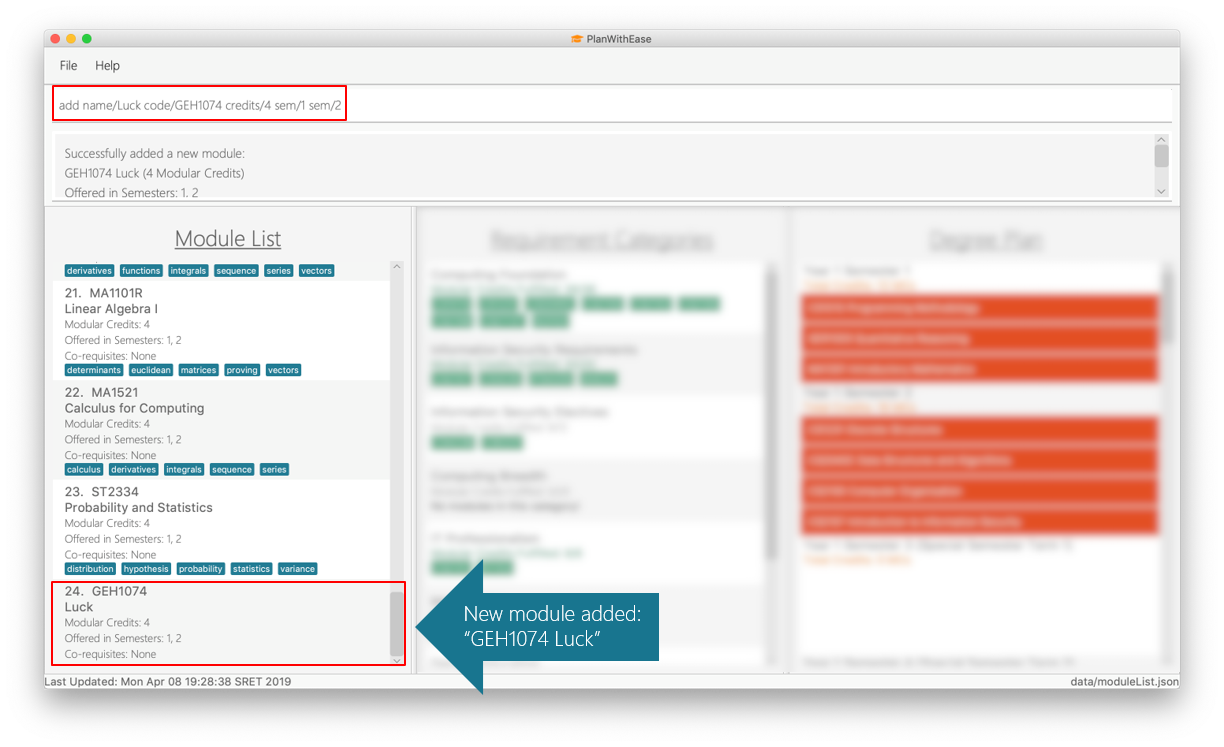
add code/GEH1074 name/Luck credits/4 sem/1 sem/2
Adds a module namedLuckwith module codeGEH1074, which is assigned4modular credits and is offered in semesters1and2, to the module list.
|
When adding a module with a corequisite, if the module is added successfully, the co-requisite modules will be updated as well. |
Example:
-
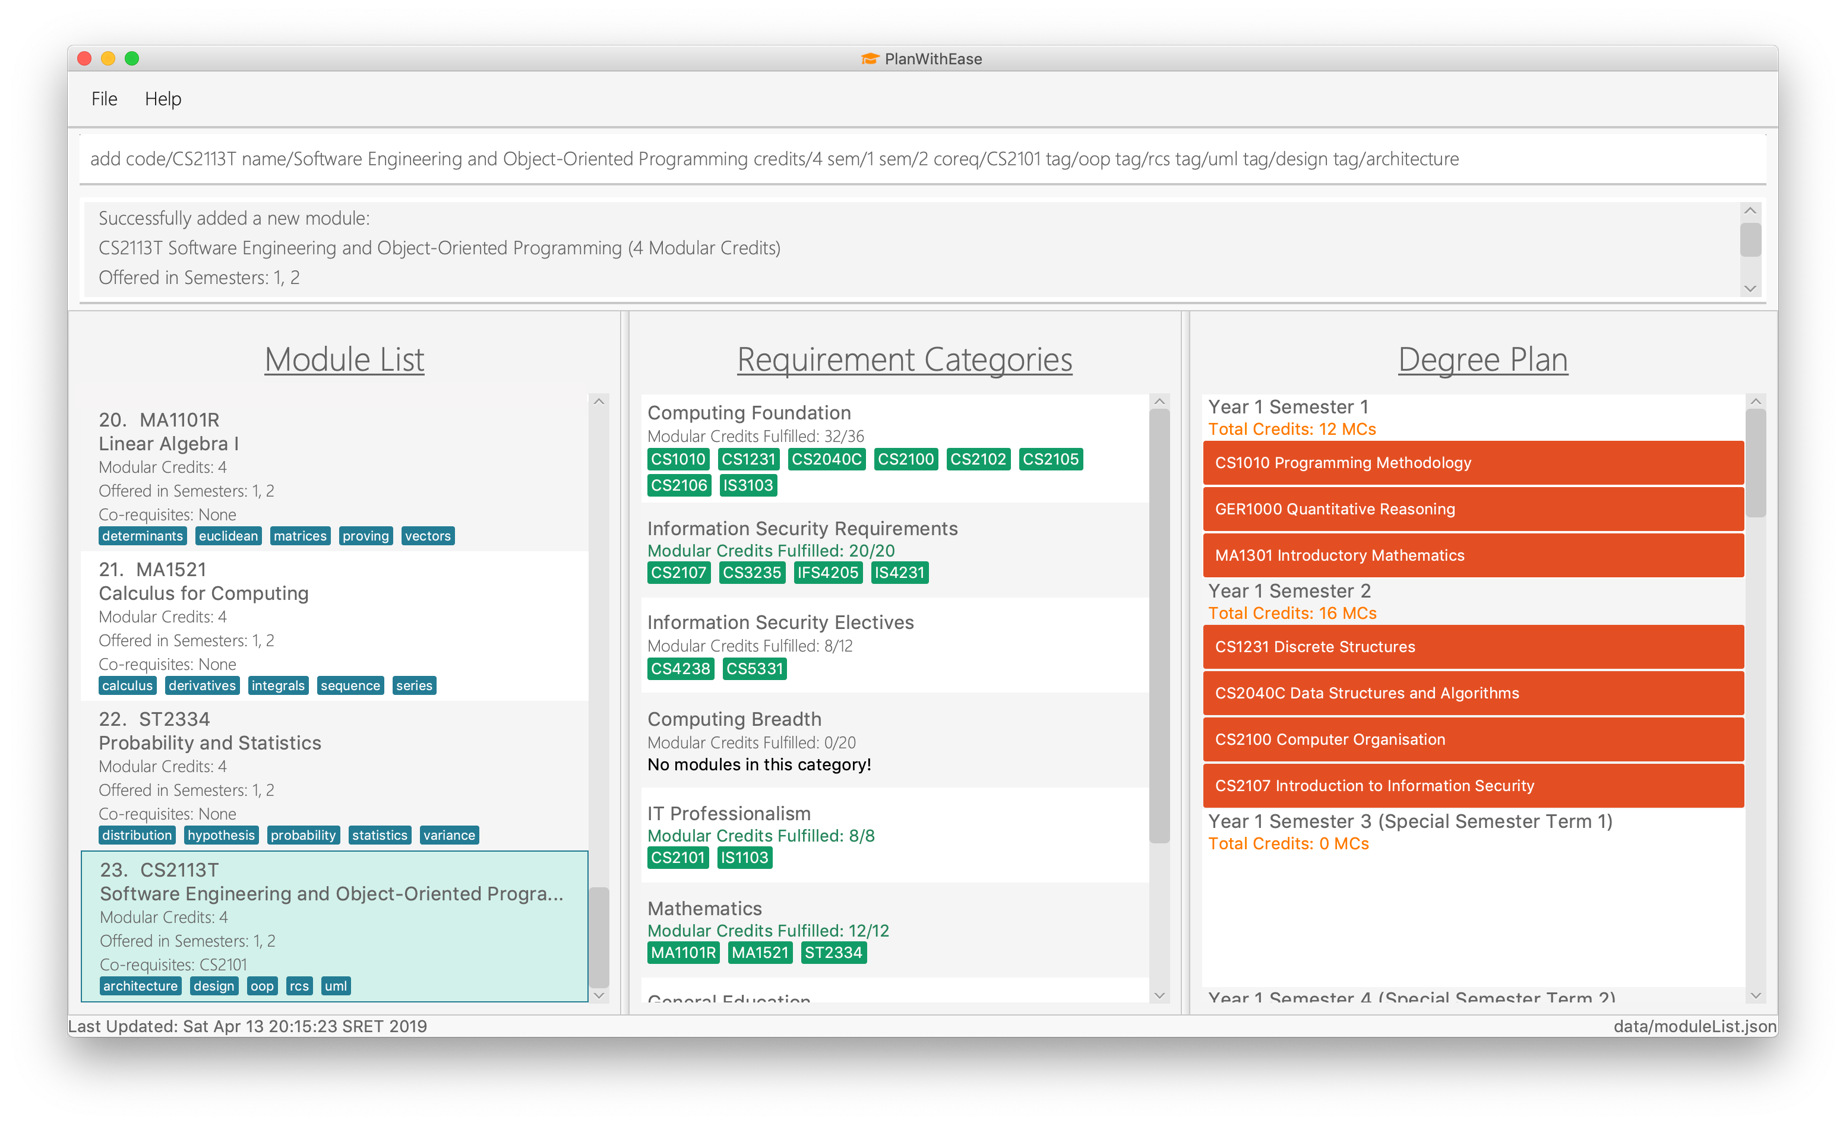
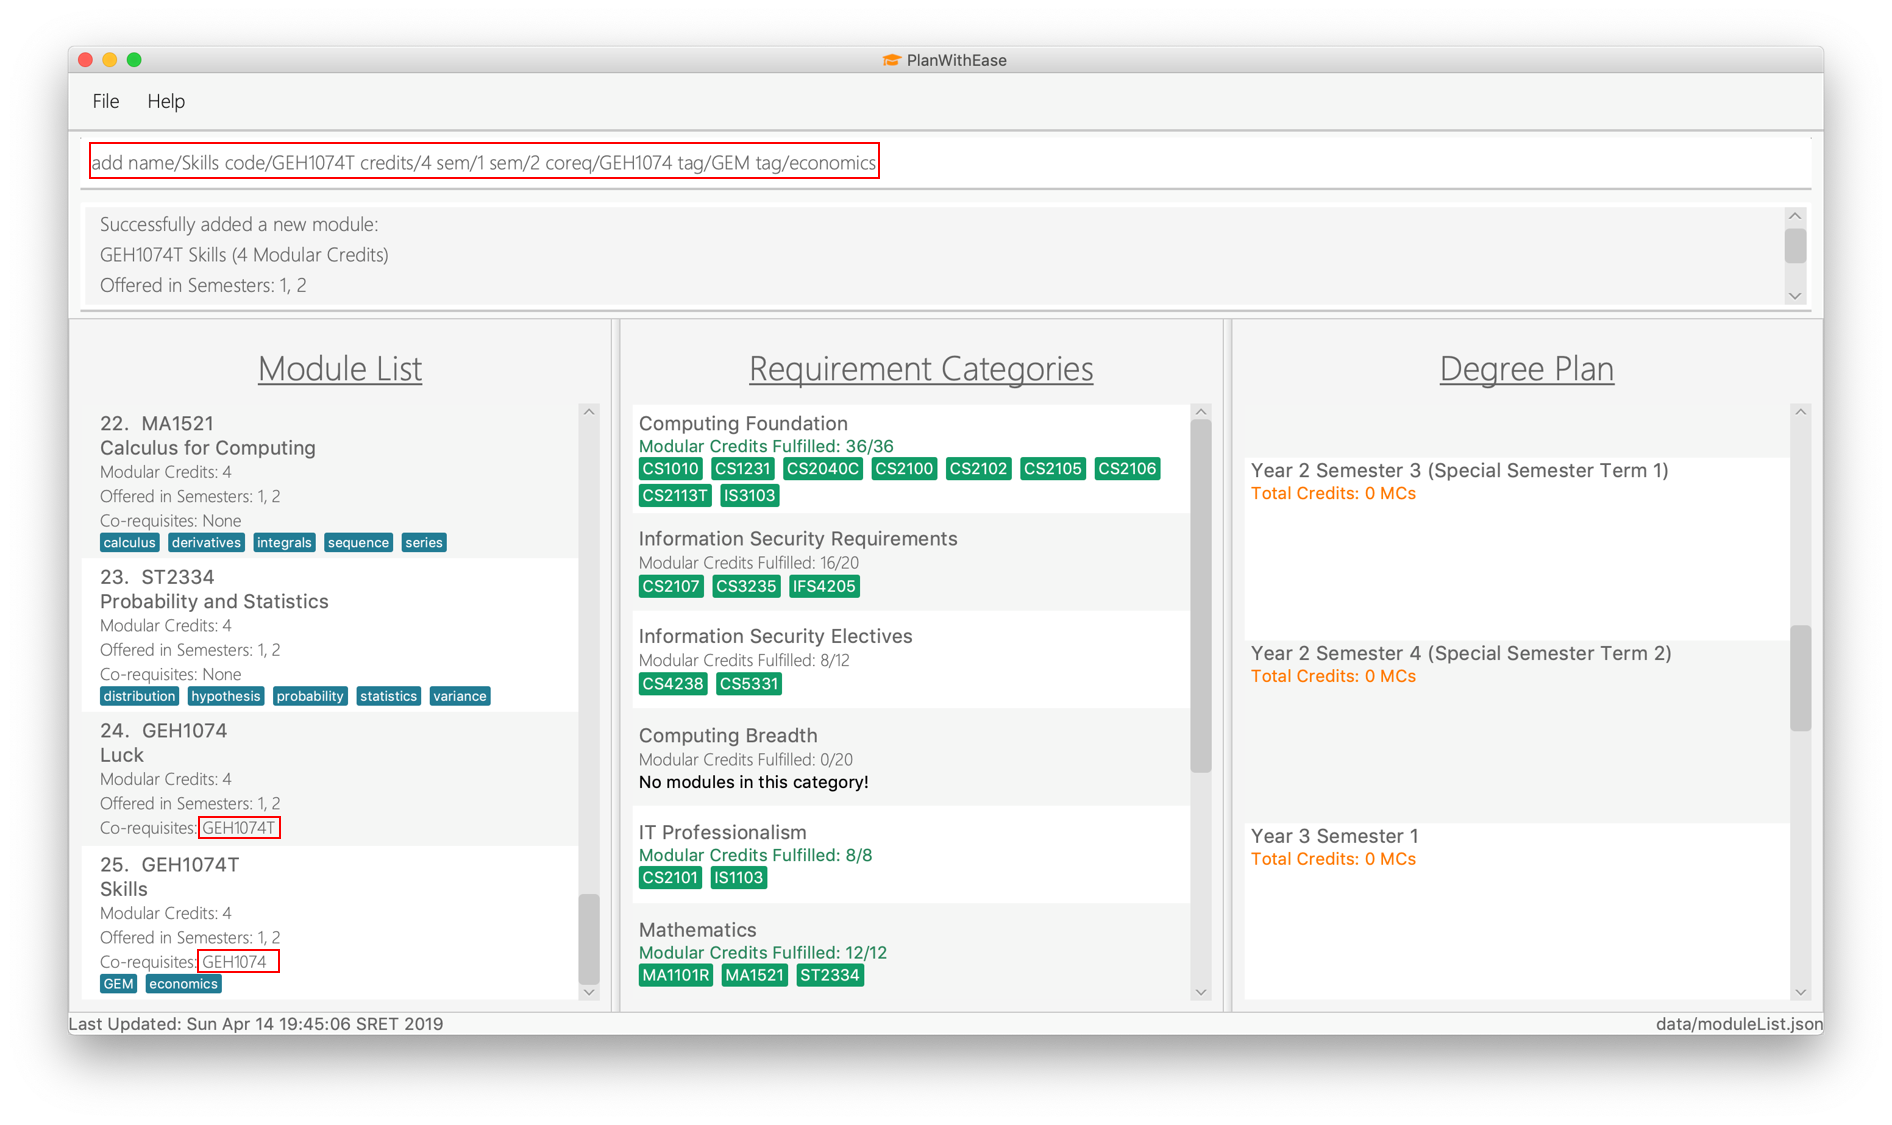
add name/Skills code/GEH1074T credits/4 sem/1 sem/2 coreq/GEH1074 tag/GEM tag/economics
Adds a module namedSkillswith module codeGEH1074T, which is assigned4modular credits and has module codeGEH1074as a corequisite, to the module list. The module added has the tagsGEMandeconomicsas well.
Both modules (GEH1074TandGEH1074) will be updated to be co-requisites as shown below.
Editing modules : edit 
Want to change the module details? No problem!
You can use this handy edit command to update the module details to your liking.
Command Format: edit INDEX [name/NAME] [code/CODE] [credits/CREDITS] [sem/SEMESTER]… [coreq/COREQUISITE]… [tag/TAG]…
|
Examples:
-
edit 1 name/Data Structures and Algorithms code/CS1234
Edits the name and code of the 1st module in the displayed module list to beData Structures and AlgorithmsandCS1234respectively. -
edit 3 code/CS2040C tag/
Edits the code of the 3rd module in the displayed module list to beCS2040Cand clears all existing tags associated with the module. -
edit 5 coreq/CS2105 coreq/CS2106
Edits the co-requisites of the 5th module in the displayed module list to beCS2105andCS2106.
|
Just like the |
Example: If GEH1074 and GEH1074T are not co-requisites, running the command edit 1 coreq/GEH1074T
(assuming index 1 of the module list is GEH1074) will result in GEH1074 and GEH1074T being co-requisites.
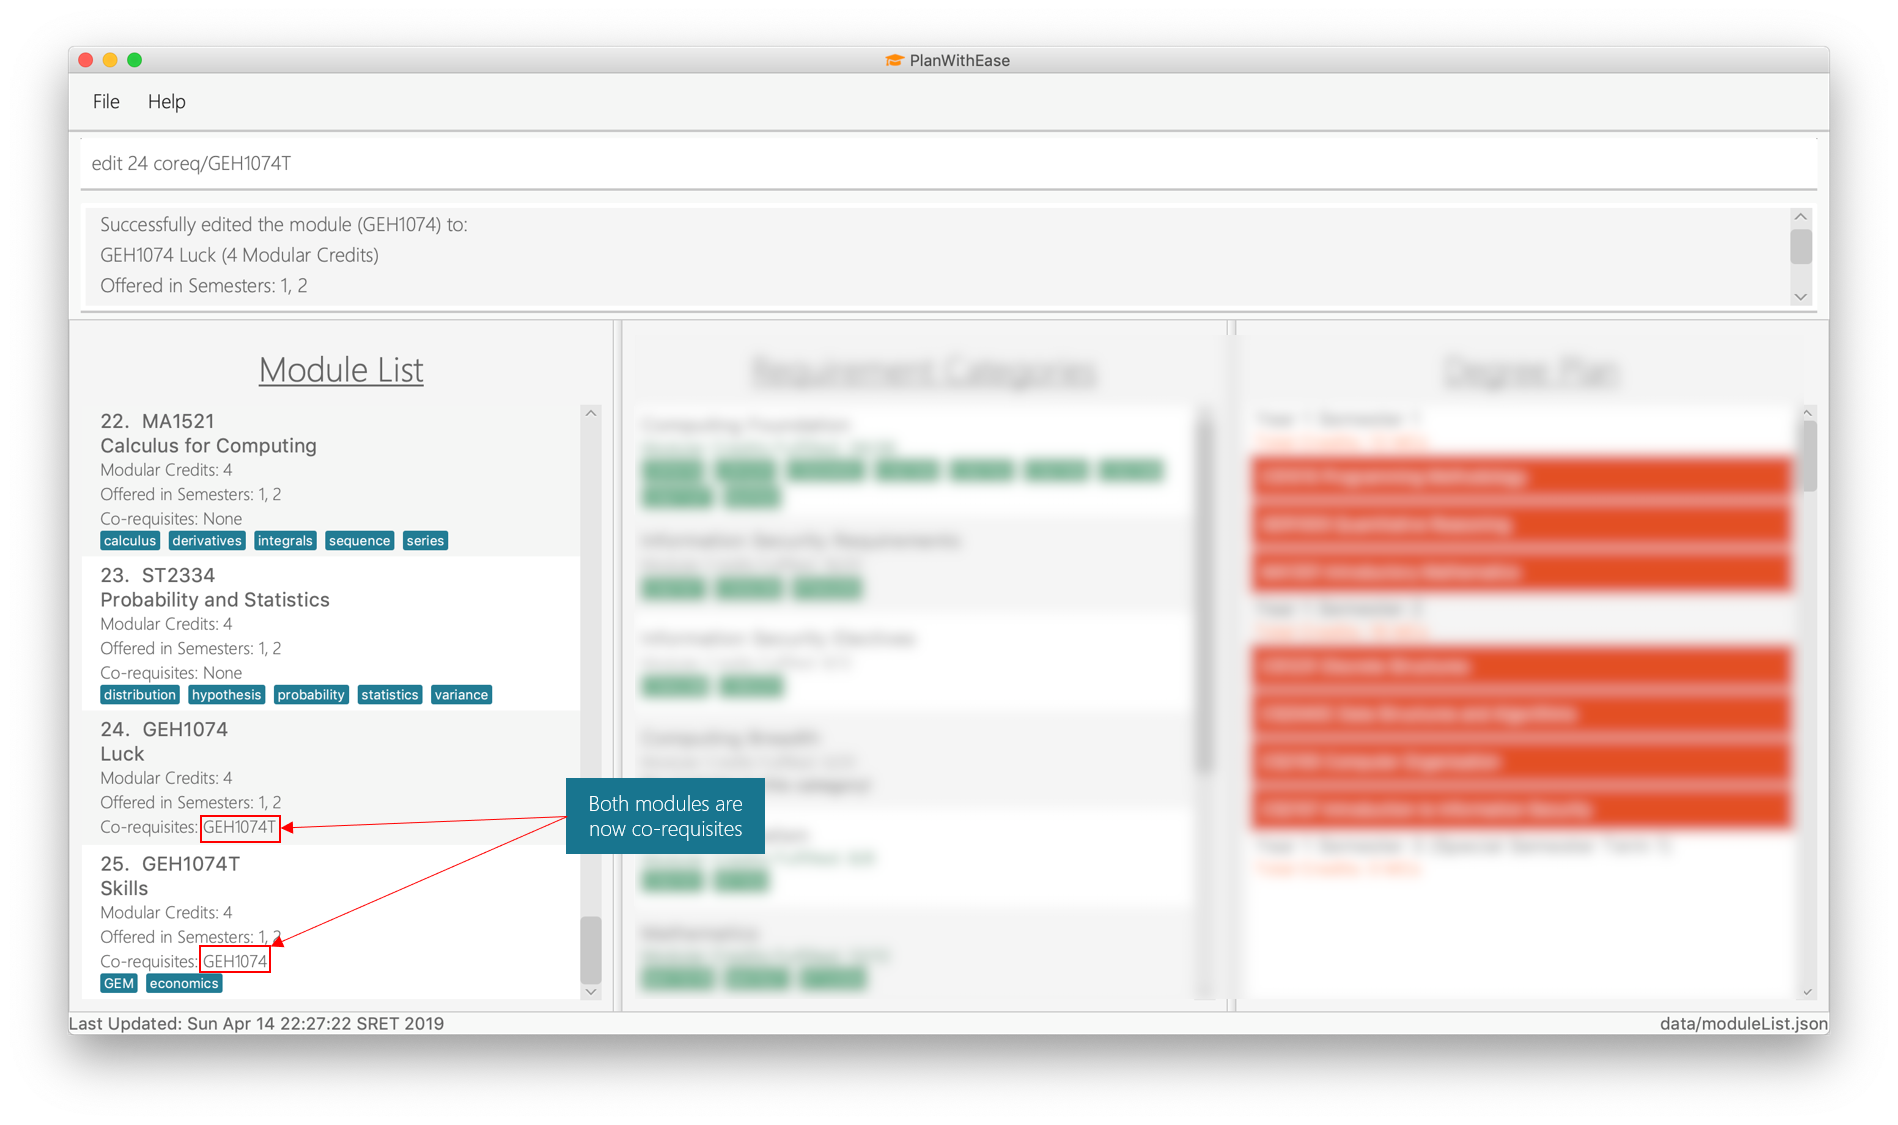
GEH1074 and GEH1074T are being edited to be co-requisites.Contributions to the Developer Guide
The following sections illustrate my ability in writing documentation to provide developers insights on the design of the application. It also showcase the technical depth of my contributions to the project. |
Edit Module Feature
The edit feature aims to help users update module details in our application. When there are changes to be made to
the module (e.g. semesters which modules are offered in have changed), users will want to be able to update the
module details easily without going through the hassle of deleting and adding the new module.
This section describes the implementation and the design considerations of the edit feature, and how the edit
feature is capable of cascading the updated module code from the module list to the requirement categories and degree
plan.
Current Implementation
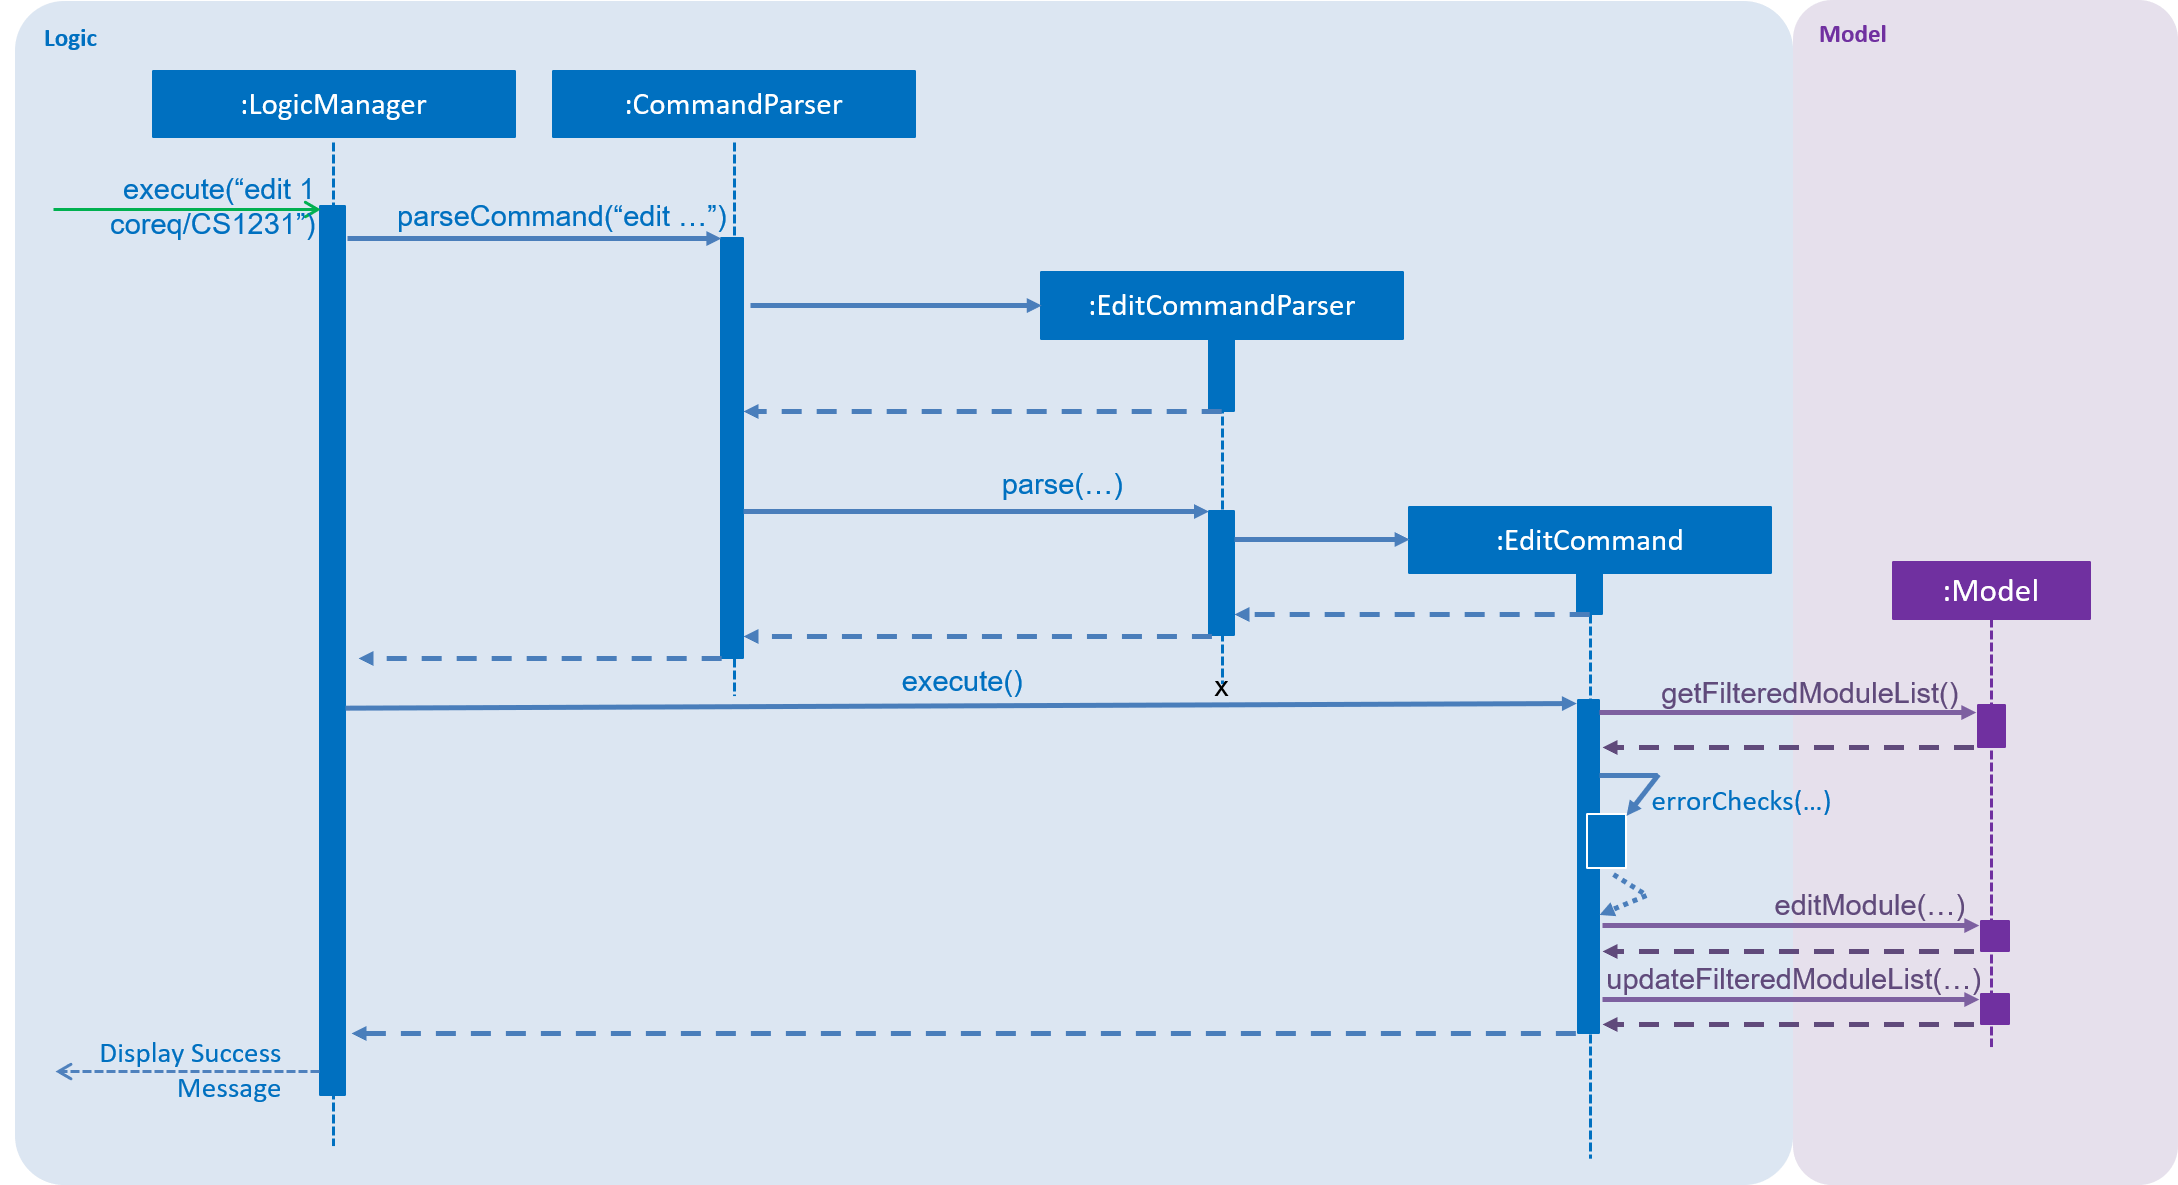
When the user invokes the edit command, e.g. (edit 1 code/CS1231), the following steps are taken by the
application.
-
The
CommandParserinvokes theEditCommandParserclass to parse the user input provided. The parsed data will then be used to create aEditCommandobject and will be returned toCommandParserand subsequentlyLogicManager. -
LogicManagerwould then invoke theEditCommand#execute(…), which performs the following validation checks to ensure that the edited module details are valid.-
Ensures that the edited module does not exists in module list (non-duplicate module)
-
Ensures that the edited module is not updated to be a co-requisite of itself (no self-referencing)
-
Ensures that the edited module’s co-requisite exists in the module list
-
Ensures that the edited module’s co-requisites can be taken in the same semester
-
Ensures that the edited module can be taken in the same semester as the edited module’s co-requisites
-
Ensures that the updated semesters which the edited module is offered in allows the module to remain in the current semester of the degree plan.
-
-
Once the validation checks are complete,
EditCommandwill invokeModel#editModule(…), which will be discussed later. -
EditCommandwill then invokeModel#updateFilteredModuleList(…)to display all modules in the filtered module list. -
Finally, a success message will be displayed to the user.
The high-level overview sequence diagram for the edit feature is shown below.
|
|
edit featureIf there are any changes made to the module’s code, Model#editModule(…) will cascade the edited module code to the rest of the Model objects (namely UniqueModuleList, UniqueDegreePlannerList, UniqueRequirementCategoryList) through Application.
-
When
Model#editModule(…)is invoked,Application#editModule(…)will be called. -
Application#setModule(…)is invoked to replace the original module with the edited module inUniqueModuleList. -
When setting the edited module in
UniqueModuleList,UniqueModuleListwill cascade the edited module code to all modules' co-requisites -
The edited module code is cascaded to
UniqueDegreePlannerasApplication#setModule(…)checks if the original module code exists in the degree planner, and if so, updates it accordingly. -
Similarly,
Application#setModule(…)also checks if the original module code exists in the requirement categories, and if so, updates it accordingly.

edit feature illustrating cascading of edited module codeDesign Considerations
Aspect: How should edited module code be cascaded down to other Model objects?
The table below shows comparisons between the two approaches.
Approach |
Pros |
Cons |
1. Implement cascading of edited module code in |
It makes sense for a class in Logic component to handle logic-related matters. |
|
2. Implement cascading of edited module code in |
It doesn’t create additional coupling with other Model components |
|
After weighing the pros and cons, approach 2 was chosen.
Firstly, doing so will reduce the need for additional coupling with other Model components (as compared to approach
1). Although it may seem strange to implement logic checks to achieve the desired cascading effect of the edited module
code in Application (a class in the Model component), implementing logic checks in Model can also be seen as a way
of maintaining data integrity. One such example is Java’s Set interface (Model), where each implementing class
ensures that there are no duplicate elements in the collection of data (i.e. implementing logic in model).
Similarly, implementing cascading of edited module code in Application is deemed to be similar to implement logic
in model for maintaining data integrity. As such, approach 2 is more suitable and was chosen.